43 Braided Hairstyles For Long Hair
Experiment with these timeless and graceful hairdos that are perfect for every occasion.
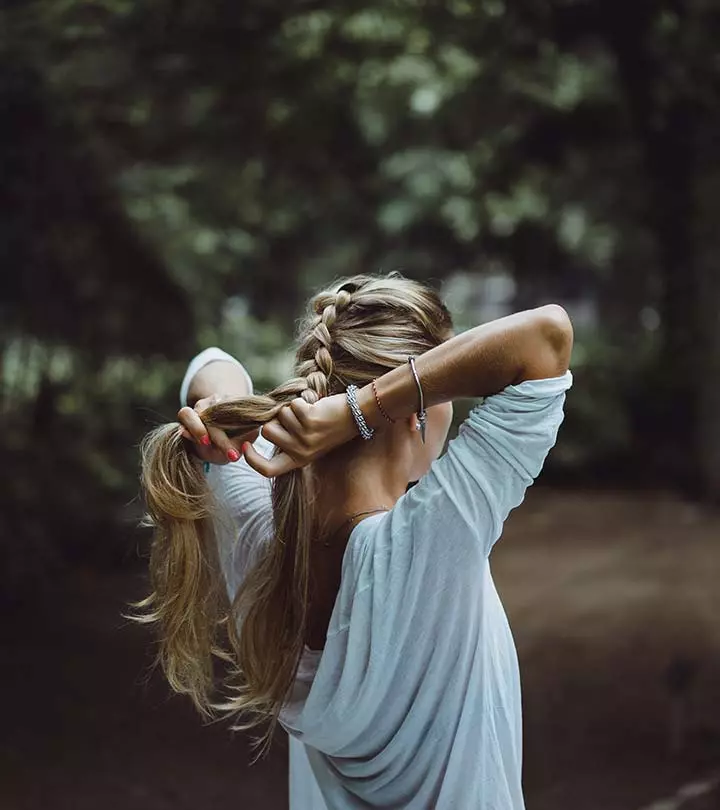
Image: shutterstock
Long and thick hair may not be easy to manage, and most people find it difficult to try out different hairstyles with it. But, there are several interesting braided hairstyles for long hair that can make you look like a princess out of a Disney show. Be it the three-strand braids, Dutch braids, French braids, or the fishtail braids, your long tresses can do wonders if you know how to do them. A detailed styling guide, a little creativity, and determination can make your hair look the best. Besides, well-braided hair will also help you manage your hair from flying and causing a messy head and tangled locks. In this article, we have listed some of our favorite braided hairstyles that guarantee the best looks. Keep scrolling to check them all out!
 Before You Get Started
- While styling your hair with products and tools, ensure to use a heat protectant. Give your hair the needed hair care routine and use hair type-appropriate shampoo and hydrating deep conditioner.
- Use satin or silk pillows at night to avoid friction and damage to the braided hair. This will also prevent hair fall.
- Do not keep your hair braided for more than 1-2 days. The locks may become frizzy due to friction and lead to damage.
- Second-or third-day hair is perfect for braiding, as it allows a perfect grip. However, ensure the scalp is not too greasy.
In This Article
43 Beautiful Braided Hairstyles For Long Hair
The best hairstyles for long hair are functional, stylish, and time-saving, and braids are one of them.
Toronto based professional hairstylist Laura Clark, who has a styling business of her own, says, “If I need a quick out of my face hair style, I will braid my side bangs all the way down my hair so they are on either side of my face. This gives a really cute fun look, even if I haven’t styled my hair it will look like I have done the messy beach look. It takes me no longer than 5 minutes to style this. It is great for online meetings as well if I need to pull my side bangs back”.
There are different types of braids that help keep your hair manageable and untangled. Keeping all this in mind, we have compiled a list of the best braided hairstyles for your long hair.
1. Double Braided Updo
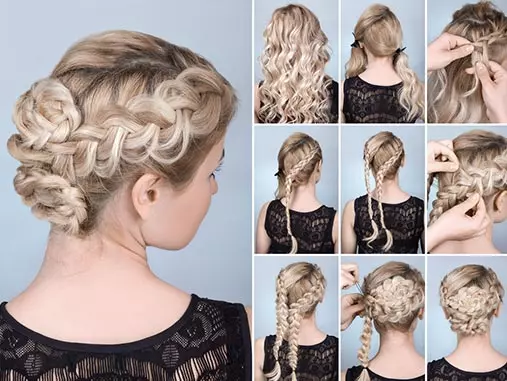
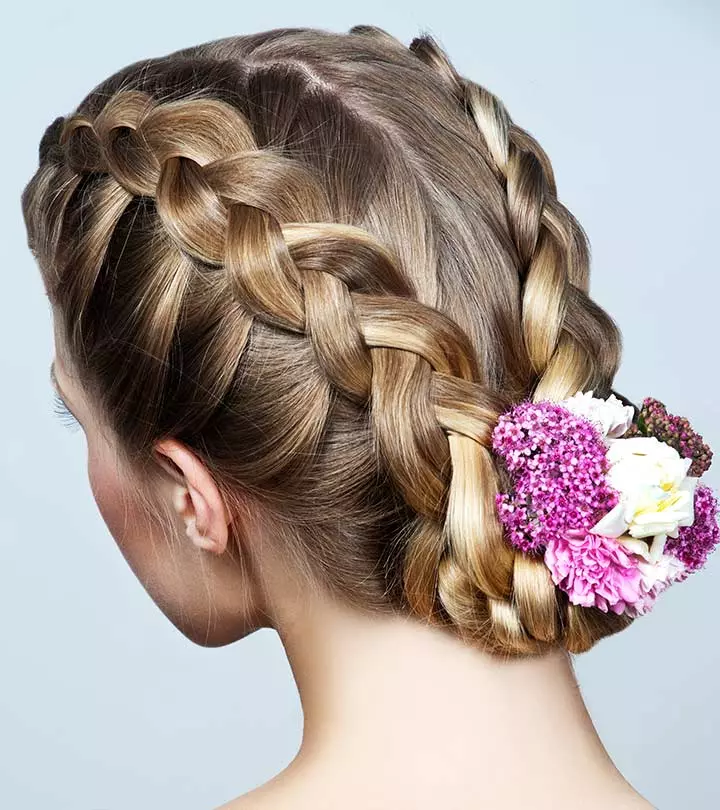
The most elegant hairdo of the lot, this braided hairstyle is perfect for weddings and formal events. At first glance, it may look difficult to achieve. But it is super simple to master once you get a hang of braiding your hair. Just two braids rolled up into intricate circles and you’re ready!
What You Need
- Bobby pins
- 2 hair elastics
- Comb
- Hairspray
How To Style
- Comb your hair and make a side part.
- Then, make a diagonal part from the middle part at the crown and separate your hair into two sections.
- Weave a 3-strand plait with the upper section of the hair.
- Take the lower section and make a French braid with it such that it runs parallel to the upper braid.
- Secure both the braids with hair elastics and pancake them.
- Take the right braid and pin it near the left ear. Use the remaining braid to make a circular pattern on the crown.
- Similarly, pin the left braid near the right ear. Make a circular pattern at the nape of your neck with the braid section that remains.
- Secure the circular patterns with some bobby pins and spritz hairspray to set the hairstyle.
2. Side Braided Messy Bun
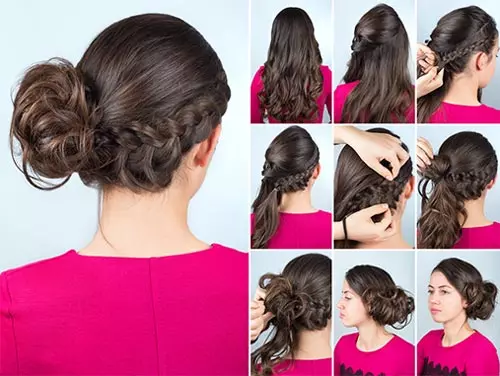
Who knew combining our comfort hairstyles – a braid and a messy bun could give such a trendy hairdo? This braided messy bun transitions easily from a busy office hairdo to an effortless party look. So, the next time you are late, don’t think much about how to style your hair. Do this simple updo instead!
What You Need
- Hairbrush
- Bobby pins
- Hair elastic
- Hairspray
How To Style
- Brush your hair and get rid of all the tangles.
- Separate your hair into two sections by making a diagonal part on the top of your head.
- Clip up the large section of the hair and braid the other section.
- As you make this braid, keep adding the surrounding hair sections to it so that the braid lines with the curve of the head.
- Once you reach the center of the nape of your neck, secure the braid with a hair elastic.
- Pull apart the braid a little so that it appears wider.
- Tie the braid with the remaining hair into a loose and low side ponytail.
- Wrap around the ponytail to form a loose messy bun and secure it with some bobby pins.
- Spritz on some hairspray, and voila! You’re done!
3. Easy Braided Ponytail
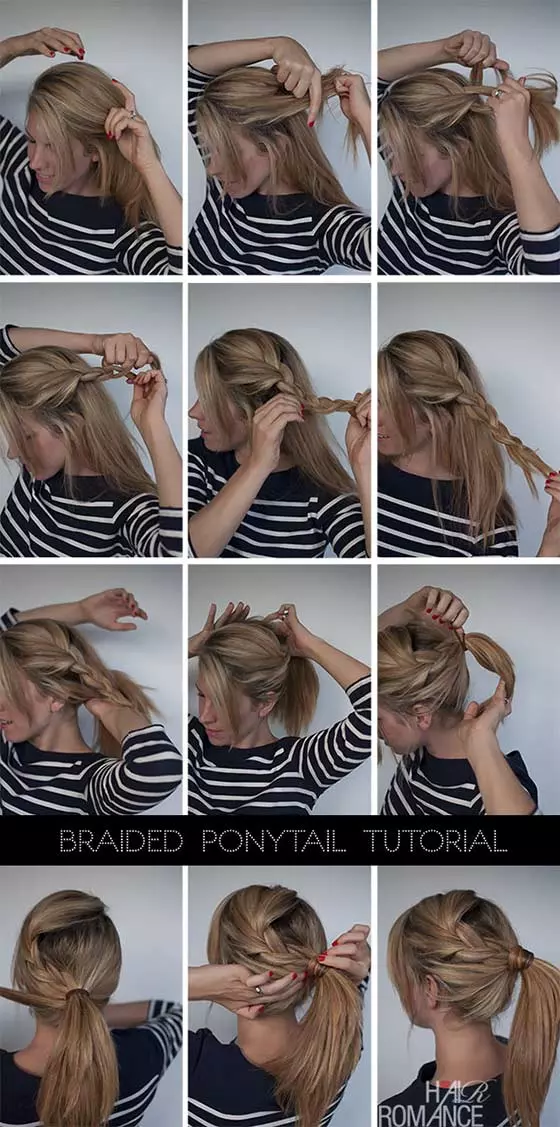
Let’s start out with something, shall we? Perfect for a day filled with classes, this ponytail wrapped with a braid is chic, simple, and takes less than 5 minutes to do! Honestly, what more could you ask for from a hairstyle?
What You Need
- Smoothing serum
- 2 hair elastics
- Bobby pins
How To Style
- Prep your washed, dried hair with some smoothing serum.
- Part your hair deeply on one side.
- Leaving out your bangs, pick up a big chunk of hair from the front from the side of the parting with more hair.
- Do a simple 3 strand braid with this section and secure it at the end with a hair elastic.
- Gather all your hair (including the braid) into a mid-level ponytail at the back of your head and secure it with a hair elastic.
- Remove the hair elastic at the end of your braid and unravel your braid.
- Pick up a thin section of hair and wrap it around the base of your ponytail to conceal the hair elastic.
- Secure this thin section of hair with a bobby pin under your ponytail to finish off the look.
 Trivia
4. Messy Loose Boho Ponytail Hair

Now, this hairstyle is definitely the very definition of boho. Loose waves, super relaxed braids, carelessly tied and haphazardly placed buns…this hairstyle definitely ticks all the boxes when it comes to boho styling. And it looks ridiculously cute!
What You Need
- Sea salt spray
- Hair elastics
- Bobby pins
- Light hold hair spray
How To Style
- Spritz on sea salt spray all over your hair.
- Part your hair on one side.
- Pick up a 3 inch section of hair from the front and split it in 2 sections to fishtail braid it.
- To do so, pick up a thin section of hair from the outer side of one section and add it to the inner side of the other section. Keep doing this alternately until you’ve braided right till the end and secure with a hair elastic.
- Stretch and pull the braid apart to make it look wide and messy.
- Tie all your hair, along with the braid, into a low ponytail.
- Take a big chunk of hair from right under the hair elastic of your ponytail, and roll and tie it into a super messy bun.
- Take another chuck of hair from below the bun and repeat the previous step.
- Finish off by spritzing on some light hold hair spray to set the do in place.
5. The Brilliant Braid
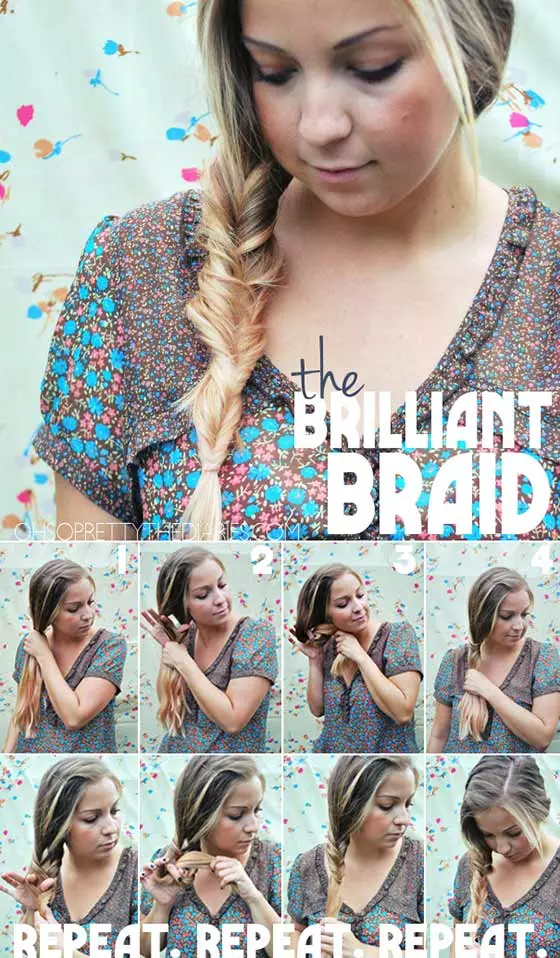
Many moons ago, when I was just starting out on my hairstyling journey, the fishtail braid was my Everest. Though now I can whip one up in 5 minutes flat, back then I could have done anything to find an easier way to fishtail braid my hair. I had to suffer – but you don’t have to! Here’s a simple hack to do this beautiful braid in the easiest way possible. You’re welcome.
What You Need
- Texturizing spray
- Bobby pins
- Hair elastic
How To Style
- Spritz on some texturizing spray all over your hair.
- Part your hair on one side and pin back the hair on the side of the parting with more hair.
- Gather all your hair on one side and flip it over your shoulder.
- Grab all your hair with one hand.
- Above where you are holding all your hair, create a gap with the forefinger and thumb of your other hand.
- Grab the hair at the bottom with your forefinger and thumb and flip it all over and into the gap you had created. Do not let go of your hair.
- Repeat steps 4 to 6 over and over again until you have “braided” all your hair. Make sure you don’t create the gap right in the middle, but slightly away from where you had created one previously.
- Secure the end of your brilliant braid with a hair elastic.
6. Triple Braided Bun

You can’t say ‘no’ to a braided style this beautiful. Perfect for any formal event, this updo looks deceptively intricate but is super easy to do. Just 3 braids rolled up into 3 buns and you’re good to go!
What You Need
- Teasing comb
- Hair elastics
- Bobby pins
- Light hold hair spray
How To Style
- Part your hair on one side.
- Tease down the hair at the top of your head to create volume.
- Divide all your hair into 3 parts.
- Braid each of the 3 parts separately so that you end up with 3 braids, and secure their ends with hair elastics.
- Roll up your first braid into a bun and secure it to your head with the help of hair elastics.
- Repeat the previous step with the other two braids.
- Spritz on some light hold hair spray to secure the braided buns in place.
 Quick Tip
7. Four Strand Accent Braid

Who says that a braid can only be done with 3 strands? Prove all those naysayers wrong with this gorgeous 4 strand braid. It may look difficult to achieve but once you get the hang of the braiding pattern, there’s no stopping you!
What You Need
- Texturizing spray
- Hair elastic
- Bobby pins
How To Style
- Prep your washed, dried hair with some texturizing spray.
- Part your hair on one side.
- Leaving out your bangs, pick up a 3 inch section of hair from the side of your parting with more hair.
- Divide this section of hair into 4 equal sections and number them accordingly.
- To braid this hair, flip section 1 over 2 and section 4 over 3.
- Then flip section 1 over 4 (that is now in the middle).
- Renumber the sections again and repeat steps 5 and 6 until you have braided all your hair.
- Secure the end of your braid with a hair elastic.
- Secure the braid at the back of your head with some bobby pins and flip some hair over them to hide them from view.
8. Five Braids Bun
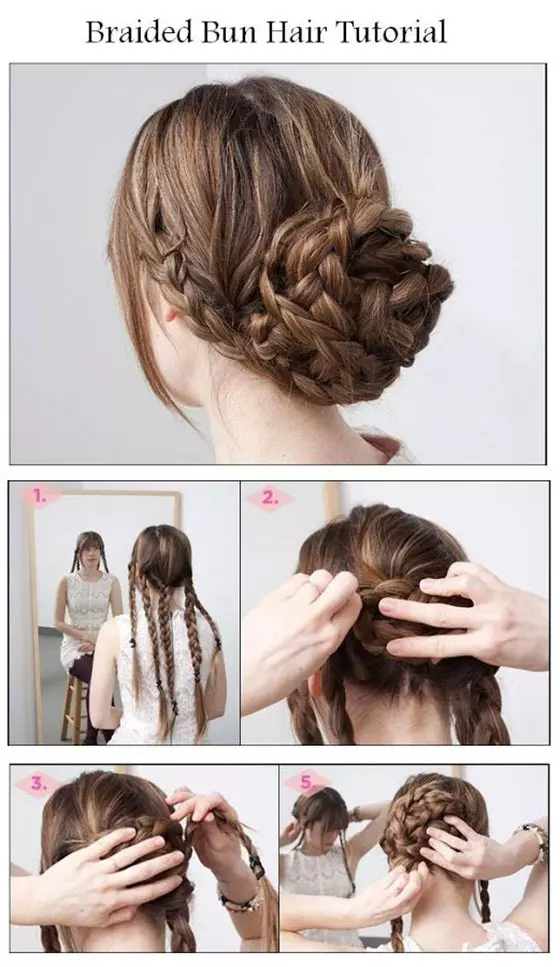
Here’s another long braided hairstyle that uses a simple hack to create a stunning effect. And with a name like ‘Five Braids Bun’, this hairstyle is quite self-explanatory. The four braids rolled into a bun create the illusion of having voluminous hair, so it’s perfect for someone who finds it difficult to style their fine textured hair.
What You Need
- Hair elastics
- Bobby pins
- Medium hold hair spray
How To Style
- Part your washed, dried hair down the middle.
- Divide your hair into 5 equal sections and do a simple 3 strand braid with each of them separately.
- Take the third braid (that is right in the middle), roll it into a bun, and secure it to your head with the help of bobby pins.
- Now, pick up the braid right next to the bun, wrap it around the bun, and secure it with the help of bobby pins.
- Wrap and pin the rest of the braids around the bun in the same manner.
- Spritz on some medium hold hair spray to secure the bun in place.
9. Boho Braids Back Headband
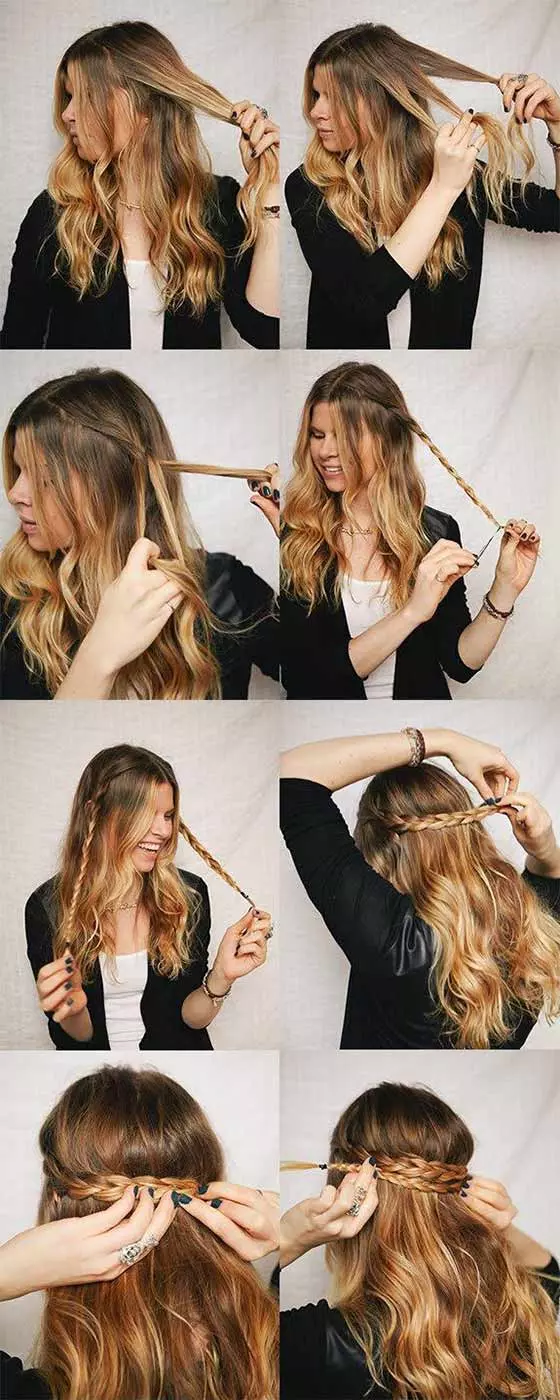
Let loose your bohemian spirit with this gorgeous braided headband style. While most headband styles place the braids on top of your head, this unique hairdo pins them across the back. Simple, yet oh-so-beautiful.
What You Need
- Sea salt spray
- Hair elastics
- Bobby pins
How To Style
- Spray some sea salt spray all over your hair to give it a wavy texture.
- Part your hair down the middle.
- Pick up a 3 inch section of hair from the left side of your parting, braid it, and tie the ends with a hair elastic.
- Repeat step 3 on the other side.
- Place the left braid across the back of your head and pin it behind your right ear.
- Place the right braid across the back of your head and pin it behind your left ear.
- You can insert more bobby pins along the length of your braids to further secure them in place.
10. Little Fishtails

What’s better than one big fishtail braid? Many little fishtail braids, of course! This sectioned off fishtail style creates an adorable bubbled effect in your braid, making sure that bits of your hair do not unravel through the day.
What You Need
- Texturizing spray
- Hair elastics
- Straightening iron
How To Style
- Spritz on some texturizing spray to add some hold to your hair.
- Part your hair on one side.
- Gather all your hair on one side and tie it into a low side ponytail to fishtail braid it.
- Divide your hair into 2 sections.
- Pick up a thin section from the outer side of your left section and add it to the inner side of your right section.
- Then, pick up a thin section from the outer side of your right section and add it to the inner side of your left section.
- Repeat steps 5 and 6 alternately until you have braided about 3 inches of your hair, then tie it up with a hair elastic.
- Keep repeating steps 4 to 7 until you have fishtail braided all your hair into little sections.
- Straighten your bangs and part them on one side.
- Loosen up the braid a little to give it more volume and texture and finish off the look.
11. Half Up Pull Through Braid

Flirty, fun, and carefree. This is the image you will project with this super relaxed half updo. With a unique take on the traditional braid, which makes generous use of hair elastics and the ‘pull through’ method, you are sure to make heads turn when sporting this look.
What You Need
- Hair brush
- Hair elastics
- Bobby pins
- Sea salt spray
How To Style
- Brush back your hair and tie it into a half ponytail.
- Pick up a 2 inch section of hair from near your left ear, braid it, and secure the end with a hair elastic.
- Repeat the previous step on the right side.
- Flip your left braid over the half ponytail and pin it under it.
- Repeat the same with your right braid to hide the elastic holding your ponytail from view.
- Now, split your ponytail horizontally into half so that you end up with one section over the other.
- Split the bottom section of hair again into 2 parts, wrap them around the top section, and tie them together with a hair elastic.
- Keep repeating step 7 until you’ve “braided” the full length of your half ponytail.
- Finish off with a few spritzes of sea salt spray to add more texture to the look.
12. Half Up 3 Boho Braids

Running late for a date and only have 5 minutes to do your hair and makeup? I’ve got you covered! This half up style only requires you to braid 3 braids together into a single braid. It’s braid-ception.
What You Need
- Texturizing spray
- Hair elastics
How To Style
- Start off by spritzing on some texturizing spray all over your hair.
- Pick up a 3 inch section of hair from above your left ear, do a simple 3-strand braid with it, and secure the end with a hair elastic.
- Repeat the previous step with the hair on top and on the right side of your head so that you end up with half your hair in 3 braids.
- Pancake (loosen) the braids to make them look wider and messier.
- With the 3 braids acting as 3 strands, braid them together 2-3 times and secure this combined braid with a hair elastic.
13. Double Boho Braid
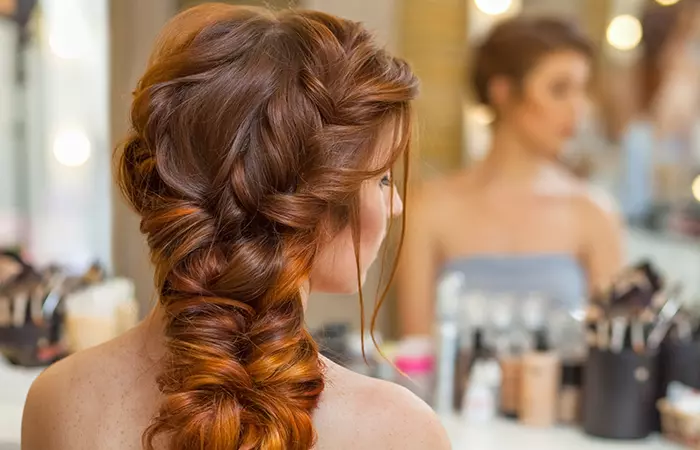
Looking for a style that’s a tad more traditional? Look no further! This gorgeous style makes use of every braided style in the book. With a topsy tail at the top and a fishtail braid resting atop a normal one, this style is sure to make everyone who sees it do a double take.
What You Need
- Texturizing spray
- Hair elastics
- Bobby pins
How To Style
- Prep your washed, dried hair with texturizing spray.
- Pick up 1 inch sections of hair from near your ears and tie them together in a half ponytail at the back.
- Topsy-tail this half ponytail by creating a gap above the hair elastic and flipping the ponytail over and into it.
- Fishtail braid the ponytail by splitting it into 2 sections and alternately picking up a thin section of hair from the outer side of one section and adding it to the inner side of the other section.
- Secure the end of the fishtail braid with a hair elastic.
- Now do a simple 3 strand braid with all the hair left out under the fishtail braid and tie the end with a hair elastic.
- Insert the tail of the fishtail braid into a stitch at the bottom of the simple braid and secure them together with the help of bobby pins.
- Finish off the look by pancaking your braids to make them look messier.
14. Pull Through Braid

There is a serious lack of hairstyles for people whose personal style is sporty, yet feminine. This ponytail done up in a pull through braid should remedy that. Perfect for a cozy night in or a girls-only sleepover, this ponytail braid style will make you look cute and still keep your hair out of your face.
What You Need
- Hair elastics
- Bobby pins
How to Style
- Pull back all your hair and tie it into a high ponytail.
- Take a thin section of hair from your ponytail and wrap it around the base of your ponytail to hide the hair elastic from view.
- Horizontally split your ponytail into 2 sections so that you end up with one section on top of another.
- Split the bottom section of hair into 2 parts, wrap them over the top section, and tie them together with a hair elastic.
- Repeat the previous step over and over again until you have pull-through braided your ponytail completely.
- Pull apart your braid to loosen it up and give it a fuller look.
15. Chic Shoelace Braid

Get experimental with your hairstyling game with this new style of braiding! Though the name may sound bizarre, shoelace braids actually look super chic and edgy. AND they are so easy to do! Pair them with a fishtail braided bun and you are ready to walk down a high-fashion red carpet.
What You Need
- Texturizing spray
- Hair elastics
- Bobby pins
- Medium hold hair spray
How To Style
- Prep your hair with lots of texturizing spray.
- Part your hair down the middle.
- Pick up a 1 inch section of hair from the left side of your parting, from right in front.
- Split this section of hair in two and make a knot as if you are tying a shoelace.
- Add more hair to both the sections of hair and tie them into a loose knot again.
- Keep repeating step 5 until you have reached the back of your head, then pin it down.
- Repeat steps 3 to 6 on the right side.
- Now, tie all your hair into a high ponytail.
- Fishtail braid your ponytail by splitting it into 2 sections and alternately picking up a thin section of hair from the outer side of one section and adding it to the inner side of the other section.
- Roll the braid into a bun and secure it to your head with the help of bobby pins.
- Spritz on some medium hold hair spray to secure your style in place.
16. Mohawk Braid Ponytail

Have a sports tournament coming up? Or maybe you plan on engaging in a hardcore session of working out? Whatever the case, this Mohawk braid ponytail is sure to make you look cute while you sweat it out!
What You Need
- Texturizing spray
- Paddle brush
- Hair elastics
- Bobby pin
How To Style
- Prep your washed, dried hair with a few spritzes of texturizing spray.
- Brush back all your hair.
- Pick up a 2 inch section of hair from right near the top of your forehead and split into 3 sections to Dutch braid it.
- To do so, for the first stitch of the braid, simply braid the 3 sections but by flipping the side sections of hair under the middle section.
- Then with each subsequent stitch, add more hair from outside the braid to the side sections.
- Once your Dutch braid had reached the back of your head and used up half of your hair, secure it with a hair elastic.
- Gather all your left out hair and the tail of your Dutch braid into a high ponytail and secure it with a hair elastic.
- Loosen your braid to make it look wider and create a softer look.
- Take a thin section of hair from your ponytail and wrap it around the hair elastic holding your ponytail, to hide it from view.
17. Fishtail Merged Crown Braid

Honestly, I’ve watched so many tutorials for crown braids and I can safely say that they are a pain in the you-know-where to do. So here’s a super easy way to get that pretty crown braid look without going crazy! The bonus here is that the combined fishtail and normal braids actually create a much more intricate effect than a normal braid would do.
What You Need
- Texturizing spray
- Hair elastics
- Bobby pins
- Light hold hair spray
How To Style
- Spritz on some texturizing spray all over your hair.
- Pick all the hair at the top of your head that is between both your ears.
- Split this hair into two parts.
- Take one part and divide it into 2 sections to fishtail braid it.
- Fishtail braid the section by splitting it into 2 sections and alternately picking up a thin section of hair from the outer side of one section and adding it to the inner side of the other section.
- Secure the end of the fishtail braid with a hair elastic.
- Repeat steps 5 and 6 on the other part.
- Now divide all your hair into two parts, with one fishtail braid on each side.
- Simply braid all the hair on your left with the fishtail braid acting as one strand and the rest of the hair split into 2 strands, and secure the ends with a hair elastic.
- Repeat step 9 with all the hair on your right.
- Take your right braid, flip it over to the left side from the back of your head, and secure it to your head wherever its tail may land.
- Repeat the previous step with your left braid.
- Insert more bobby pins along the length of both the braids to further secure them in place.
- Spritz on some light hold hair spray to finish off the look.
18. Triple Braided Bun With A Flower Crown
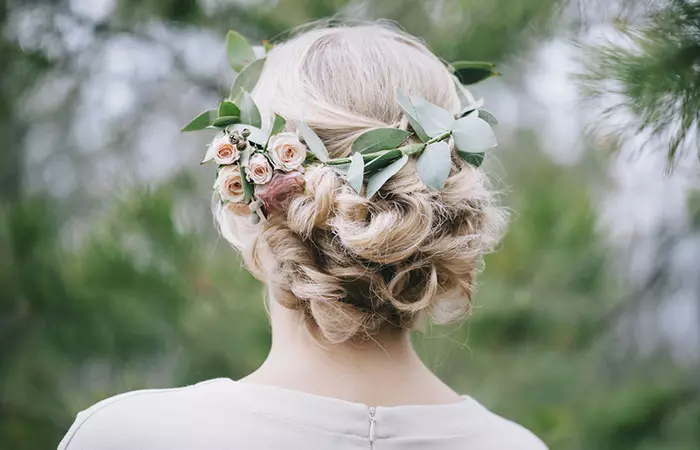
Now here’s a wedding hairstyle that is sure to light up the simplest of dresses. With its simple triple braided updo and a colorful flower crown, you don’t even need to worry about your hairstyle drooping or unraveling through the day.
What You Need
- Paddle brush
- Hair elastics
- Bobby pins
- Flower crown
- Light hold hair spray
How To Style
- Brush back all your hair and tie it into 3 ponytails right next to each other at the back of your head.
- Simply braid your ponytails into 3 separate braids and secure their ends with a hair elastic.
- Take your left braid, wrap it around the base of the other two braids and secure it to your head with bobby pins.
- Roll the other two braids around the first to style them into one bun and secure them to your head with lots of bobby pins.
- Place your flower crown around the base of your bun and secure it in place with the help of bobby pins.
- Spritz on some light hold hair spray to finish off the look.
19. Faux Braided Crown

Look, I know it’s damn difficult to French braid around your head to get a crown braided look. So here’s a simple hack to achieve the same effect with significantly lesser effort. You’re welcome.
What You Need
- Tail comb
- Hair elastics
- Bobby pins
- Light hold hair spray
How To Style
- Using a tail comb, first divide your hair vertically into two parts, from the center of your forehead to the nape of your neck.
- Then, horizontally divide the 2 sections of hair so that you are left with your hair split in four quadrants.
- Tie your 4 quadrants of hair into ponytails.
- Simply braid all your ponytails and secure their ends with hair elastics.
- Now take the braid at your front left, pull it to the right, place it across the top of your head, and secure it with the help of bobby pins.
- Keep pulling the rest of the braids towards your right and pinning them down to your head until they resemble one crown braid.
- Finish off the look with the help of some light hold hair spray.
20. Topsy Tail Braided Flower
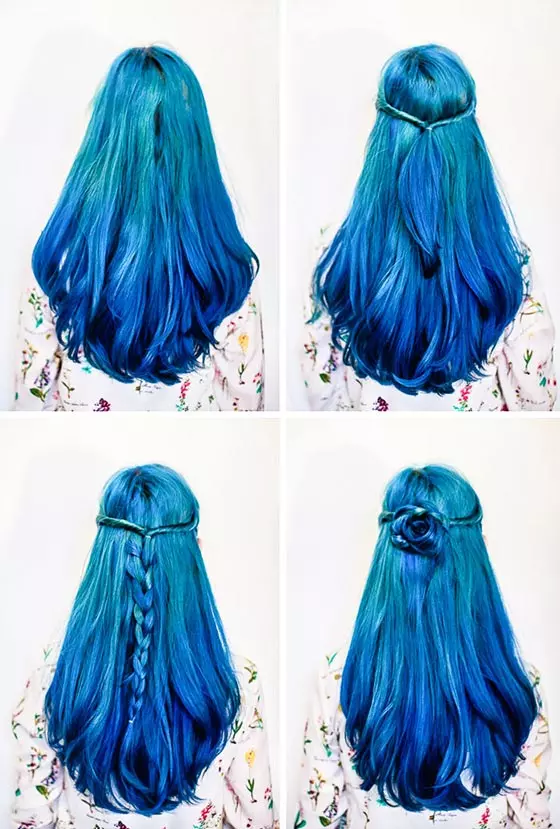
Go ultra soft and feminine with this intricate braided flower hairstyle. Looks impossible to achieve, I know. But it’s actually super easy! You just need to know how to do a basic 3 strand braid and you’re good to go!
What You Need
- Texturizing spray
- Hair elastics
- Bobby pins
How To Style
- Prep your hair with texturizing spray to give it more hold.
- Pick up 1 inch sections of hair from above both your ears and tie them into a half ponytail at the back.
- Topsy tail the half ponytail 3 times by flipping it over and into itself.
- Now, simply braid your half ponytail and secure it at the end with a hair elastic.
- Keeping your braid flat against your head, start rolling it from its base into a flower shape.
- Keep inserting bobby pins to secure the flower in place.
- Tuck the tail of your braid into the center of your flower and secure it with bobby pins to finish off the look.
21. Game Of Thrones Braids

Yeah, we all agree that Cersei Lannister is a pretty awful person. But there’s no denying that her hairstyling game is on point. These pinned up simple braids style takes about 5 minutes to perfect and make you look like an absolute queen.
What You Need
- Hair elastics
- Teasing comb
- Bobby pins
- Sea salt spray
How To Style
- Part your hair slightly off-center.
- Leaving out the hair at the front, pick up a 1 inch section of hair from right above your left ear. Simply braid it till the end, and secure it with a hair elastic.
- Repeat the previous step on the right side.
- Tease down the hair on the crown of your head to create some volume.
- Place your right braid across the back of your head and secure it with bobby pins under some loose hair near your left ear to hide the pins from view.
- Repeat the previous step with your left braid.
- Finish off with a few spritzes of sea salt spray to give your hair a wavy texture..
22. Half Up Lace Rose

Be your girliest best by sporting this floral hairstyle that will make everyone fall in love with your hair. The half French braids at the sides create a unique illusion that makes them look like twists and the braided flower at the back almost looks like it was cut out of lace (hence, the name).
What You Need
- Teasing brush
- Fine toothed comb
- Hair elastics
- Bobby pins
- Light hold hair spray
How To Style
- Leaving out the hair right in the front, tease down the hair at the crown of your head.
- Smooth down the hair left in front over the teased hair and pin it in the center with some bobby pins criss-crossed over each other.
- From above your left ear, pick up a 2 inch section of hair and divide it into 3 sections to French braid it.
- With each stitch of the braid, add more hair to it above the braid, but not from below. This will conceal the top half of your braid and make it look like it’s twisted.
- Once your French braid has reached the back of your head, simply braid it until the very end and secure it with a hair elastic.
- Repeat step 3 to 5 on your right side.
- Pancake your braids to give them a fuller look.
- Pick up one braid and start rolling it from its base, while keeping it laid flat against your head, to create your lace rose.
- Tuck the tail of the braid into the center of the flower and pin it in place.
- Now roll the other braid around the first one to increase the size of the lace rose and pin it in place.
- Spritz on some light hold hair spray to set the do in place.
23. Topsy Fishtail Braid

Now, here’s another style that lets you sport that elusive fishtail braid, without actually making you go through all that trouble. It makes use of repeatedly topsy tailing sections of your hair to create the illusion of a fishtail braid.
What You Need
Hair elastics
How To Style
- Pick up 2 inch sections of hair from above both your ears and tie them together at the back of your head with a hair elastic.
- Topsy tail this half ponytail by flipping it over and into the gap above the hair elastic.
- Now, pick up 1 inch sections of hair from below the first sections of hair that you picked up and tie them with a hair elastic above the first ponytail, below the first elastic.
- Topsy tail this new ponytail.
- Keep repeating steps 3 and 4 until you have a topsy tail braided all your hair this way.
- Pull and loosen the braid to give it a messier feel and finish off the look.
24. Double Dutch Braid Bun

Perfect for prom or a night out partying, this double Dutch braided bun updo is the cutest hairstyle to pair with that sparkly dress of yours. Just throw your hair into this loose bun style and dance away your night carefree!
What You Need
- Texturizing spray
- Bobby pins
- Hair elastics
How To Style
- Prep your washed, dried hair with texturizing spray.
- Part your hair down the middle.
- Pick up a 2 inch section of hair from right next to the left side of your parting.
- Divide this section of hair into 3 parts and Dutch braid it.
- To do so, braid by flipping the side strands under the middle strand and adding more hair into the braid with each subsequent stitch.
- Once your Dutch braid has reached the back of your head, simply braid it right till the end and secure it with a hair elastic.
- Repeat steps 3 to 6 on the right side.
- Pancake your Dutch braids to give them more volume.
- Take a 3 inch section of hair near the nape of your neck, simply braid it, and secure the end with a hair elastic.
- Gather all your hair and Dutch braids (leave out the 3 strand braid at the bottom) and tie them into a low ponytail, making sure not to pull out all your hair the last time you twist your hair elastic around it. This way you will create a loose low bun.
- Now wrap the 3 strand braid around the base of your bun and secure it in place with the help of bobby pins to finish off the look.
25. Braided Headband Side Ponytail

Looking for an easy braided hairstyle? Kick back and relax over the weekend with this pretty yet functional side ponytail hairstyle. While this French braided headband does look chic, it serves an even more important purpose—keeping your hair out of your face while you spend hours on end on Netflix.
What You Need
- Texturizing spray
- Hair elastics
- Bobby pins
How To Style
- Spritz on some texturizing spray all over your washed, dried hair.
- Section off all the hair from the front (from ear to ear) and tie all the hair at the back into a low side ponytail.
- Now take all your hair in the front and flip them over to one side.
- Pick up a 2 inch section of hair from near your left ear and start French braiding it towards your right ear.
- To do so, add more hair to the braid from the side of your forehead with each subsequent stitch.
- Once your French braid has reached behind your right ear, simply braid it right till the end and secure it with a hair elastic.
- Now take this braid, wrap it around the base of your ponytail to hide the hair elastic from view, and secure it with a bobby pin under your ponytail.
26. Boho Top Knot

Be on top of your boho style game with this half up top knot that is the epitome of ‘messy chic’. The highlight of this look is the messy braid that cascades down your back and adds oomph to your overall style.
What You Need
- Sea salt spray
- Hair elastics
- Bobby pins
How To Style
- Spritz on sea salt spray all over your washed, dried hair to give it lots of texture.
- Gather half your hair and tie into a half ponytail.
- Roll this half ponytail into a super messy and relaxed bun and secure it to your head with bobby pins.
- Pick up a 3 inch section of hair from right under your bun and split it into 2 sections to fishtail braid it.
- To do so, alternately pick up a thin section of hair from the outer side of one section and add it to the inner side of the other section until you reach the very end. Then, secure it with a hair elastic.
- Pancake your fishtail braid to give it a softer look.
27. Hippie Braids

Heading to a music festival? I have got you covered! Regardless of the dust and grime that are an inevitable part of music festivals, you still want to look fresh as a daisy. Well, these super hippie braids will help you do just that AND keep your hair out of your face.
What You Need
- Hair elastics
- Light hold hair spray
How To Style
- Part your hair down the middle.
- From the left side of your parting, leave out a 2 inch section of hair right from the front.
- Pick up a 2 inch section of hair from right behind the left out hair, loosely braid it right till the end, and secure the end with a hair elastic.
- Repeat steps 2 and 3 on the right side.
- Pull back both the sections of the hair left out in the front, combine them at the back, and do a simple 3 strand braid right till the end.
- Secure the braid with a hair elastic and spritz on some light hold hair spray to finish off the look.
28. Ponytail Braids

Tied your hair into a high ponytail but want to add a little something more to it? Try out braiding random sections of hair in your ponytail to accent your otherwise boring ponytail and step out in style.
What You Need
- Texturizing spray
- Paddle brush
- Hair elastics
- Bobby pins
How To Style
- Spritz on texturizing spray over all your hair.
- Brush back all your hair and tie it into a high ponytail.
- Pick up a thin section of hair and wrap and pin it around the base of your ponytail to hide the hair elastic from view.
- Pick up random 1 inch sections of hair, simply braid them, and secure them at the end with hair elastics. Do so until you have 2-3 accent braids in your ponytail.
- Pick up another 1 inch section of hair and fishtail braid it right till the end.
- Fluff out your ponytail and pancake all your braids to finish off your look.
29. Easy Curly Side Braid

Going for that cute and sexy look that is so hard to pull off? I’ve got the perfect solution! While the diffused curls in this look give off the perfect sexy vibes, the Dutch braid ponytail takes care of the cuteness factor.
What You Need
- Volumizing mousse
- Blowdryer, with a diffuser attachment
- Bobby pins
- Hair elastics
How To Style
- Prep your washed, wet hair with a dollop of volumizing mousse.
- Blowdry your hair with a diffuser attached to give yourself some rough and textured curls.
- Pull back all your hair and grab a chuck of hair from the back of your head to Dutch braid it.
- To do so, split the section of hair into 3 parts and braid it by flipping the side strands under the middle strand and adding more hair to the braid with each subsequent stitch.
- Once your braid has reached the nape of your neck and you have run out of hair to add to it, tie it into a low ponytail along with the rest of your hair.
- Take a thin section of hair from your ponytail, wrap it around the base of your ponytail to hide the hair elastic from view and secure it with a bobby pin under your ponytail.
30. Pancaked Braided Ponytail

Want to spice up your same old boring ponytail? Here’s a simple way to do so! Just braiding a section of hair and wrapping it around your ponytail is enough to elevate your style quotient from ‘drab’ to ‘out of this world’!
What You Need
- Texturizing spray
- Hair elastics
- Bobby pins
How To Style
- Prep your washed, dried hair with texturizing spray.
- Part your hair on one side.
- From the side with more hair, pick up a 3 inch section of hair, braid it till the end, and secure it with a hair elastic.
- Leaving out the braid, gather all your hair and tie it into a ponytail at the back of your head.
- Pancake your braid to make it look super wide and messy.
- Wrap the braid around the base of your ponytail and pin it in place to hide the hair elastic from view.
31. Rope Twist Braid

Fling all your preconceived notions about what a weaved braid is supposed to look like out of the window. Because this is a style that is a unique takeoff from the traditional braid. The rope braid requires just 2 strands and a little bit of twisting to create an unconventional and new-age hairstyle.
What You Need
- Texturizing spray
- Hair elastics
How To Style
- Prep your washed, dried hair with texturizing spray.
- Tie up all your hair into a mid-level ponytail at the back of your head.
- Split the ponytail into 2 sections.
- Separately, twist both the sections of hair towards the right till the end.
- Now, intertwine both the sections of hair by twisting them together towards the left right till the end.
- Secure the rope braid at the end with a hair elastic.
32. Festive Side Ponytail

Celebrate Christmas and bring in the new year in style with this appropriately named Festive Side Ponytail. This fishtail and braided flower style pairs well with casual, as well as fancy, clothes. But it’s the side ponytail element that adds a hint of glamor to this look.
What You Need
- Texturizing spray
- Hair elastics
- Bobby pins
- Medium hold hair spray
How To Style
- Spritz on texturizing spray all over your hair.
- Part your hair on one side.
- On the side with more hair, pick up a 3 inch section of hair and divide it into 2 sections.
- Fishtail braid these 2 sections by picking up a few strands of hair from the outer side of one section and adding it to the inner side of the other section, alternately, until you’ve braided right till the end. Secure with a hair elastic.
- Tie all your hair and the braid into a low side ponytail.
- Wrap the fishtail braid around the base of your ponytail and secure it with bobby pins to hide the hair elastic from view.
- Pick up a 2 inch section of hair from your ponytail, simply braid it right till the end, and secure it with a hair elastic.
- Pancake one side of the braid right till the end.
- Start rolling the braid from its base, with the pancaked part placed on the outside, to create the flower.
- Keep securing the flower down with bobby pins as you roll it.
- Tuck the tail of your braid in the center of the braid and pin it down.
- Finish off with a few spritzes of medium hold hair spray to set the style in place.
33. Braid Ponytail With Bow Accessory

It is difficult to look your stylish best while still dressing appropriately for work. But, with this hairstyle, you won’t have to face that dilemma! This cute Dutch braided ponytail may not be very out of the ordinary. But it’s the bow clip attached to it that makes a world of difference and makes your hairdo ‘work chic’.
What You Need
- Hair elastics
- Bow hair accessory
How To Style
- Part your hair down the middle.
- Pick up a 2 inch section of hair from the left side of your head and start Dutch braiding it.
- To do so, braid by flipping the side strands under the middle strand and adding more hair to the braid from outside with each subsequent stitch.
- Once your Dutch braid has reached the back of your braid, simply braid it till the end, and secure it with a hair elastic.
- Repeat steps 2 to 4 on the right side.
- Gather all your hair along with both your braids and tie it into a low ponytail.
- Remove the hair elastics from your braids and unravel them until the base of the ponytail.
- Clip on your bow hair accessory to hide the hair elastic on your ponytail from view and finish off the look.
34. 3D Chain Link Braid

You don’t only have to take clothing inspiration from fashion show runways. Hair styling is also a major part of the look that fashion designers create to showcase at their shows. This 3D chain link braid, for example, was first seen at a Donna Karan New York show and is unique in the 3D effect it creates, compared to the traditional braids that lay flat.
What You Need
- Texturizing spray
- Hair elastics
How To Style
- Spritz on texturizing spray all over your hair to give it more hold.
- Tie all of your hair into a ponytail a couple of inches above the nape of your neck.
- Divide the ponytail into 4 equal sections, with each section tucked between the fingers of your left hand.
- Now, with your right hand, pick up sections 2 and 4 and flip them over to your left so that they become sections and 1 and 2. This way, sections 1 and 3 become sections 3 and 4.
- Keep repeating this braiding pattern until you have reached the very end of your braid and secure it with a hair elastic.
- Pull out the braid gently to give it more dimension and finish off the look.
35. Half Up Fishtail Braid

If you lean towards more delicate styles, here’s a hairstyle that you will definitely fancy. This combination of a topsy tail and a half up fishtail is one that seems tailor-made for a wedding. Throw on a fancy dress and pair the style with minimal makeup to steal all the hearts in the room.
What You Need
- Teasing brush
- Texturizing spray
- Fine toothed comb
- Hair elastics
How To Style
- Tease down all the hair at the top of your head.
- Smoothen the hair above the teased hair with the help of a fine toothed comb.
- Grab 3 inch sections of hair from both sides of your head, twist them a couple of times, and tie them into a half ponytail at the back of your head.
- Create a gap above your half ponytail with the help of your fingers and flip your ponytail into it. This is called ‘topsy-tailing’.
- Split your half ponytail into 2 sections to fishtail braid it.
- To do so, take a thin section of hair from the outside of the left section and add it to the inside of the right section.
- Then, take a thin section of hair from the outside of the right section and add it to the inside of the left section.
- Keep repeating steps 6 and 7 alternately until you’ve braided all your hair.
- Secure the end of your braid with a hair elastic to finish off the look.
36. Accented Side Braid

You don’t always have to go for complicated hairstyles when braiding your hair. Here’s an easy way that you can shake up your braid style. Just adding 2 small accent braids to your regular braid will make people sit up and take notice of your style game. And you can try your own variations of this trick, with different kinds and number of accent braids, to suit your own personal style!
What You Need
Hair elastics
How To Style
- Part your hair on one side.
- From the side with more hair, pick up a ½ inch section of hair, do a simple 3 strand braid with it, and secure it at the end with a hair elastic.
- Repeat the previous step with another section of hair right next to the first one.
- Now gather all your hair on one side and simply braid it till the end, the small braids being a part of the first strand.
- Secure the end with a hair elastic and pull apart the braid to finish the look.
37. Twisted Fishtail Side Braid

How about trying different braid styles for long hair that is fit to be paired with a grown? Yes! A braid with a gown! Never thought those two could be paired together, did you? Well, this twisted and bubbled fishtail braid style is so elegant and pretty that it seems to just belong in a ballroom.
What You Need
- Hair elastics
- Bobby pins
How To Style
- Gather all your hair onto one side and tie it into a low side ponytail.
- Wrap a thin section of hair around the base of your ponytail and pin it in place to hide the hair elastic from view.
- Split your ponytail into 2 sections and make a fishtail braid by alternately picking up a thin section of hair from the outer side of one section and adding it to inner side of the other section.
- Tie a hair elastic after fishtail braiding for about 2-3 inches.
- Keep repeating steps 3 and 4 until you reach the end of your hair.
- When you are tying your last hair elastic, do not pull out all your hair at the last twist. Just leave the tail of your braid in a loop to finish off the look.
38. Half Up Fishtail Do

Going for a casual coffee meet-up with friends but still want your style game to be on point? Throw your hair into a half fishtail braid and a couple of simple braids that make for a super cute and easy hairstyle that can be paired with a casual denim jacket and jeans.
What You Need
- Heat protectant
- 1 inch curling iron
- Hair elastics
- Sea salt spray
How To Style
- Apply some heat protectant all over your washed, dried hair.
- Curl the lower half of all your hair.
- Tie half your hair into a ponytail and split it into 2 sections to fishtail braid it.
- Alternately, take a few strands of hair from the outer side of one section and add it to the inner side of the other section until you have braided right till the end. Secure it with a hair elastic.
- Pancake the fishtail braid to give it a super wide look.
- Do two simple 3 strand braids on either side of your fishtail braid with 2 inch sections of hair to accent the style.
- Spritz on some sea salt spray to give your hair some texture and finish off the look.
39. Khaleesi Braid

*Suppresses the urge to scream “Where are my dragons?!”* Besides being totally badass and the Mother of Dragons, Khaleesi (a.k.a. Daenerys Targaryen) is also #goals when it comes to hair styling. This is but out humble attempt to recreate her iconic Dutch braided style.
What You Need
- Texturizing spray
- Hair elastics
- Bobby pins
How To Style
- Prep your washed, dried hair with some texturizing spray.
- Part your hair down the middle.
- Pick up a 2 inch section of hair from near your left temple, split it into 3 strands, and Dutch braid it by flipping the side strands under the middle strand and adding more hair from the top of your head with each subsequent stitch.
- Once your Dutch braid has reached the crown of your head, simply braid the rest of the way down and secure the end with a hair elastic.
- Repeat steps 3 and 4 on the right side.
- Now, pick up a 2 inch section of hair from near your left ear and Dutch braid it by adding hair from both sides.
- Once your Dutch braid has reached your neck, simply braid it till the end and secure it with a hair elastic.
- Repeat steps 6 and 7 on the right side.
- Tie the top 2 Dutch braids together with a hair elastic.
- With the side Dutch braids acting as the side strands and the 2 combined Dutch braids acting as the middle strand, braid all the 3 braids together and secure them at the end with a hair elastic.
- From the loose hair that is left at the nape of your neck, pick up a thin section of hair and wrap and pin it at the base of your braids.
- Take all the left over loose hair and wrap it around the length of your braid. Pin it around the hair elastic at the end to hide it from view.
40. Messy Pigtail Braids
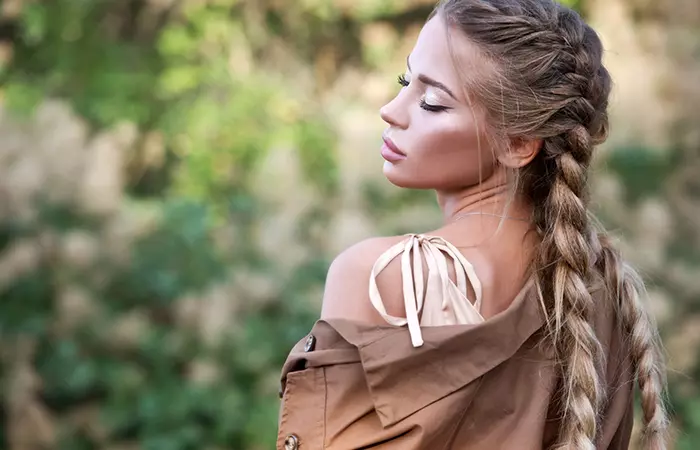
I’ve said this before and I’ll say it again – just because you’re all grown up now doesn’t mean you have to leave all your childhood styles behind. These Dutch braids make for super cute pigtails and are perfect for a night with your bae, all cozied up in a sweater and sipping hot chocolate, and listening to chill music.
What You Need
Hair elastics
How To Style
- Part your hair down the middle and split all your hair into 2 parts, one on each side.
- From your left section, pick up a 2 inch section of hair from near your temple and split it into 3 strands to Dutch braid it.
- To do so, braid the hair by flipping the side strands under the middle strand and adding more hair to the braid with each subsequent stitch.
- Once your Dutch braid has reached the nape of your neck, simply braid it the rest of the way down and secure it at the end with a hair elastic.
- Repeat steps 2 to 4 on the right side.
- Pancake and pull apart your braids to give them a relaxed, boho feel and finish off the look.
41. Braid In A Side Braid

Yes, we know you don’t have all the time in the world while dressing up in the morning. But it’s nice to put in just a little more effort to look more polished, isn’t it? And you don’t even have to do much! Doing this braid braided into a braid style is as easy as it gets!
What You Need
Hair elastics
How To Style
- Part your hair on one side.
- Take a 2 inch section of hair from the nape of your neck, braid it right till the end, and secure it with a hair elastic.
- With the little braid acting as the third strand, and the rest of your hair split into the other 2 strands, braid your hair and secure it at the end with a hair elastic.
- Pull apart your braid to give it a more relaxed feel and finish off the look.
42. Fishtail Pony Braid
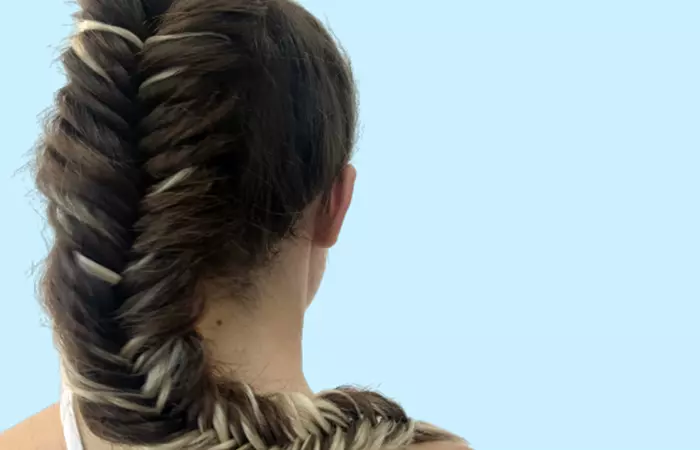
When I braid my hair, I always have this nagging thought that it is going to get loose and unravel completely. The perfect way to prevent this from happening is to throw your hair into a ponytail before braiding it. Simple and effective! This fashionable fishtail braid ponytail pairs perfectly with summer sun dresses as well as warm winter jumpers.
What You Need
- Paddle brush
- Texturizing spray
- Hair elastics
How To Style
- Prep your washed, dried hair with some texturizing spray.
- Brush back all your hair and tie it into a high ponytail.
- Split your hair into 2 sections to fishtail braid it.
- Start fishtail braiding your ponytail from about 2 inches below its base. Begin by alternately picking up a thin section of hair from the outer side of one braid and adding it to the inner side of the other section.
- Once your braid has reached the end of your ponytail, secure it with a hair elastic.
- Pancake and loosen your braid to make it look super loose and relaxed.
43. Rapunzel Braid

Every girl wishes to be a Disney princess at some point and Rapunzel, with her long, gorgeous hair, tops the list. Although it’s not be practical to grow one’s hair long enough to drop down a castle window, you can try recreating her beautiful braid and deck it up with flowers.
What You Need
- Comb
- Hair spray
- Hair ties
- Hair decoratives
How To Style
- Brush the hair backward and prep it with some hair spray for hold.
- Take a small section of hair from the crown and tie it into a semi-ponytail at the back of the head.
- Make a 1-inch section of hair from both sides, slightly above the ears, and secure with an elastic tie below the previous one.
- Repeat the same till you reach towards the end of the hair.
- Pancake and fluff the braids by tugging to create a voluminous look.
You’ll notice that many of these hairstyles incorporate common braids like the French braid. So we recommend that you start practicing those common braid styles to perfect these cool long hair braids. A fashion blogger shares how she likes to try numerous braid styles with her long tresses. She writes, “Yes, it’s been around forever, but I tried out a simple french braid. Small steps and all that (i).” She adds, “Although the sheer length of my hair made me take around 20 minutes which is more than the entire amount of time I spend on getting ready!”
Infographic: 10 “Must Try” Braided Hairstyles
Braids come in all shapes and sizes, but all the varied styles have something in common — they are all super feminine and can make you look all dressed up with minimum effort. But with so many options, you may be a little overwhelmed. Check out the infographic below to find a selection of the must-try braiding styles for every occasion! Illustration: StyleCraze Design Team
Remember those days when you sported a plain three-strand braid to school! Now, everyone has a personalized version of the braid! From a French braid to braid twists, let us simplify things for you if you are baffled by the umpteen types of braids. It can be a wedding or a business meeting, going to the gym or on a date, you can find a braid for every occasion. Braids are a protective hairstyle that shield your hair from damage. Also, on those days when you have not washed your hair but suddenly have to go somewhere – braids can be a life-saver! And you can pair it with literally any other hairstyle: ponytails, updos, twists, and loose hair. Braids offer endless possibilities for those looking for hairstyles for girls with long hair. Not to mention, there is a braid for every mood – messy, neat, and everything in between. That is how versatile braids are!
Frequently Asked Questions
What is the easiest braid to do?
Classic three-strand braid is the easiest braid to do.
What are lemonade braids?
Lemonade braids came into the picture in 2016, when Beyonce released her visual album Lemonade. This protective hairstyle is fashioned by side-swept cornrows.
What is a butterfly braid?
A butterfly braid is made of two large braids on each side of your head that create a single braid on the back of the head.
What are knotless braids?
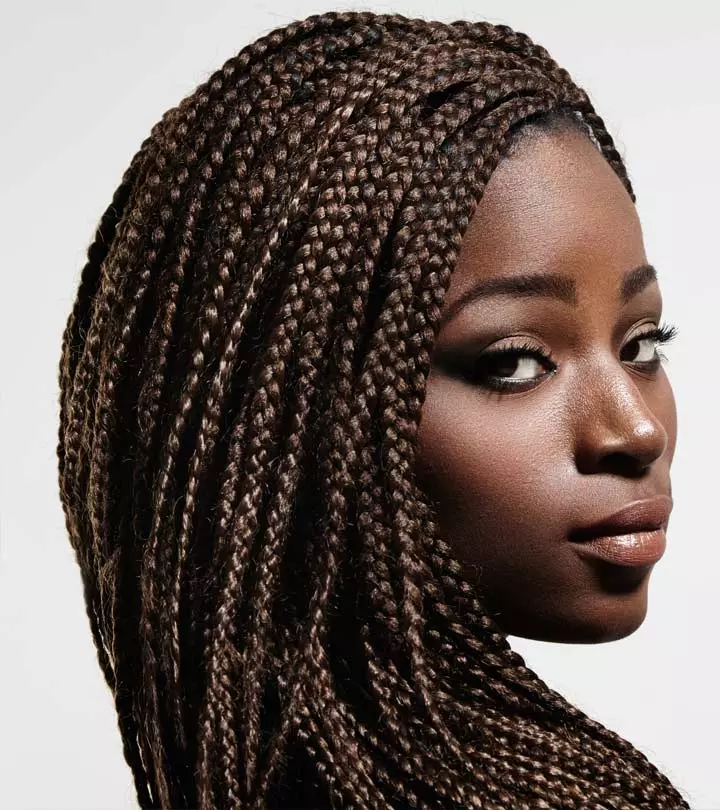
Knotless braids do not include a single knot and are like traditional three-strand box braids. This hairstyle may help prevent traction alopecia.
What is the difference between Goddess braids and bohemian braids?
Nothing. Goddess and bohemian braids are the same.
Key Takeaways
- Braiding is one of the best hairstyling techniques to help manage long hair while also ensuring it looks attractive.
- You can experiment with creative braiding styles like Dutch braids, French braids, fishtail braids, four-strand braids, and so on.
- Apply the pancake technique, which involves tugging at individual braid stitches, to loosen the braid and give it volume.
- Use a good holding spray to keep loose braided hairstyles in place.
Illustration: Braided Hairstyles For Long Hair
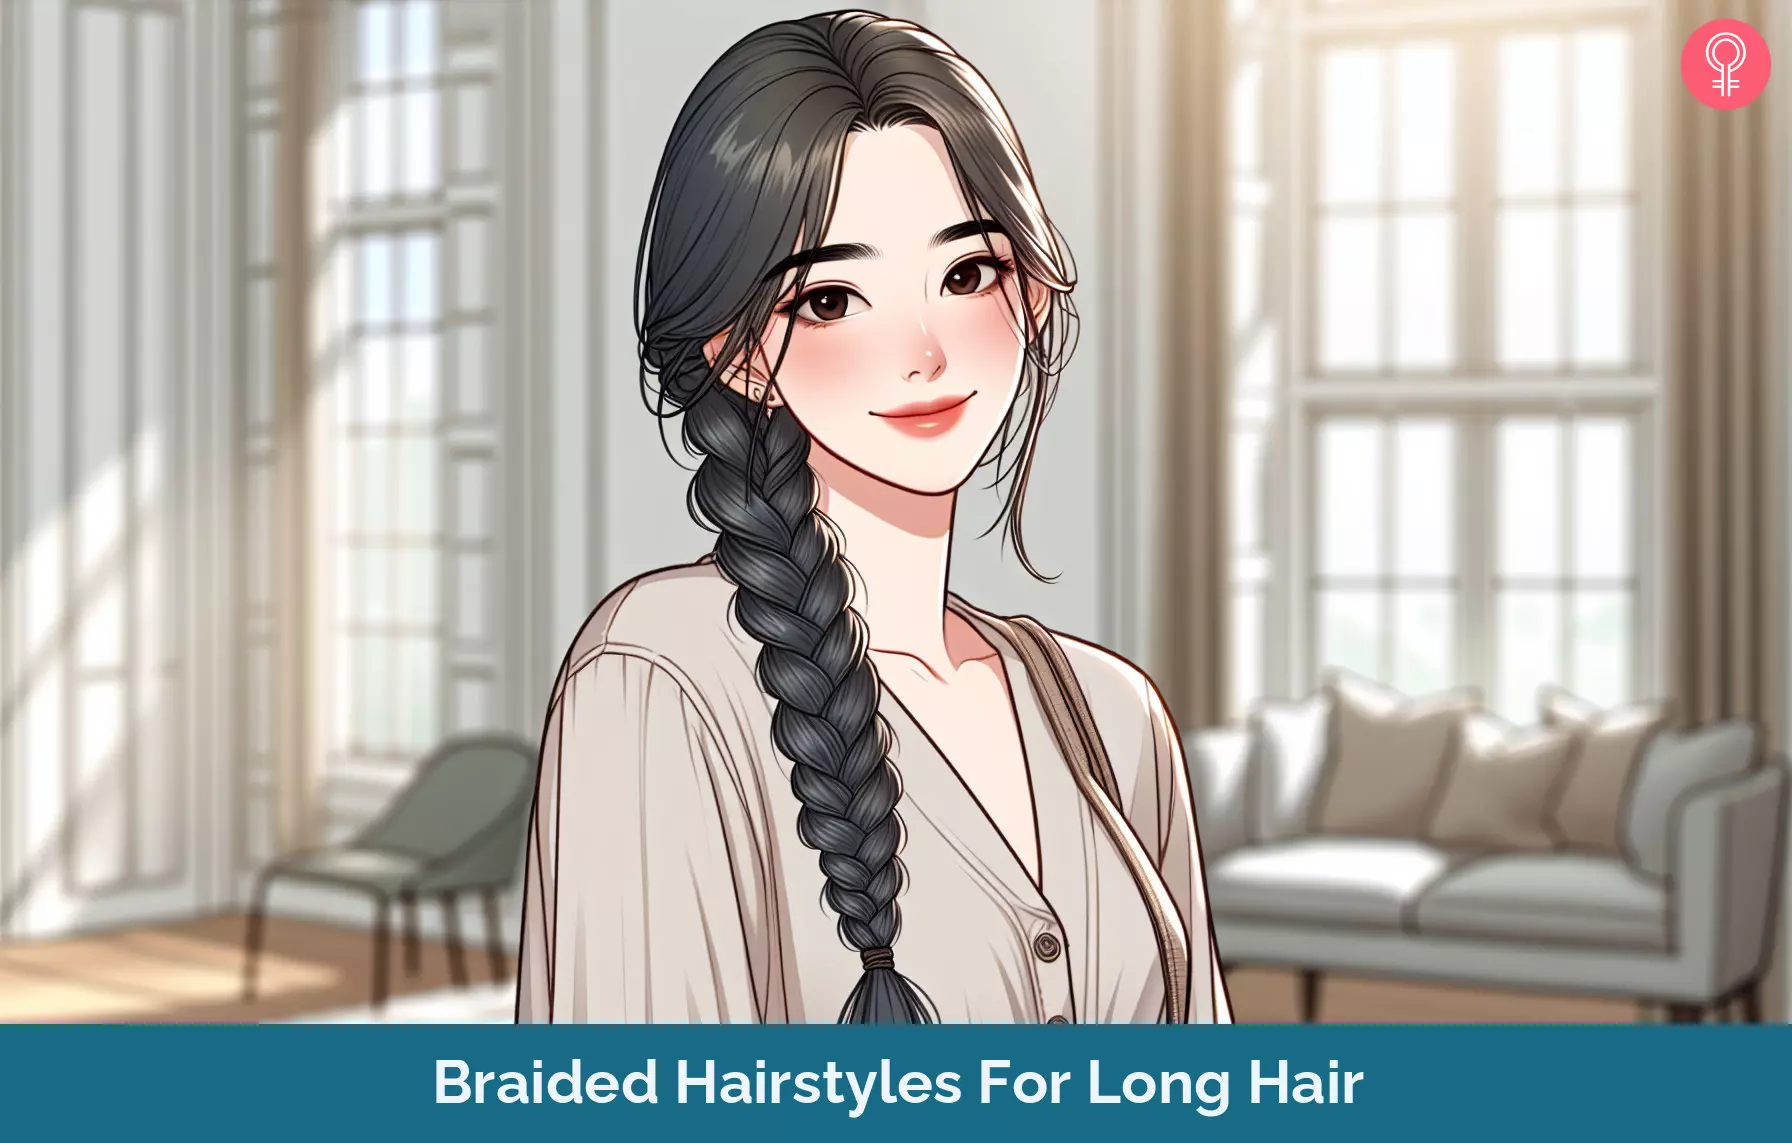
Image: Dall·E/StyleCraze Design Team
Learn how to achieve the gorgeous 2-minute rope braid hairstyle! Quick and easy, this tutorial will have you rocking a stylish look in no time. Get ready to slay!
Personal Experience: Source
StyleCraze's articles are interwoven with authentic personal narratives that provide depth and resonance to our content. Below are the sources of the personal accounts referenced in this article.
i. Braid Away! Inspired to braid.https://quirkyengineer.blogspot.com/2013/06/braid-away-inspired-to-braid.html
Read full bio of Laura Clark
Read full bio of Arshiya Syeda
Read full bio of Subhrojyoti Mukherjee
Read full bio of Aparna Harry






Community Experiences
Join the conversation and become a part of our empowering community! Share your stories, experiences, and insights to connect with other beauty, lifestyle, and health enthusiasts.