How To Get Wavy Hair: 10 Easy Techniques For Beach-Ready Waves
You will be surprised at the simple techniques you can use to get this dreamy hairdo.

Image: Midjourney/ StyleCraze Design Team
When you plan to go to the beach, you picture yourself lying on the sand, soaking in the sun as the rays reflect off your perfect beach wavy hair. But when most of us try adding waves to our tresses, it either becomes too curly or not wavy enough. So, here it is – the perfect guide on how to get wavy hair effortlessly! Sometimes hair curling irons and other hair styling tools may not give you the natural-looking wavy or curly tresses you crave.

We searched far and wide on the web and found 10 easy techniques you can use to make your hair naturally wavy. So, what are you waiting for? Scroll down, pick your favorite technique and get to waving those amazing tresses!
 Before You Get Started
- Wavy hair looks excellent on a triangle face shape as it shifts the focus away from the jawline.
- If you have a round face, waves can make your hair look thicker and your face leaner.
- Avoid overwashing your hair in order to retain the wavy hair texture for a longer period of time. You can use a dry shampoo to avoid a greasy look.
- Sleep on a satin pillowcase to prevent the waviness from getting disrupted and to prevent frizz.
In This Article
How To Get Wavy Hair – 10 Easy Techniques
Using a diffuser is a great way to get natural-looking curls and wavy hair. Celebrity Stylist Nick Arrojo says, “The diffuser takes away all the air of a blow dryer but keeps all the heat, which encourages curl expansion. It will dry curly hair without blowing on it, using heat to lock the curl in place. If you have some wave or curl in your hair (most of us do!) and want to accentuate this look, a diffuser is a great way to go.”
Apart from using a diffuser, you can also try different techniques to get beautiful beachy waves. Scroll down to learn more.
1. Princess Leia Buns Technique
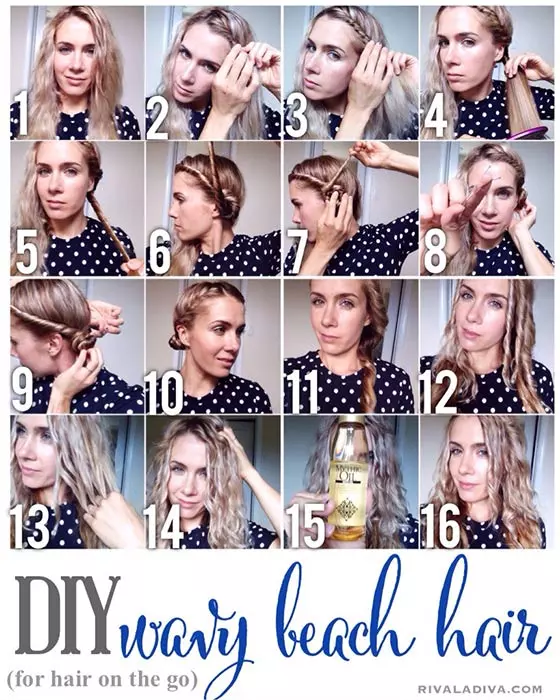
The force will surely be with you when you embark on this journey to get wavy hair. All you need to do is roll up your hair into 2 buns (a la Princess Leia) and you will end up with the hair of your dreams the next morning! This hairstyle is easy to do and requires no heat. If you like natural hair, this is the style you should go for.
What You Need
- Hair brush
- Anti-frizz serum
- Bobby pins
How To Style
- Brush out all the knots and tangles from your hair while it is still damp.
- Apply anti-frizz serum to your hair to prevent it from frizzing up as it dries.
- Part your hair down the middle.
- Pick up a 2 inch section of hair from right near the left side of your parting.
- Start twisting it while adding more and more hair to it from both sides.
- Once this twisted section of hair has gone past your ear, twist the hair the rest of the way down until the very end.
- Roll this twisted hair into a bun and pin it down behind your ear. You could also use some hair elastics to further secure it in place.
- Repeat the same process on the right side.
- Sleep with these twisted buns in your hair overnight.
- Next morning, open up your buns and shake your hair out.
- Rub a little bit of Argan oil all over your wavy hair to give it some shine.
2. The Hair Knotting Technique
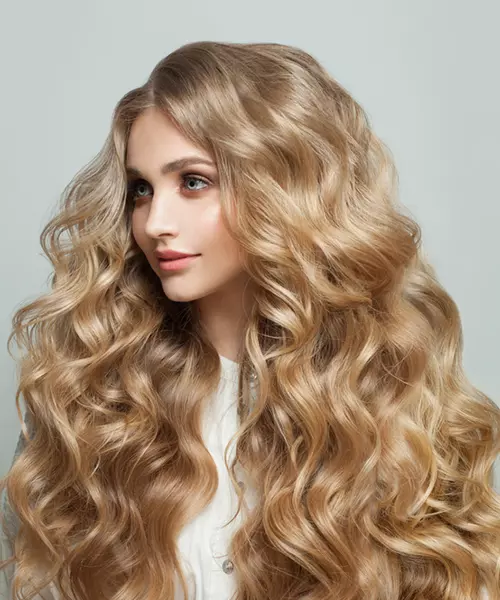
I love it when I find a completely new hairstyling technique. And this particular one is so ingenious that I can’t believe I didn’t think of it myself. Like, seriously, whoever thought of knotting their hair to curl it is a genius.
What You Need
- Hair brush
- Claw clips or double prong clips
- Hairspray
How To Style
- Brush out all knots and tangles from your damp hair.
- Grab a 3 inch section of hair from the front and create a loop with it near the roots.
- Pull the tail end of the hair through the loop, but not all the way through.
- Clip this knotted section of hair to your head.
- Create such knots with all your hair.
- Leave the knots in for a few hours until your hair dries.
- Spritz on some hairspray before opening the knots.
- Brush out your hair to give your waves a softer look.
3. Twisted Crown Technique
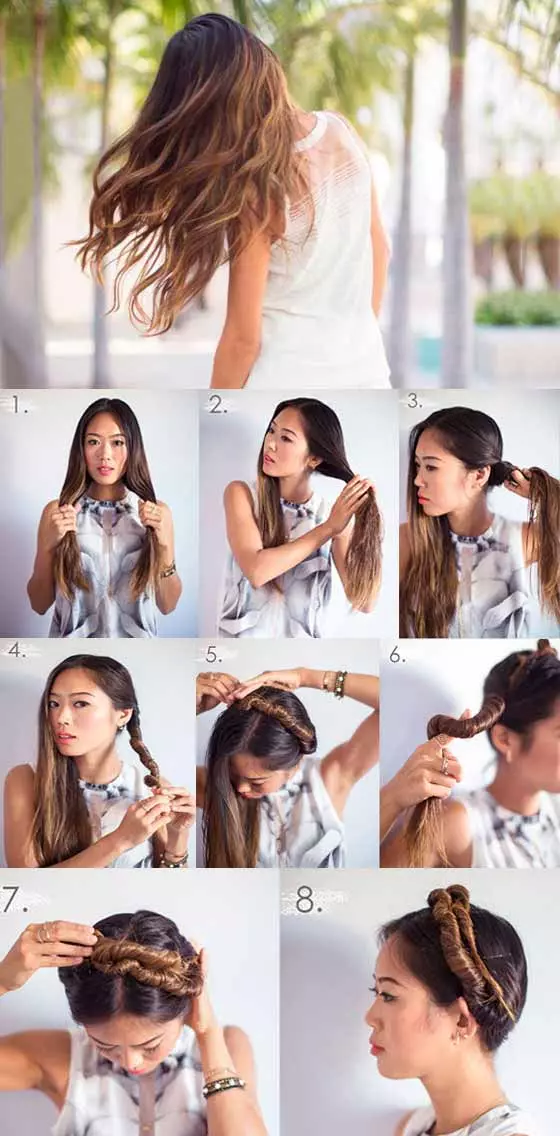
Girl, you are a queen, and anything you do needs to be fit for royalty. This twisted hair technique will make your hair look like a crown sitting atop your head while you snooze. Unravel the crown and you end up with amazingly wavy hair.
What You Need
- Bobby pins
- U-pins
- Light hold hairspray
How To Style
- Part your damp hair down the middle and divide it into 2 sections, one on each side.
- Simply twist the hair on your left, right until the very ends.
- Place this twisted hair across the crown of your head and pin it behind your right ear.
- Insert more bobby pins and U-pins to further secure it in place.
- Repeat steps 2 to 4 on the right side.
- Keep these crown twist in your hair overnight.
- Spritz on some light hold hairspray over your hair before unraveling it and shaking out the waves.
4. The Scarf Technique
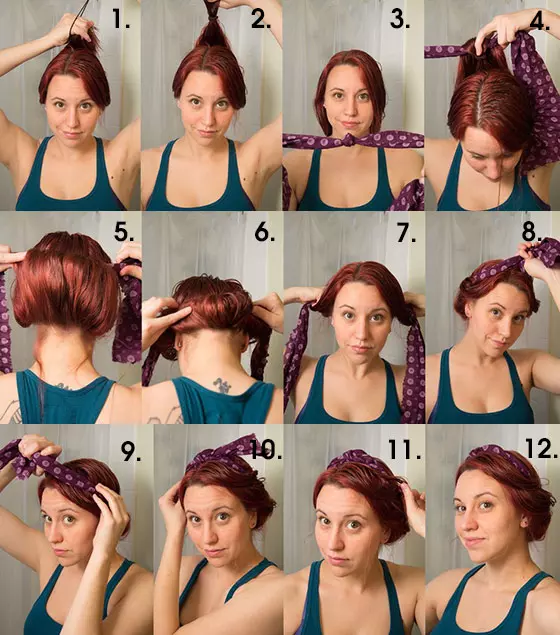
Now here’s a style you can sport while still creating waves with it. This scarf hairdo makes for an adorable pin-up style, and once you open it, your hair will be its best wavy self.
What You Need
- Texturizing spray
- A scarf
- Hair elastic
How To Style
1. Spritz on texturizing spray all over your damp hair.
2. Tie a hair elastic just a couple of inches above the ends of your hair.
3. Tie a knot at the center point of your scarf.
4. Hold your scarf behind your head and flip the end of your ponytail over it.
5. Start rolling the scarf towards your head while wrapping your hair around it.
6. When you have reached the roots of your hair, tie the end of the scarf at the top of your head.
7. Sleep with this wrapped up hair overnight and remove it in the morning to get gorgeous wavy hair.
 Quick Tip
5. The Straightened Braids Technique
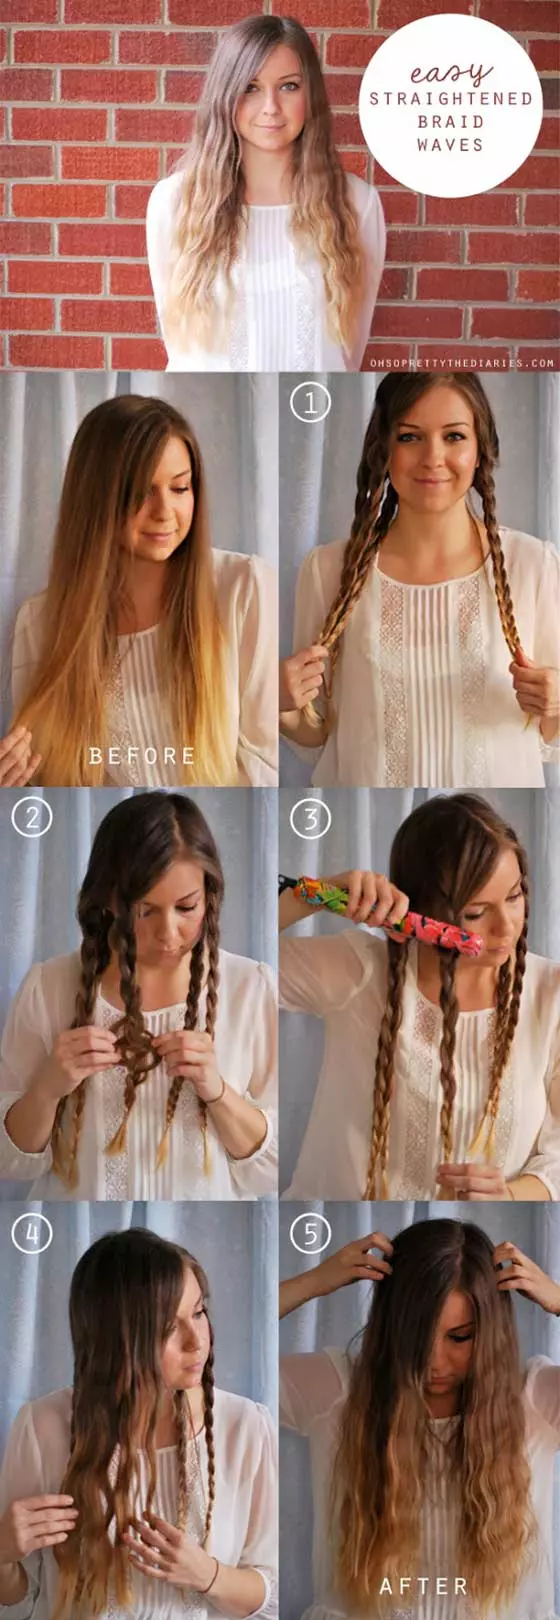
For those who prefer using heat tools, creating beach waves with a straightener is a great option. With a few twists of the wrist, you can transform straight hair into beautifully waved locks. Now here’s an innovative way to get that wavy hair in a jiffy. This technique requires some straightening, but gives some well-defined waves and oodles of oomph to your hair.
What You Need
- Hair elastics
- Hair straightener
- Light hold hairspray
How To Style
- Starting out with dry hair, tie all your hair into several braids, depending on how thick and long your hair is.
- Loosen your braids to make them as flat as possible.
- Clamp down your hair straightening iron at the very top of your first braids and hold it there for a few seconds.
- Then move down your braid a little, clamp your iron down again, and hold it there for a few seconds.
- Keep repeating this until you’ve reached the end of your braid.
- Repeat this procedure with all your braids.
- Spray on some light hold hairspray before opening your braids.
- Shake out your hair to create more volume in your waves.
6. The Hair Scrunching Technique
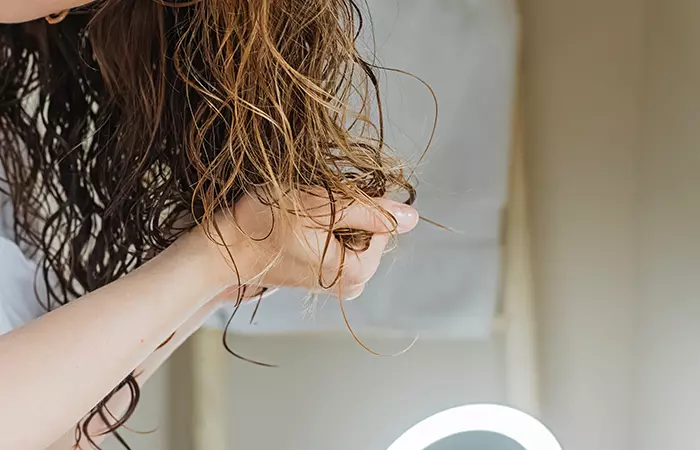
Looking for a sexy way to sport wavy hair? Hair scrunching is what you need to do! And the best part? No comb, no brush, no clips. Your hands are all you need! Here are the steps to get scrunchy hair:
What You Need
- Volumizing mousse
- Towel
How To Style
- Apply a dollop of volumizing mousse to your hair right after you step out of the shower.
- Towel dry your hair as much as possible.
- Bend your head forward so that your hair falls in front of you.
- Now start scrunching your hair from the ends by balling it up in your hands and squeezing it for a few seconds.
- Keep doing this every 10 minutes until your hair dries completely.
7. The Snake Braiding Technique

OK, ladies. Get your nimble fingers ready for this insane braiding technique. This Dutch braid that snakes around your head makes for a really cool hairstyle all by itself before it is opened to unravel your wavy hair.
What You Need
- Hair elastic
- Light hold hairspray
- Hair brush
How To Style
- Brush out your damp hair to remove all knots and tangles.
- Flip all your hair forward, in front of your head.
- From near your left ear, at the nape of your neck, start Dutch braiding your hair in a horizontal manner.
- To do so, pick up a 2 inch section of hair and divide it into 3 strands.
- Braid this hair by flipping the side strands under the middle strand and adding more hair to the braid with each subsequent strand.
- Once your Dutch braid has reached near your right ear, change your pattern and continue braiding in the opposite direction.
- Keep braiding this way so that all your hair is braided in a ‘snake’ pattern.
- Once you’ve run out of hair to add to the braid, simple braid the rest of the hair down. Pin this tail of your braid to your head.
- Leave this ‘snake’ braid in until your hair is dry.
- Spritz on some hairspray before opening your braid.
- Brush out your hair to reveal gorgeous, wavy hair.
8. The Fishtail Braid Technique
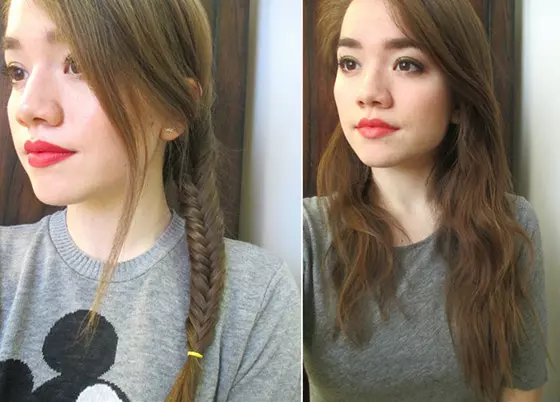
Perhaps the easiest style out here, the fishtail braid technique gives the chicest waves in the simplest way possible. What do you need to do? Just fishtail braid your hair. That’s it.
What You Need
- Texturizing spray
- Hair elastic
How To Style
- Spray texturizing spray all over your almost-dry hair.
- Split your hair into 2 sections.
- Take a thin section of hair from the outer side of your left section and add it to the inner side of your right section.
- Take a thin section of hair from the outer side of your right section and add it to the inner side of your left section.
- Keep repeating steps 3 and 4 alternately until you reach the end of your braid, then secure it with a hair elastic.
- Sleep in with this braid overnight.
- Next morning, open your braid and shake out your hair to unravel your waves.
9. The Friar Tuck Technique
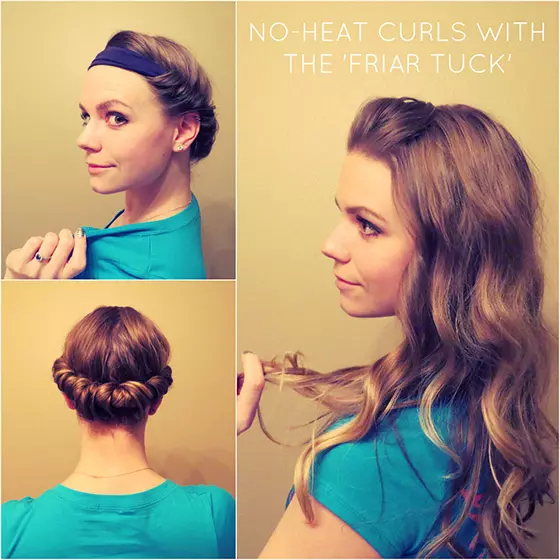
You would be surprised how many ways an elasticated headband can come in handy. One great use for it is to create super defined waves in your hair. Another is to use it as a slingshot to attack your enemies.
What You Need
- Hair brush
- Sea salt spray
- Elasticated headband
- Silk scarf
- Dry shampoo
How To Style
- Brush out all the knots and tangles from your dry hair.
- Part your hair down the middle.
- Dampen your hair by spritzing on sea salt spray over it.
- Put on your headband in such a way that it lies across your forehead, and all your hair lies under it.
- Pick up a 2 inch section of hair from your left side, flip it up and tuck it under the headband.
- Now add more hair to that section and flip and tuck it the same way.
- Keep repeating steps 5 and 6 until your reach the back of your head.
- Then repeat the whole tucking procedure on the right side.
- Tie a silk scarf around your hair to prevent it from frizzing and leave it on overnight.
- Next morning, remove all your hair from the headband and brush out your tangles.
- Finish off by spritzing on some dry shampoo to give your waves more hold.
10. The Flat Iron Technique
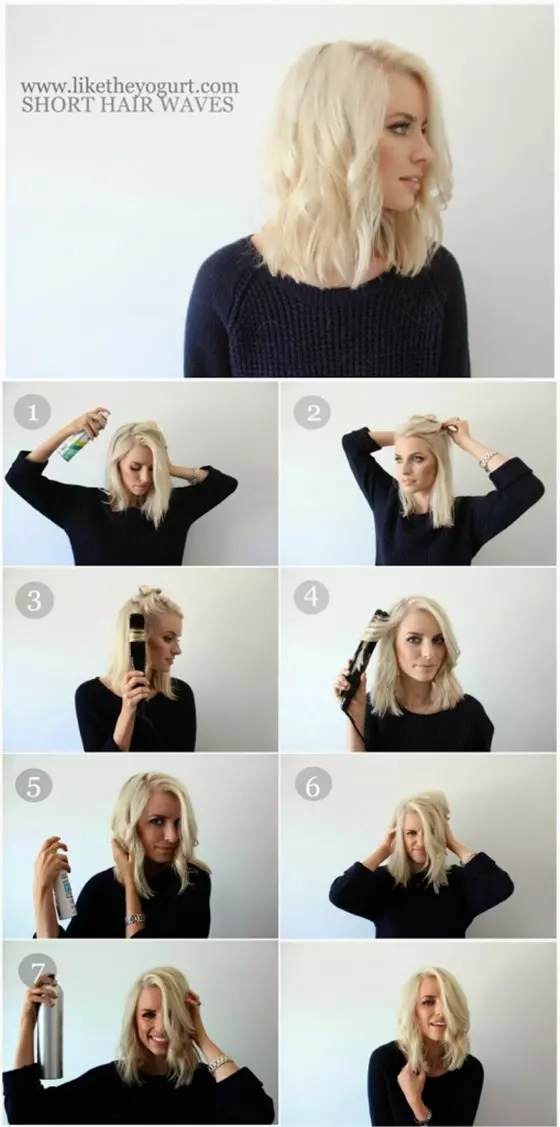
I get it. Sometimes you make your hair decisions at the very last minute. This wavy hair technique is for one of those days. Because you can’t possible wait a few hours to style your hair into waves, this flat iron technique will give you results in just minutes!
What You Need
- Dry shampoo
- 1.5 inch flat iron
- Sea salt spray
- Light hold hairspray
How To Style
- Start off by spraying dry shampoo at the roots of your hair.
- Section off the top half of your hair.
- With a flat iron, curl the lower half of the loose hair at the bottom.
- Unclip the hair on top and repeat the previous step.
- Spritz on some sea salt spray and scrunch your hair with your hands to give your waves some more texture.
- Finish off with some hairspray to prevent your waves from unraveling through the day.
These hair styling methods are sure to give you the waves of your dreams! Additionally, there are some common mistakes you should avoid to get gorgeous, bouncy waves. Learn more in the next section!
Common Mistakes To Avoid
Here are common mistakes that you can avoid to get those classic waves you so desire:
- Applying Too Much Serum: Applying too much anti-frizz serum can weigh down your hair, making your waves look flat and greasy. While applying anti-frizz serum to your hair, make sure to use it on clean, damp locks. Take only 1-2 drops of serum in your palms and warm it between your palms for a few seconds. Next, apply it to your hair from the ends and work it up to the middle. Try to spread the product evenly across your mane either with your fingers or a wide-toothed comb.
- Leaving Hair Knotted/Twisted/ Braided For Too Long: Prolonged tension or tying hair too tight can cause damage to the hair shaft and follicle, and when done repeatedly can lead to Traction alopecia (1).
- Using Hairspray The Wrong Way: Always make sure to hold the hairspray at least 30 cm away from your hair. If you want to add some extra volume to your mane, flip your hair over and spray the product in a continuous motion while gently shaking your locks.
- Using High Heat Settings: Using styling tools, like a curler or flat-iron, on high-heat settings can cause your hair to break, thin down, or burn and even destroy hair keratin (2). You should apply a heat protectant spray or cream before styling your locks to prevent heat damage. Then set your styling tool on a low heat setting. Increase the temperature gradually, if required, rather than starting from a high temperature. Always use curling or straight iron on dry hair.
Key Takeaways
- Using a diffuser is one of the simplest ways to get natural-looking waves.
- You can use different techniques such as the Princess Leia bun, hair knotting, and twisted crown to get waves.
- You may use a flat iron along with dry shampoo, sea salt spray, and light-hold spray to achieve natural-looking waves in minutes.
- Hairstyles such as long layers and feather cut can help you flaunt your waves proudly.
Tips To Keep Your Hair Wavy
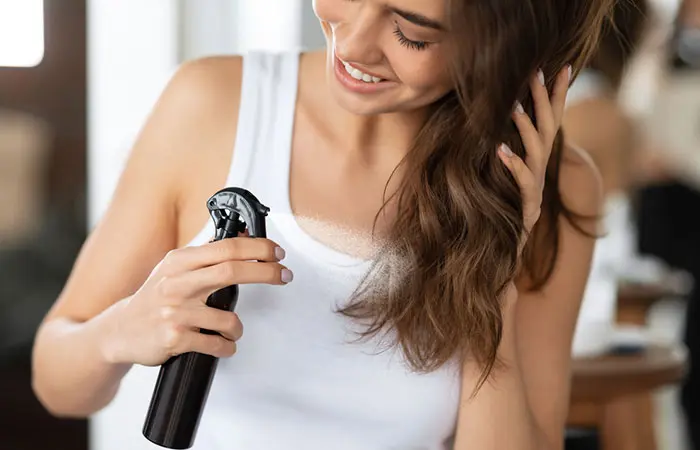
Here are some tips that will help you enhance the longevity of those beautiful waves:
- Start With Damp Hair
If you want to create waves without heat, starting with slightly damp hair is key. This helps set the wave pattern as your hair dries naturally.
- Use Sea Salt Spray
Apply sea salt spray or texturizing spray to damp hair. Scrunch it with your hands to enhance waves. This method gives you beachy, undone waves and works well on naturally wavy or fine hair.
- Braid Loosely While Sleeping
Loose braiding will help maintain the waves without scrunching them out further or flattening them.
- Avoid Brushing
Brushing or excessive touching can straighten your tresses. To preserve the style, lightly detangle or set it with your fingers when needed.
- Avoid Heavy Products
Always use a light hair spray to set the waves. Avoid heavy or greasy products that can weigh your hair down.
By following these tips and using the right products, you can maintain gorgeous, wavy hair for longer.
 Quick Tip
Infographic: Wavy Hairstyles To Try
The above points prove that it is easy to create waves for your locks. Wavy hair not only looks elegant, but it is also easy to carry. Now that you know how to get wavy hair, you need some hairstyles to flaunt those waves better.
Check out our infographic below to discover all the amazing hairstyles you can try.
Some thing wrong with infographic shortcode. please verify shortcode syntax
Summer calls for perfectly tousled wavy hair. From light waves to messy waves, each of these tutorials shows you how to get wavy hair. Waves not only make your hair look voluminous, but they can also be used to add texture to unwashed hair. Make sure you read each tutorial carefully as some of them require keeping the hairstyles in overnight to style your hair in flawless waves. You can also use these tutorials to accentuate your naturally wavy hair. Remember to use hair products like a holding spray, gel, or hair mousse to maintain the waves for a long time.
Frequently Asked Questions
What are the best techniques for getting waves on different hair types?
For fine hair, techniques like Hair Knotting or Hair Scrunching are ideal, as they add volume without heaviness. For thick hair, techniques like the Flat Iron may be more effective for defined waves.
What causes wavy hair naturally?
Natural wavy hair is caused by multiple factors such as genetics, humidity, pregnancy hormones, menopause, or puberty.
How do you make wet hair curly?
You cannot make wet hair permanently curly as it may damage your strands. You can braid or twist damp, detangled hair and leave it overnight to achieve a naturally loose curl look.
Does salt make hair wavy?
Yes, both normal salt and sea salt can make hair wavy. The water molecules from damp hair get attracted to salt compounds that shrinks hair strands to make it more naturally wavy.
Is there a way to get wavy hair permanently?
Yes, you can try a wavy perm treatment that uses a chemical solution to break down your natural hair structure and make it wavy.
Illustration: Easy Ways To Get Wavy Hair At Home

Image: Stable Diffusion/StyleCraze Design Team
Say goodbye to heat damage and hello to effortlessly chic waves! Check out this video to unlock the secrets to achieving gorgeous heatless wavy hair.
References
Articles on StyleCraze are backed by verified information from peer-reviewed and academic research papers, reputed organizations, research institutions, and medical associations to ensure accuracy and relevance. Read our editorial policy to learn more.
- The art of prevention: It’s too tight—Loosen up and let your hair down
https://pmc.ncbi.nlm.nih.gov/articles/PMC8072502/ - The effect of various cosmetic pretreatments on protecting hair from thermal damage by hot flat ironing
https://pubmed.ncbi.nlm.nih.gov/21635854/
Read full bio of Nick Arrojo
Read full bio of Arshiya Syeda
Read full bio of Asmita De
Read full bio of Joyce Joyson











Community Experiences
Join the conversation and become a part of our empowering community! Share your stories, experiences, and insights to connect with other beauty, lifestyle, and health enthusiasts.