23 Awesome Hairstyles For Girls With Long Hair
Style your long, enviable hair in attractive and trendy ways with our easy tutorials.
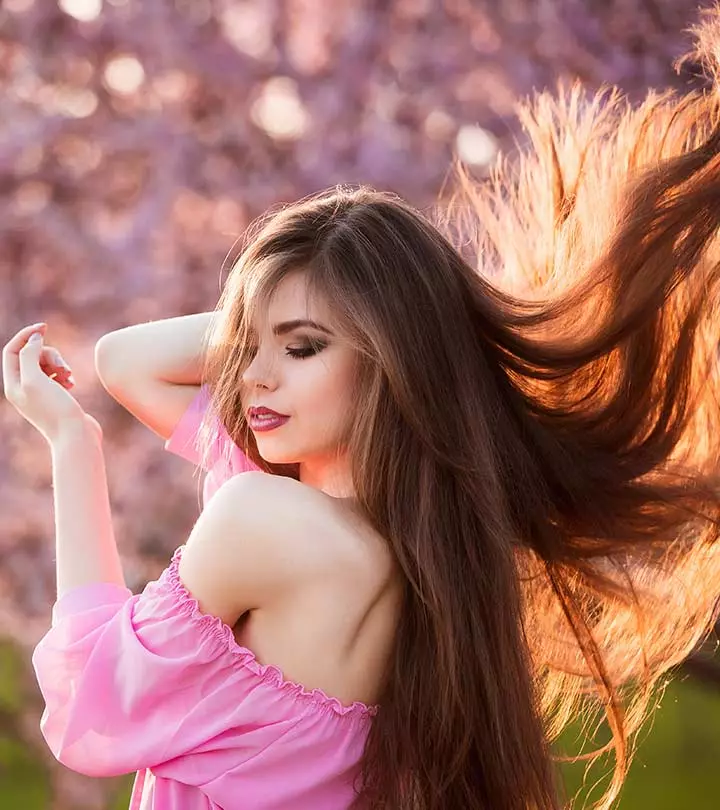
Image: Shutterstock
Having long hair is both a blessing and a curse. While people around you are in awe of your hair, only you know what it takes to style it. Finding hairstyles for girls with long hair is not as easy as it sounds as it requires a fair bit of time, effort, and skill on your part. Some even feel like getting rid of their locks with the scissors. But, don’t take any drastic steps! Never take any decisions in haste as far as your hair is concerned. You may regret it soon after. With the proper techniques and products, you can easily style your long hair in beautiful ways that are perfect for any occasion. If you are looking for some cute and simple hairstyles for girls with long hair, you have come to the right place for advice. In this article, we have come up with a list of the 23 easiest hairstyles for long hair, a step-by-step guide on how to do them, and more. So, let us get started!
 Before You Get Started
- Long haircuts for girls are easier to maintain than shorter ones. However, they also need regular trims to avoid split ends and tangles.
- Brush your hair twice daily to ensure it is healthy for all the styling strain.
- Do not tie hair too tightly or pull at your hair. This can lead to breakage.
- Add more layers to your hair for a more flattering and textured look.
- Keep anti-frizz serums or conditioners handy for non-layered long hair.
In This Article
23 Awesome Hairstyles For Girls With Long Hair
1. Pull Through Braid
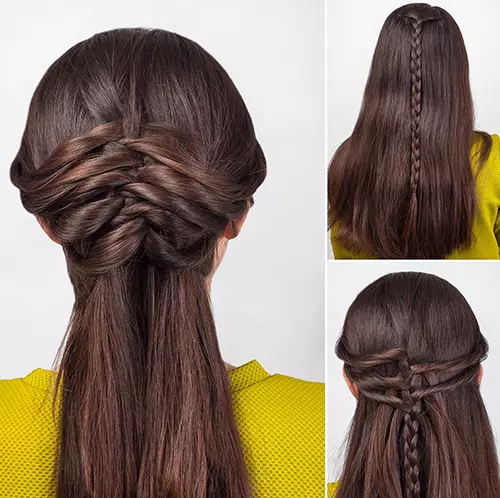
Long for an effortless, feminine look but short on time? This intricate-looking braid might seem daunting, but it can be recreated in 10 minutes. Perfect for a regular day or a special event, this elegant style looks best on long hair and promises stunning results. With this hairstyle for girls, you can add a touch of femininity to your look and turn heads wherever you go.
What You Need
- Hairbrush
- Bobby pins
- Hair elastic
- Hairspray
How To Style
- Detangle your hair and part it as desired or comb it back.
- Take a small section of hair at the crown and create a three-strand braid at the crown and secure it with an elastic.
- Take a small section of hair from one side just above your ear and pull it all the way through the braid.
- Keep doing this equally on both sides until you achieve your desired pattern.
- Secure the braid with bobby pins and set it with hairspray.
2. Upside Down Dutch Braided Bun
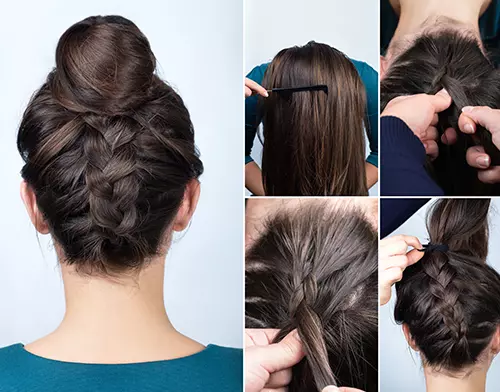
Nothing says a stylishly stunning look like an upside-down Dutch braided bun. One of the best hairstyles for girls, It’s the perfect way to add some chicness and vitality to second or third-day hair without having to invest too much time. Not only will you look great, but you’ll also be the envy of all your friends. So don’t be afraid to add a unique touch to your tousled topknot, and show off your style with an upside-down Dutch braid.
What You Need

- Hair spray
- Comb
- Hair ties
- Bobby pins
How To Style
- Flip your head over and detangle with a comb.
- Divide a small section of hair at the nape of the neck into three sections.
- Begin braiding a Dutch braid by crossing the side strands under the middle and adding a section of hair to each side strand as you go.
- Do this until it reaches the top of the ears and tie off the braid.
- Sweep the rest of the hair into a high ponytail and loop the ponytail into a bun.
Secure the bun with bobby pins, then finish with hairspray to smooth down flyaways.
3. Twisted Bun

See, I don’t expect you to drop a pretty dime to get your hair done every time you have a school dance or wedding to attend. Instead, you can do this pretty twisted updo yourself in less than 10 minutes. This bun looks deceptively intricate but is actually super simple to achieve.
What You Need
- Hair brush
- Bobby pins
- U pins
- Hairspray
How To Style
- Brush out all the knots and tangles from your hair.
- Part your hair down the middle.
- Continue parting your hair till the nape of your neck so that your hair is divided vertically into 2 sections.
- Holding each section in each of your hands, tie them into a single shoelace knot at the back of your head.
- Take the tail of the section of hair hanging on your right and twist it right till the end.
- Roll this twisted section into a circular bun around the knot and secure it to your head with bobby pins and U pins.
- Repeat steps 5 and 6 with your left section of hair, making sure you roll it into a bun in the opposite direction of the first section.
- Spritz on some hairspray to set the updo in place.
4. Extra Long Double Ponytail

You may have super long hair but it may not look as full and long as you want it to when you tie it up in a high ponytail. That’s because you’re going about tying it all wrong. This simple hack of a style uses two ponytails tied on top of each other to give your ponytail fuller body, length, and dimension.
What You Need
- Texturizing spray
- Comb
- Hair elastics
How To Style
- Spritz on some texturizing spray all over your washed, dried hair.
- Horizontally divide your hair into 2 sections.
- Tie the top section of hair in a rough bun to section it away.
- Tie the lower section of hair into a mid level ponytail at the back of your head.
- Untie the top section of hair.
- Backcomb the hair at the crown of your head to give it some volume. Celebrity hairstylist Amanda George recommends using a small bristled brush to ensure the backcombing comes out sleek.
- Tie the top section of hair into a ponytail right above the bottom ponytail.
- Fan out the top ponytail to conceal the base of the bottom ponytail and finish off the look.
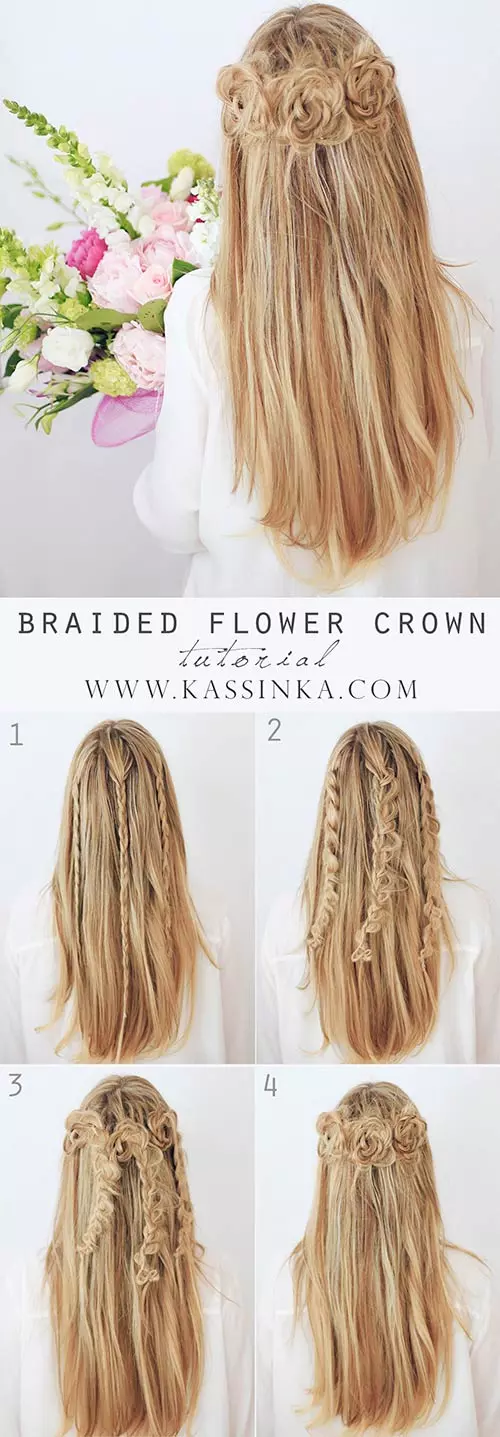
5. Braided Flower Crown
When it comes to feminine hairstyles, this one is as girly as it gets. I mean, who wouldn’t love to have their hair look like roses, right? Again, this is an open hairstyle for girls that looks like it would take ages to perfect but actually just requires some basic braiding and pinning.
What You Need
- Hair brush
- Hair elastics
- Bobby pins
- Light hold hairspray
How To Style
- Brush out all the knots from your hair, then brush it all back.
- Pick up a 3 inch section of hair from the crown of your head, braid it right till the end and secure it with a hair elastic.
- Repeat the previous step on two more sections of hair picked up from either side of the first section.
- Loosen all three braids by tugging them loose from the right.
- Start rolling each braid in a circular manner (making sure the loosened side remains on the outside) and keep pinning it down flat against your head along the way to make it look like a flower.
- Finish off with a few spritzes of light hold hairspray to set the braided flowers in place.
 Quick Tip
6. Khaleesi Inspired Twist

Embrace your inner queen (or, might I say, your inner Khaleesi) with this Game Of Thrones inspired hair look. This topsy tailed style is a simplified version of the intricate hair look sported by Daenerys Targaryen and looks perfect on long flowy maxi skirts and sundresses.
What You Need
- Hair brush
- Hair elastics
- Sea salt spray
How To Style
- Start by brushing back all your hair.
- Leaving out some sections in the front to frame your face, grab the top half of your hair and tie it in a ponytail.
- With your fingers, create a gap in the hair right above the hair elastic securing your ponytail.
- Flip your ponytail up and into this gap to topsy tail it.
- Grab 2 sections of hair from near both your ears and tie them into a ponytail right above the first ponytail.
- Topsy tail this ponytail twice.
- Spritz on sea salt spray to give your hair some texture and finish off the look. “The sea salt spray is essential to make this look come together in an effortless way,” says Amanda George, celebrity hairstylist. “You can also use a mist to achieve a beachy vibe and texture that holds.”
7. Half Dutch Ponytail

Add some pizzazz to your basic ponytail look by incorporating some dainty braiding into it. A side Dutch braid works beautifully to make your hair look voluminous and to show off your kickass braiding skills! Use it to enhance the beauty of your simple ponytail.
What You Need
- Hair brush
- Texturizing spray
- Hair elastics
- Bobby pins
How To Style
- Brush back all your hair.
- Spritz on some texturizing spray all over your hair to give it some hold.
- Pick up a chunk of hair from above one ear (whichever ear you prefer) and divide it into 3 sections.
- Dutch braid these 3 sections by flipping the side section under the middle section and adding more hair into the braid (only from the side of your ear) with each stitch of the braid.
- Once your Dutch braid has reached the back of your head, simply braid it right till the end and secure it with a hair elastic.
- Tie all your hair (including the Dutch braid) into a ponytail.
- Pick a thin section of hair, wrap it around the base of your ponytail to hide the hair elastic from view, and secure it with a bobby pin.
8. Half Up Bow
Whoever told you that bows only belong on Christmas and birthday presents was gravely mistaken. A bow made out of your hair (as opposed to just attaching a cloth bow to your hair) is sure to make you look like a Disney princess. Add this sweet detail to your hairstyle to make for an innocent and adorable look.
What You Need
- Texturizing spray
- Hair elastic
- Sectioning clip
- Bobby pins
- Hairspray
How To Style
- Prep your washed, dried hair with some texturizing spray to give it some hold.
- Part your hair down the middle.
- Pick up two big sections of hair from either side of your head and start tying them into a ponytail.
- At the last twist of your hair elastic, don’t pull your hair all the way through. This will leave your hair in a loop.
- Split this loop of hair into two.
- Separate one loop with a sectioning clip.
- Lay the second loop flat against your head and secure it down from the underside with a bobby pin.
- Repeat the previous step on the other loop.
- Flip the tail of your ponytail up and over the center of the bow and pin it to your head to secure it in place.
- Spritz on some hairspray to set the bow in place.
 Quick Tip
9. Easy Boho Braid

Boho styles have been a rage for years now, and why wouldn’t they be? Their floaty, carefree, and romantic vibes make one look like someone who has stepped out of a dream. If that’s the effect you want to create with your look, you need to try out this boho braided style. “Be careful when sectioning your hair. Adjust any hair strands by gently pulling it to create symmetry,” recommends Amanda George.
What You Need
- Sea salt spray
- Hair elastic
How To Style
- Spritz on some sea salt spray all over your hair and part it on one side.
- From the side with more hair, pick up a 3 inch section of hair from right next to your parting.
- Split this section of hair into 3 sections.
- Start French braiding these sections by adding more hair from the outside into the braid with each stitch of braiding.
- Once your French braid has gone past your ear, simply braid right till the end and secure with a hair elastic.
- Tug apart and loosen your braid to make it look softer and finish off the look.
10. Asymmetrical Fishtail
Here’s the greatest thing about braiding – just when you think you’ve seen it all and everyone is doing the same thing, you come up with a unique twist that no one has ever seen before. This asymmetrical fishtail accent creates an unconventional and offbeat look that will have people wondering “Why didn’t I think of that before?”
What You Need
- Heat protectant
- 2 inch curling iron
- Hair elastics
How To Style
- Begin by applying heat protectant and curling the lower half of all your hair.
- Part your hair slightly off center.
- Pick up a 3 inch section of hair from above one ear, place it along the back of your head and bring it to the other side.
- Pick up another 3 inch section of hair from above the other ear and tie it together with the first section with a hair elastic.
- Split this little ponytail into 2 sections.
- Fishtail braid these two sections by alternately picking up a few strands of hair from the outer side of one section and adding it to the inner side of the other section.
- Once you have fishtail braided right till the end, secure it with a hair elastic.
- Loosen the braid to give it some dimension and cut off the hair elastic at the top of your braid to finish off the look.
11. Ideal Rope Braid

The Rope braid is the latest hairstyle for girls with long hair.You must be thinking what’s so “ideal” about this rope braid. Well, it’s ideal because it does not require any actual braiding. All you need to follow is a simple twisting pattern and the beautiful braid you will end up with will speak for itself.
Amanda says, “To start the rope braid, section your hair into two halves. Twist each of the sections, individually, to the left. Once they are tightly twisted, twist one half with the other to complete the rope braid. If the braid is small enough it will secure itself, but you can hold it in place with a hair tie.”
What You Need
- Texturizing spray
- Hair elastic
How To Style
- Start by spritzing texturizing spray all over your hair.
- Part your hair on one side.
- From the side with more hair, pick up a medium sized section of hair from near your parting.
- Split this section into two.
- Individually twist these sections towards your face right till the end.
- Now intertwine these sections with each other away from your face, adding more into the twists from the side of your forehead.
- Once your twisted braid has reached the nape of your neck, add in all the hair from the back and split your hair equally into 2 sections.
- Individually twist these sections towards your face and intertwine them with each other away from your face.
- Secure the end of your twisted braid with a hair elastic.
- Loosen the twisted braid to make it look fuller and finish off the look.
12. Halo Braids

I don’t know about you, but I truly believe that Zoella is the gift that keeps on giving. From makeup to fashion to hairstyling to hair decor, is there anything this gorgeous YouTuber is not good at? Here she demonstrates the most adorable halo braids style that even a 7-year-old can do on herself, making it an easy and attractive hairstyle for a girl.
What You Need
- Hair brush
- Smoothening serum
- Hair elastics
- Bobby pins
How To Style
- Brush back all your hair.
- Pick up a 2 inch section of hair from behind your left ear, braid it right till the end, and secure it with a hair elastic.
- Repeat the previous step on the right side.
- Rub some smoothening serum on the braids to get rid of any frizz.
- Place your left braid along the top of your head and pin it down behind your right ear and vice versa with your right braid.
13. French Braid Twisted Bun

Heading out for Sunday brunch with your friends? Match the relaxed vibe of the afternoon with this totally cute hairstyle for long hair. The French braided twisted bun looks effortlessly chic and is perfect for teaming up with a casual T-shirt and a dainty necklace.
What You Need
- Texturizing spray
- Hair brush
- Hair elastic
- Bobby pins
How To Style
- Spritz on some texturizing spray and brush all your hair back.
- From near your left temple (or right, if you so prefer), pick up a medium sized section of hair and split it into 3 sections.
- French braid these 3 sections by adding more hair into the braid from outside with each stitch of the braid.
- Once your French braid has reached the back of your head, gather all your hair in one hand.
- Roll and tie all your hair into a bun and secure it down to your head with the help of some bobby pins.
- Loosen your French braid and pull out some hair to frame your face and finish off the look.
14. Triple Twist Half Up
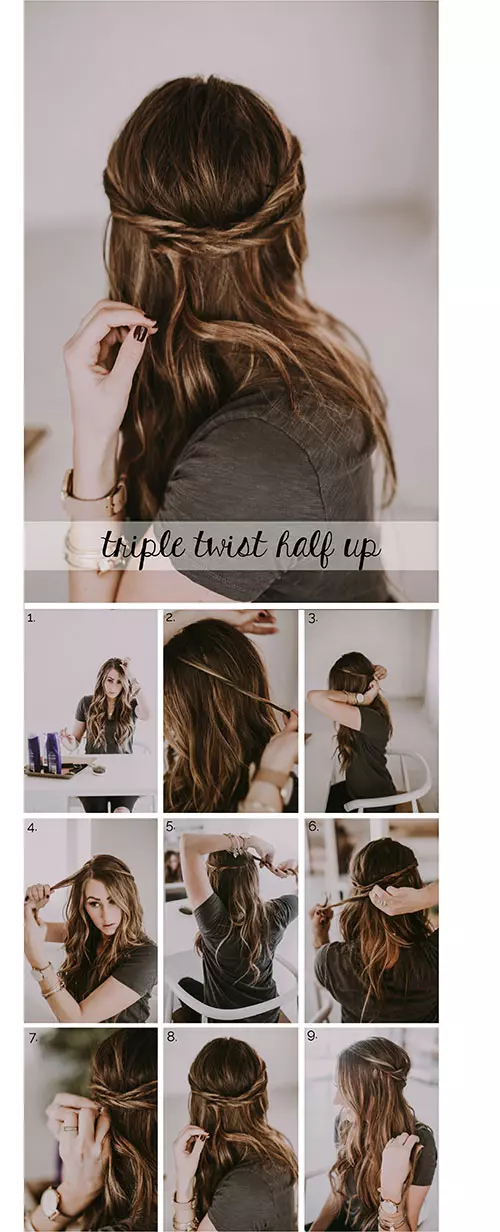
When going for a half up style, we usually work with just one section of hair on either side of our head and call it a day. Shake things up a bit and try out this triple twists look that works with multiple sections of hair to create an absolute darling hair look.
What You Need
- Heat protectant
- 2 inch curling iron
- Hair brush
- Texturizing spray
- Bobby pins
How To Style
- Apply heat protectant and loosely curl all your hair.
- Spritz on some texturizing spray and run a brush through your curls.
- Part your hair down the middle.
- Pick a small section of hair from near your left temple and twist it right till the end.
- Pin this twisted section of hair about 3/4th of the way across the back of your head (on the opposite side).
- Repeat steps 4 and 5 on the right side.
- From below the first sections of hair on both, pick up another section of hair and repeat the whole twisting and pinning process. You will now have 4 alternating sections of twisted hair.
- Gently loosen all the twists to give the style some dimension and finish off the look.
15. 10 Second Top Knot

Ever wondered how those girls on Instagram manage to tie the perfect effortlessly cute top knot? And why do you look like a hairless troll when you try to do it? The secret lies in the technique, my friend. Simply follow the instructions below and you’ll be looking as cute as them within 10 seconds!
“If you want a sleeker look, wrap the tail of your hair around the base of the top knot. For a messy-chic and textured look, wrap the tail of your hair loosely around the base of the top knot. Use bobby pins to secure and arrange your hair,” recommends Amanda George, celebrity hairstylist.
What You Need
- Texturizing spray
- Hair elastic
- Hairspray
How To Style
- Prep your hair with some texturizing spray.
- Brush back all your hair with your fingers.
- Gather all your hair at the back of your head and roll it into a bun.
- Secure the bun by tying it up with a hair elastic.
- Insert your fingers under the hair at the top of your head and gently pull it up to create some volume.
- Spritz on some hairspray to prevent your bun from drooping down through the day.
16. One Minute Knotted Half Up

Hosting a fancy dinner party and suddenly have to run into the kitchen to get the quiches out of the oven? Don’t you dare go anywhere near the oven with your hair all over the place! Tie this simple knot and wow your guests with your super pretty and elegant hairstyle (and your delicious quiches).
What You Need
- Heat protectant
- 5 inch curling iron
- Bobby pins
How To Style
- Apply heat protectant to your washed, dried hair.
- Picking up 1 inch sections of hair at a time, curl the lower half of all your hair.
- Pick up 2 inch sections of hair from either side of your head and pull them back.
- Tie these sections into a single knot at the back of your head.
- Secure the knotted hair in place with the help of some bobby pins.
17. Triangular Parted Half Ponytail
Looking to nail Ariana Grande’s style statement? Then you’ve got one less, one less problem, girl! Her signature look is this super high half ponytail style that tows the line between flirty and sporty perfectly. Try out with a simple t-shirt and jeans to serve some ~looks~.
What You Need
- Rat tail comb
- Hair elastic
- Teasing brush
- Bobby pins
- Hairspray
How To Style
- Starting from the center of your forehead, create two diagonal partitions that go in opposite directions with the help of a rat tail comb.
- Tie all the hair in between the partitions into a ponytail at the crown of your head.
- Tease down the base of the ponytail to create some volume in it.
- Pick a thin section of hair from the ponytail and wrap it around the base of the ponytail to hide the hair elastic from view.
- Secure the wrapped up section of hair with some bobby pins.
- Spritz on some hairspray to tame down any flyaways and finish off the look.
18. Twisted Halo

Doing your hair for a wedding can be such a task, especially if you’re one of the bridesmaids. If you’ve spent too much time getting the bride ready and have about 5 minutes left before the ceremony begins, this twisted halo hairstyle will have you looking exceptionally gorgeous in no time.
What You Need
- Heat protectant
- 5 inch curling iron
- Bobby pins
How To Style
- Start off by applying heat protectant and curling all your hair.
- Part your hair down the middle.
- Pick up a 2 inch section of hair from near your right temple and twist it right till the end.
- Pin this twisted section of hair at the back of your head, slightly towards the left side.
- Pick up another section of hair from near your left temple and twist it right till the end.
- Flip this twisted section of hair under the first twisted section and pin it in place slightly towards the right side of your head.
19. Simple Chignon

So your wild party girl days are over and now you need to look like the dignified lady that you are. What hairstyle suits this role the best? It definitely has got to be a simple chignon. It’s got an understated elegant vibe that will have you looking like the epitome of class in no time.
What You Need
- Texturizing spray
- Hair elastic
- Bobby pins
- Rat-tail comb (optional)
How To Style
- Prep your washed, dried hair with some texturizing spray.
- Tie all your hair into a low ponytail.
- With your fingers, create a gap in the hair above the hair elastic holding your ponytail.
- Topsy tail your ponytail by flipping it up and into this gap. Do this once more.
- Wrap your ponytail completely around the middle section of the topsy tail.
- Spread out the hair of your ponytail and secure it in place using bobby pins.
Amanda George recommends using a tail comb to add volume and shape to the low bun. She says, “Slip the pointed end of the tail comb through the bun (sideways) and gently pull outwards. You can also follow the same technique to add volume and dimension at the crown.”
20. Side Twist Party-Perfect Style

Have a Roaring 20’s theme party to attend and can’t figure out how to style your hair? This simple yet glamorous side rolled style can be perfectly paired with a flapper dress to give you that rich heiress look. Another great occasion you can sport this elegant and easy hairstyle for girls is at Christmas parties.
What You Need
- Heat protectant
- 2 inch curling iron
- Rat tail comb
- Bobby pins
- U pins
- Hairspray
How To Style
- Apply heat protectant all over your washed, dried hair.
- Picking up big sections at a time, curl the lower half of all your hair.
- Part your hair on one side.
- From the side of the parting with more hair, pick up all the hair right in the front.
- Place the tail of your comb horizontally on top of this section of hair.
- With your other hand, wrap this hair around the tail of the comb until you’ve reached the tail’s very end.
- Secure this rolled section of hair to your head with bobby pins before pulling out the comb.
- Insert a U pin into the rolled hair to further secure it in place.
- Spritz on some hairspray to secure the style in place.
21. Twisted Side Braid

Always struggling to style your hair for date nights? Can’t ever seem to find any hairstyle that’s soft and romantic enough? Well, your search ends here, m’lady. This twisted side braid is a perfect combination of a pretty French braid and a soft twist that come together to create the perfect romantic hairstyle.
What You Need
- Texturizing spray
- Hair elastics
How To Style
- Spritz on some texturizing spray all over your hair.
- While parting your hair on one side, move the comb in a zigzag pattern against your head to create a zigzag parting.
- From the side with lesser hair, grab a chunk of hair from the front and divide it into 3 sections.
- French braid these 3 sections all along your hairline by adding more hair into the braid from the outside with each subsequent stitch.
- Once your braid has reached the nape of your neck on the opposite side, simply braid it for 3 or 4 more stitches and secure it with a hair elastic.
- Now, take the front section of hair left out on the other side and start twisting it away from your face.
- Once you can’t add any more hair to your twist, take it behind the French braid.
- Loop this twisted section of hair in through the center of the braid.
- Remove the hair elastic from your braid and tie it right under where you looped your twisted hair into your braid.
- Now, redivide the hair under the hair elastic into 3 sections, simply braid it right till the end, and secure it with a hair elastic.
22. Twisted Top Knot
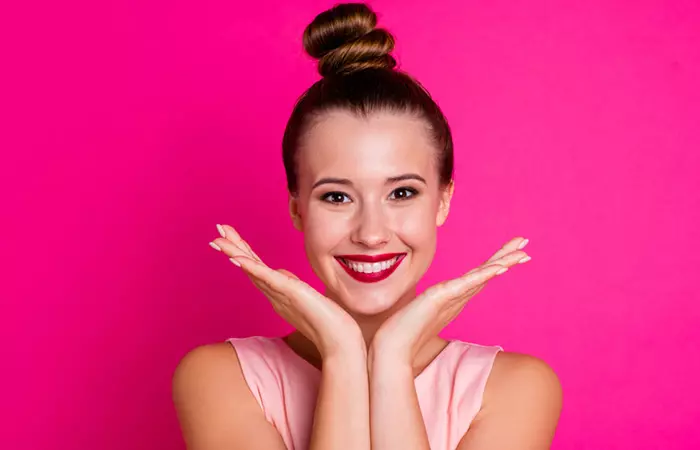
I spy with my little eye…a totally badass looking top knot! Top knots are one of those rare hairstyles that can be dressed up or dressed down without it looking awkward and out of place. You can pair this twisted top knot with a ball gown or a denim jacket outfit without any hassles at all!
What You Need
- Volumizing mousse
- Blowdryer
- Round brush
- Hair elastic
- Bobby pins
- U pins
- Hairspray
How To Style
- Apply a dollop of volumizing mousse to your washed hair.
- Blowdry your hair while brushing it down with a round brush.
- Pick up the top half of your hair and tie it into a ponytail at the crown of your head.
- Gather the remaining hair at the bottom and tie it into a ponytail right under the first ponytail.
- Split the first ponytail into two sections.
- Individually, twist these sections of hair right till the ends.
- Intertwine these twisted sections of hair with each other in the opposite direction in which they were twisted and secure with a hair elastic.
- Repeat steps 5 to 7 with the other ponytail.
- Wrap these two twisted sections into a bun around the base of the ponytails and secure it to your head with lots of bobby pins and U pins.
- Spritz on some hairspray to prevent the bun from loosening or drooping through the day.
23. Bow Hairdo
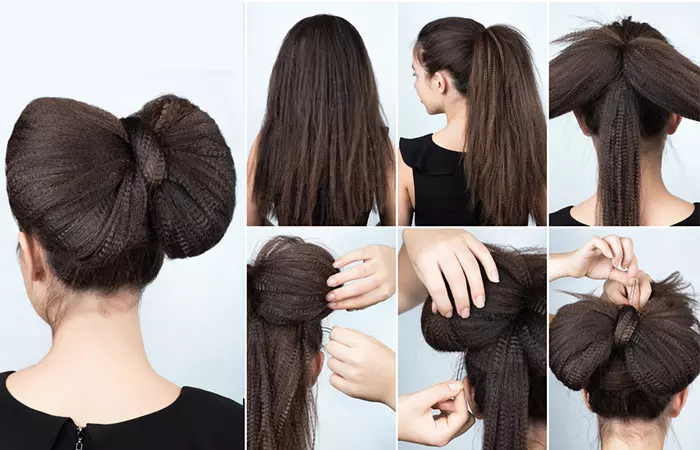
Need a hairstyle that is eye-catching and can be customized to suit various occasions? A bow hairdo is perfect for you. This creative and fun look resembles the actual bow and is ideal for everything ranging from casual outings to formal events.
What You Need
- Comb
- Heat protectant
- Hair crimper
- Hair elastic
- Bobby pins
- Hairspray
How To Style
- Comb your hair and apply a heat protectant.
- Take small sections of hair and start crimping them.
- Once you have crimped all your hair, tie them into a high ponytail.
- Divide the ponytail into three sections. The outer sections should be thicker than the middle section.
- Fold the outer sections inwards to form the loops of the bow and secure them with bobby pins.
- Wrap the middle section in the middle of the two loops to complete the bow.
- Secure it with a bobby pin and spritz on some hairspray.
Lilia, a vlogger, shared her quick and efficient hairstyling routine. She suggested applying hair treatments and masks during the shower for added convenience. During the blow-dry, she used a round brush and a hairdryer with a slightly angled nozzle for better coverage. She said, “When you’re almost done, click that cool button and go over the hair once again to cool it down and help seal the cuticle. This way your hair will be really shiny, and once you’re done just do the exact same thing with the rest of your hair (i).”
Key Takeaways
- Long hair looks amazing, but requires a good amount of maintenance to manage.
- Long hair requires regular trims to reduce split ends and knots. Also, avoid tight hairstyles that lead to breakage and damage.
- Popular hairstyles for long hair include braid styles like the Khalessi inspired twist and the braided flower crown, ponytail styles like the half Dutch ponytail, and updo styles like the twisted bun.
Infographic: Simple And Elegant Hairstyles For Girls With Long Hair
No time for intricate hairstyles yet want to look stunning every day? Don’t worry! In this section, we introduce you to some of the easiest and most elegant hairstyles perfect for your long hair that can be done in just a few minutes. Check them out in the infographic below!
Some thing wrong with infographic shortcode. please verify shortcode syntax
Having long hair can be a hassle and tough to maintain. But, it’s great for experimenting with new looks, styles, and haircuts. You can try out different easy hairstyles for long hair and variations of buns, braids, and ponytails to look different every day. So, scroll up, pick the hairstyle you like the best, and follow the tutorial to the T. As you get better at these 22 hairstyles for girls with long hair, you can start experimenting and adding your creativity to your hairstyles. You can play around with hair colors, accessories, and mix and match hairstyles.
Illustration: Awesome Hairstyles For Girls With Long Hair
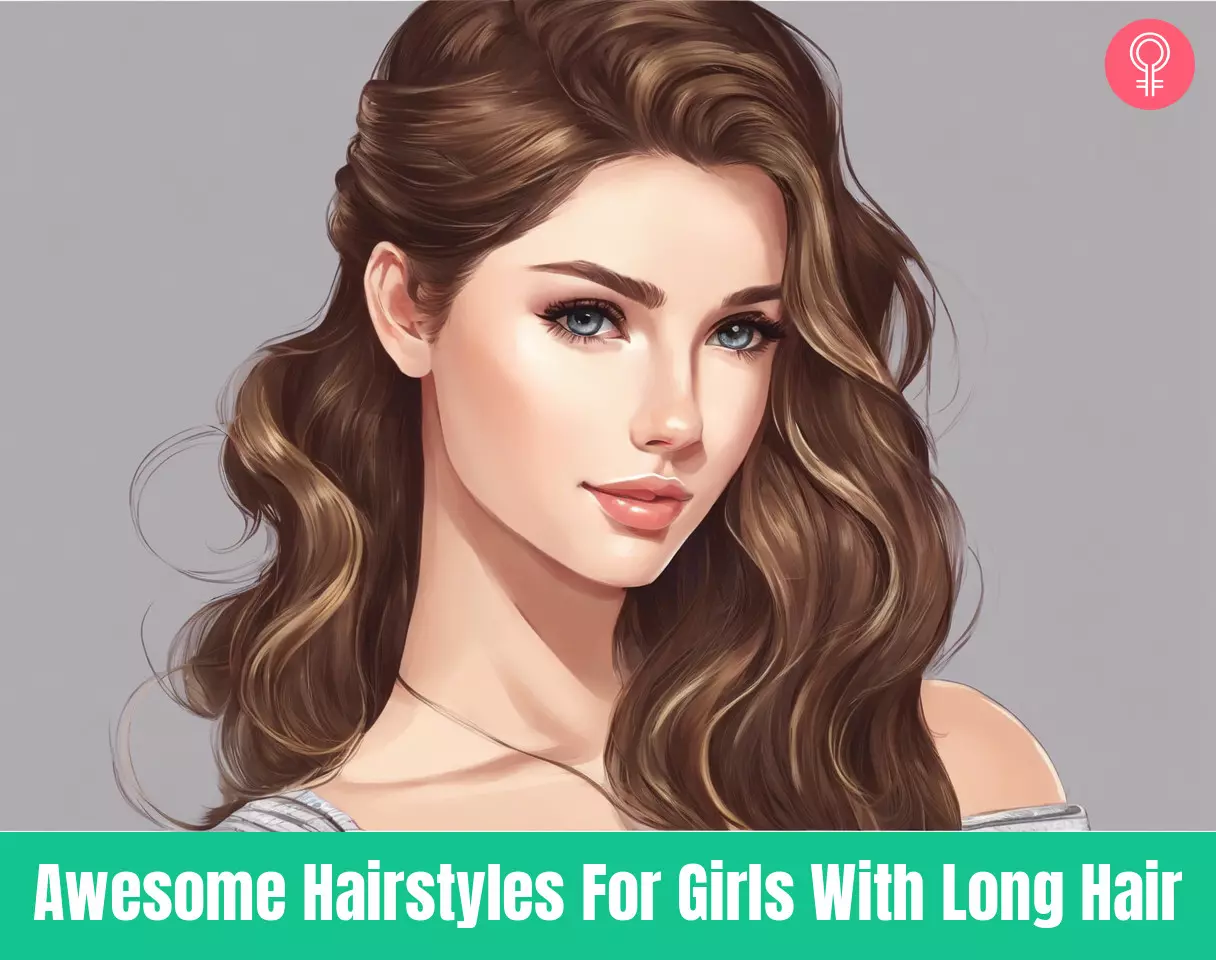
Image: Stable Diffusion/StyleCraze Design Team
Frequently Asked Questions
How can I maintain my long hair between styles?
Use moisturizing shampoos and conditioners to keep your hair clean and healthy. Weekly hair masks can also help nourish your hair. Get regular trims to keep hair damage and split ends at bay.
How can I make my long hair look more interesting?
• Use a sea salt mousse or spray to give your hair more volume and texture.
• Make a fashion statement with your hair by wearing a headband or scarf.
• Try out different hair colors, such as highlights or lowlights.
• Try out different hair colors, such as highlights, like an ombre, or lowlights, like a sombre.
• Try different hair coloring techniques. If you are more used to getting streaks, try a balayage.
What are some hairstyles for long hair that are perfect for special occasions?
A chic and classy option for a big occasion is a traditional updo like a bun, chignon, or French twist. For a special event, you can also go for soft, loose waves, accessorized with flowers or hairpins. For a formal occasion, complement a sleek, high ponytail with a ribbon or other hairpiece.
Can I have bangs with long hair?
Yes, it is possible to wear bangs with long hair. Bangs are a fantastic way to mix up your appearance and give your haircut some flair. There is a bang style that can work for you whether you have straight, wavy, or curly hair.
What are some hairstyles for long hair that are suitable for different face shapes?
Oval face shape: Oval faces are regarded as the best face shapes since they go with many different hairstyles. Long, sleek hair with slight layers or a sleek, low ponytail looks fantastic on oval faces. Messy buns or a half-up, half-down style with volume at the crown, lengthen a round face by adding height at the top of your hair.
What are some up-and-coming hairstyles for long hair that are not widely known yet?
A textured lob, which is a long bob with choppy layers and texture, or Celestial buns, also known as two buns put high on the head, has a fun, futuristic appearance.
Discover a week’s worth of stunning hairstyles for medium to long hair in this video. From elegant updos to casual waves, get ready to slay every day with these fabulous looks
Personal Experience: Source
StyleCraze's articles are interwoven with authentic personal narratives that provide depth and resonance to our content. Below are the sources of the personal accounts referenced in this article.
i. How to style long hair faster: tips and trickshttps://www.youtube.com/watch?v=42sWoB2ymN0
Read full bio of Amanda George
Read full bio of Arshiya Syeda
Read full bio of Shatabdi Bhattacharya
Read full bio of Shreya Mukherjee




Community Experiences
Join the conversation and become a part of our empowering community! Share your stories, experiences, and insights to connect with other beauty, lifestyle, and health enthusiasts.