30 Stunning Crown Braid Hairstyles For All Occasions
Stunning hairstyle ideas to choose from and give your lustrous locks a unique look
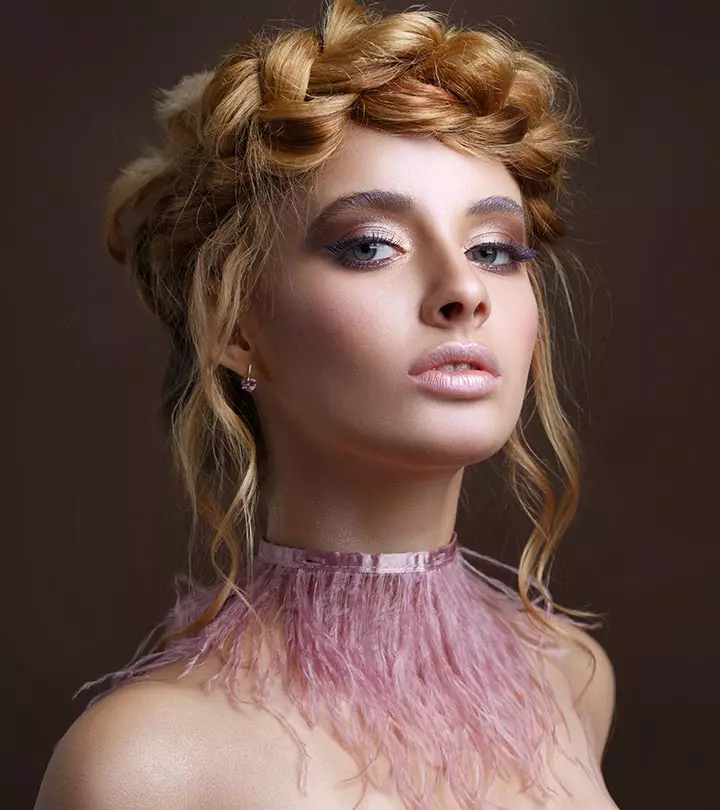
Image: Shutterstock
Every Queen needs a crown! So while diamond-studded tiaras might be too expensive, a crown braid is not3Delve with us with some exquisite crown braid hairstyles.A well-chosen hairstyle can enhance a person’s natural beauty and bring out their unique features. Crown braids are elegant hairstyles that work on all hair types and textures. Whether you need to look prim and proper for a business meeting or need to have your hair tied up for cooking at the restaurant – crown braids have your back while looking spectacular. Now that’s a miracle. You can find a crown braid hairstyle that works flawlessly no matter the occasion.
If you’re confused about how to style your hair in a crown braid, keep reading. We have added a tutorial just for you. Scroll down and get braiding!
 Before You Get Started
- Wash your hair 2-3 days before getting a crown braid to help it stay in place. In case your hair is freshly washed, and therefore slippery, you may use a dry shampoo to create hold and work with textures.
- Your hair should be at least 1-2 inches long for easy braiding even after a substantial haircut.
- Avoid using oversized rubber bands since they draw attention to them, ruining the overall look.
- Do not use bobby pins to hold thick parts of the hair in place. They frequently twist and bend thick hair.
- Avoid moisturizers with mineral or lemon oil as they can cause scalp buildup and irritation. Instead, use coconut or almond oil to keep the hair light and hydrated.
In This Article
How To Do A Crown Braid
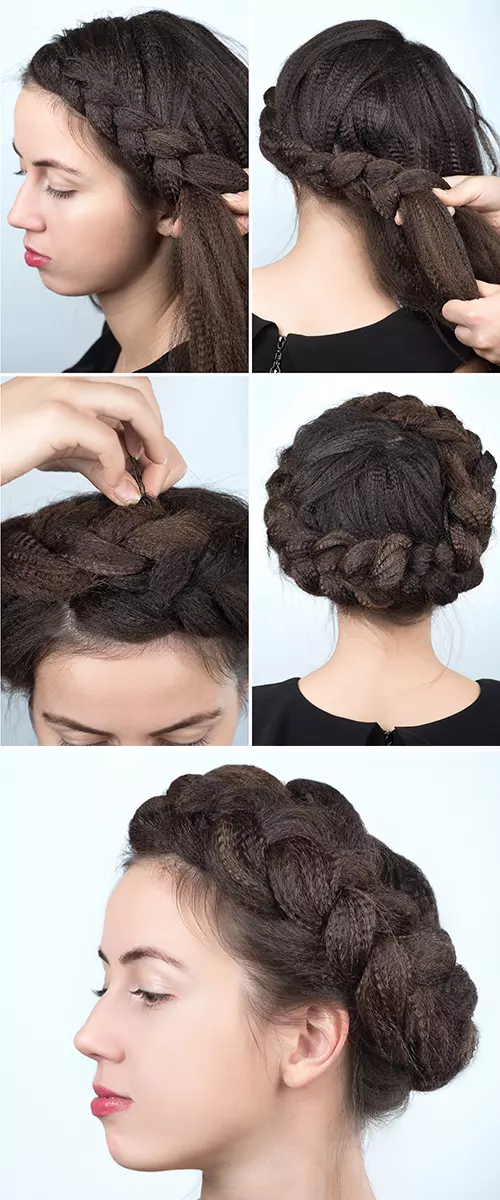
A crown braid consists of a braid (or two braids) that follows the circumference of your head. Start off by figuring out what type of braid you want. Do you want a fishtail crown braid? Or one done with a Dutch braid? To know more about the crown braids you can choose from, check out this article. Moreover, you may also read about types of braids to add some variety to your look, everyday!
What You Need
- Hair brush
- Texturizing spray
- Bobby pins
- Elastic bands
- Hairspray
How To Do
- Brush your hair to remove all knots and tangles.
- Part your hair the way you prefer it – down the middle or on one side. Your crown braid will begin and end on either side of the parting. You can also weave a crown braid without any parting.
- While the crown braid most commonly starts at the front of the head, there are some exceptions like the milkmaid braid. If you want to start the crown braid from behind, you can part your hair at the back and weave your braid forward.
- Pick up some hair from the front and divide it into the required sections based on the type of braid you want. Begin weaving the braid from any one side of the parting. Keep adding hair to the braid as you go.
- Once you reach the back, bend the braid to align with the curve of the head. Continue braiding until you reach the other side of your parting.
- If you have long hair, continue braiding a regular braid with the remaining hair. Tie the ends with an elastic band, tuck it within the main crown braid, and pin it in place.
- Pancake the braid to make it look bigger. Insert bobby pins throughout the crown braid to secure it in place. It’s always good to use bobby pins that match your hair color.
- Finish off the hairdo with a generous hit of hairspray.

Emily, a lifestyle blogger, shared her personal insights on going for a crown braid hairstyle on multiple occasions. She said, “Ever since I can remember my mom and older sisters have been putting crown braids on me, and I still wear them a lot today! They’re so versatile that you could easily put a wreath of flowers on your head for Renn Fair, or add some glam earrings for a formal event (i).”
Not just formal events, braiding your hair at home at night has its perks. Learn more about them below.
Key Takeaways
- A crown braid consists of a braid or two braids that follows the circumference of your head.
- Crown braid mostly starts from the front of the head. However, you can also weave the braids from the back to the front of the head.
- The fishtail milkmaid braid starts at the back and has a boho-vibe. The U Dutch crown braid is one of the most common gym hairstyles.
- The goddess crown braid is the perfect crown braid hairstyle for kinky hair.
Why You Should Braid Your Hair At Night?
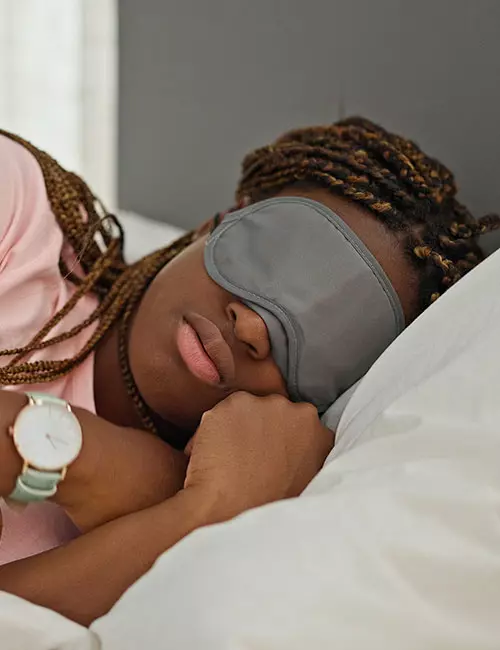
Braiding your hair before bedtime is not just a styling choice; it comes with a bunch of benefits too. Firstly, it helps prevent tangles and knots that often occur during sleep. This helps reduce hair breakage and damage.
Braids also aid in preserving moisture by keeping the strands together to prevent excessive dryness. This is especially beneficial for those with naturally dry or curly hair. Another perk is waking up to beautiful waves or curls, adding a touch of effortless style to your morning routine.
Plus, braiding can minimize the friction between your hair and the pillow, preventing frizz and maintaining a smoother texture.
Now that you know how to do a crown braid, check out these 30 stunning styles that you’ll definitely fall in love with.
30 Stunning Crown Braid Hairstyles
1. Braided Crown Bun With A Headband
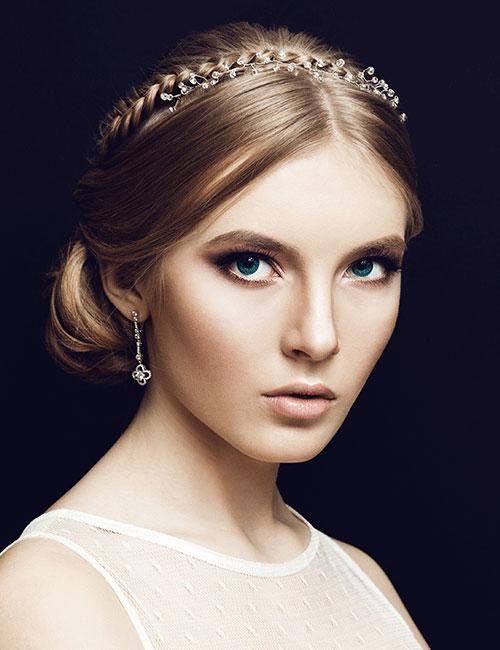
For all those who like to keep things simple yet elegant, this hairdo just fits the bill! Start by center-parting your hair using a rattail comb. Now, take a section of your hair from behind the ear and separate it into three parts. Start braiding, and once you are done, secure the braid with an elastic band. Pin it to the other side of the ear so that it looks like a headband. Next, tease your hair behind the braid using the comb at the crown to create that subtle lift. Finally, gather the remaining hair and secure it with hair pins in a loose bun.
2. Dutch Lace Braid
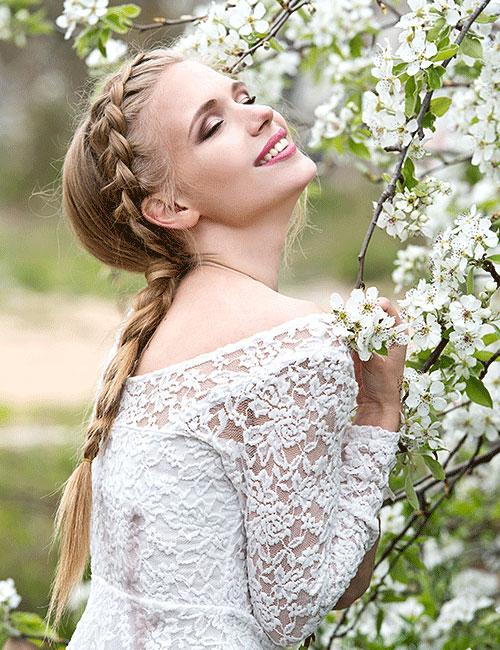
While it looks quite similar to the crown braid, the lace braid is an elegant hairstyle that requires some practice and is perfect for both formal and informal occasions. Use a comb to create a side-parting and divide your hair into three sections. Start braiding your hair, but unlike your regular braid, cross the other two strands under the center section. Continue braiding until you reach the nape, then braid the rest of the hair in a regular 3-strand braid. Secure it with a hair tie.
3. Messy Crown Braid With A Bun
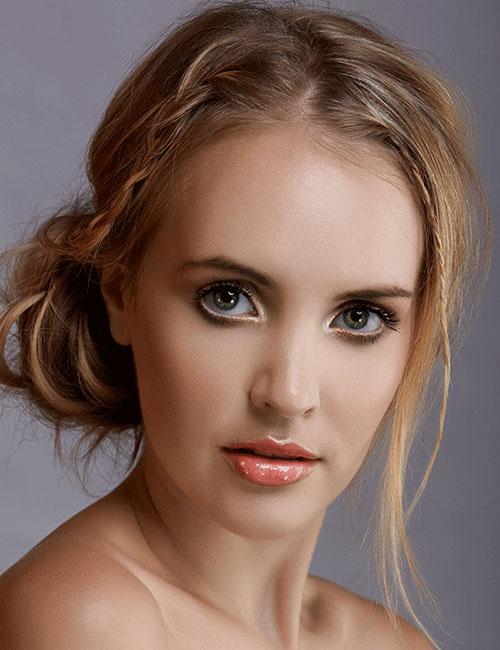
Give a modern twist to the braided hairdo by going for a messy hairstyle. Use your finger to section your hair from the center. Now, take a few sections of hair from both sides and braid it into one or two skinny braids. Next, tie the remaining hair into a loose bun. Pull out a few strands from the front and the bun to create a messy and dramatic look.
4. Tucked-in Crown Braid
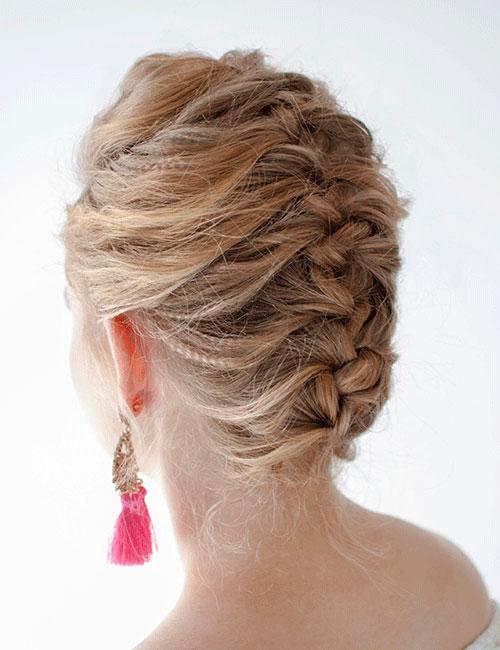
The regular French braid has an update, the tucked-in crown braid. While this hairstyle is a no-brainer, it can seriously up your style quotient. Start by creating a regular French braid from the crown and braiding it to your nape. After that, secure the braid with a clear elastic. Make sure to leave at least an inch of hair at the ends. Now, pull your braids gently to make them look fuller, and flip the ponytail inwards so that the elastic hair tie is no longer visible. Lastly, secure it with hair pins.
5. Dutch Braided Pigtail
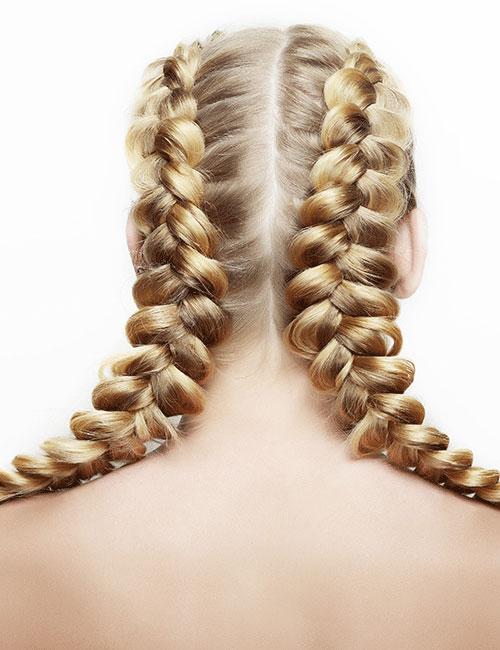
Back-to-school hairstyles aren’t just for kids anymore. Pigtails have grown to become one of the trendiest hairstyles of this season. Use a rat comb to part your hair from the center, all the way to the nape. Make a Dutch braid slightly before the hairline and secure it with a hair tie. Repeat the same process on the other side. Once you are done, fluff out the pigtails.
6. Flower Crown Braid
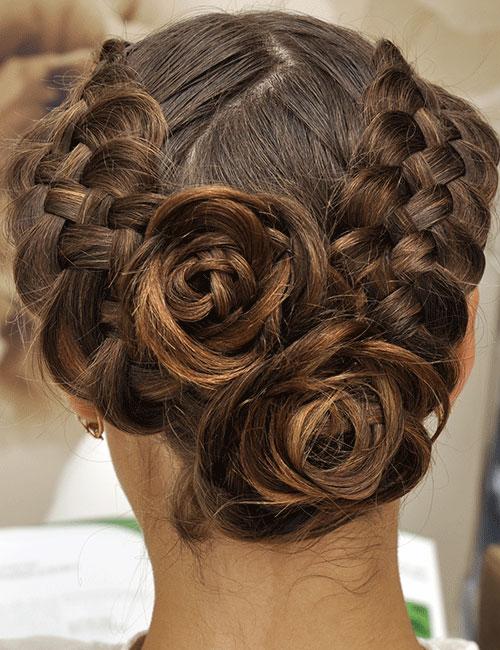
Whimsical and romantic, you can count on this beautiful braid to make you look absolutely stunning on your wedding day! Using a rat-tail comb, part your hair from the center. Now, start making two Dutch braids from the front on each side and securing them with a hair elastic. Next, begin working on the ends of the braids. Weave them separately into a regular three-strand braid.Take one section twist and roll it up in a way similar to a blooming flower and secure it with hair pins. Repeat the same process with the other skinny braid and you are done.
7. Upside-down Braid With Bun
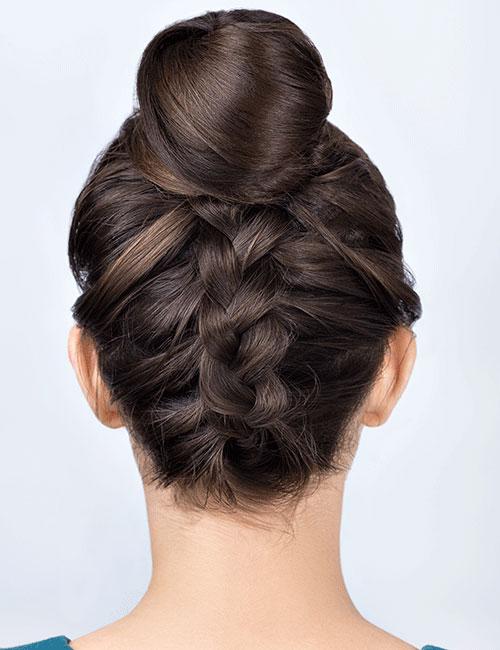
Do you want both a bun and braids? The good news is the upside-down braid with bun offers you just that. Divide your hair into two sections horizontally. Then, take a section of hair from the lower section and start braiding it. The key here is to start at the nape and then move forward simultaneously. Once you are done braiding, collect the hair from the upper section of the hair and tie it into a bun.
Celebrity hairstylist, Samuel Ashcroft offers a hack, “Do the braiding bent over as it is easier to braid the hair and then gather it into a bun.”
Next, pull your braid upward and wrap it around the base. Secure it with hair pins. This hairstyle is ideal for gym sessions and adventurous trips as it helps keep hair off your face while looking insanely stylish.
8. Braid Wrapped High Bun
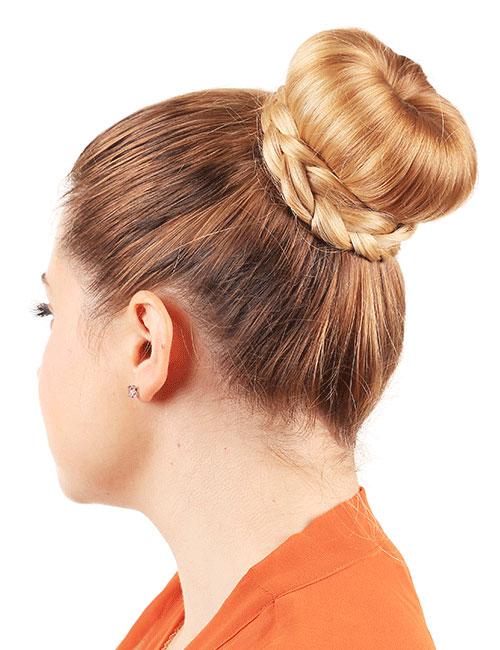
We truly love this look! Elegant and plush, this hairdo will go well with gowns and is perfect for those date nights. Tie your hair into a high ponytail. Put a hair donut over the ponytail and make a neat ponytail. Then, take the hair out of the ponytail and cover the hair donut. Secure it with a hair elastic. Next, gather the remaining section of hair and braid it into two braids. Take one braid and wrap it around the bun. Repeat the process with the other braid and secure the hairstyle with hair pins.
9. Half-Up 4-Strand Dutch Braid
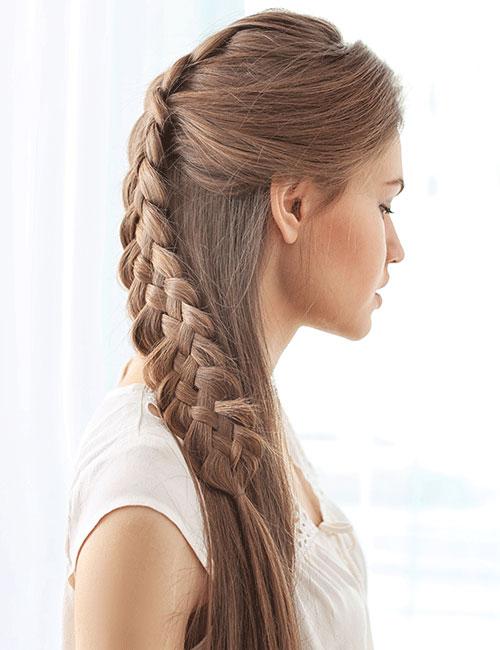
Don’t want to commit to an intricate, fully braided hairdo? Well, then opt for this half-up 4-strand Dutch braid. It looks classic and fuss-free at the same time. All you need is to comb from front to back. Create four sections off the top half of your hair. Now start braiding a Dutch braid starting at the crown. Continue braiding until you reach your ears. From here on, instead of taking sections from left and right, just continue the Dutch braid with the remaining hair. Secure it with a hair tie.
10. Fishtail Braided Low Bun
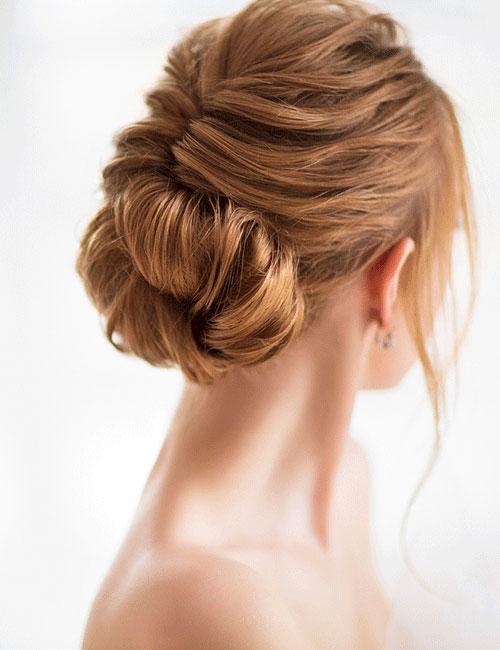
This is yet another romantic and stylish hairstyle that you can sport on your wedding day! Begin by combing your hair from front to back. Now, starting at the crown, section your hair into two parts. Take a few strands from one part and add them to the other part, and vice versa, to form a fishtail braid. Make sure all the pieces fall in the center, in one alignment. Stop braiding once you reach slightly below the ears. Now, gather the remaining hair and twist it around to form a messy bun. Secure the hairstyle with hairpins.
Ashcroft adds, “Backcomb the hair a little in the beginning to get the volume. It also needs to be teased out a bit before it goes into the bun so it’s loose. Also, use large pins to secure looser parts.”
11. Classic Crown Braid
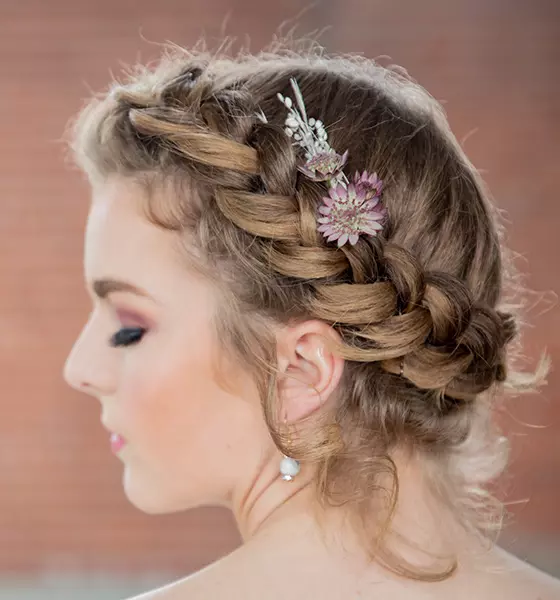
The classic crown braid is extremely easy to achieve. Start a Dutch braid from near the ears and follow the curve of your head until you reach the starting point again, then pin the ends in place. This timeless hairstyle is perfect for weddings and prom.
12. Fishtail Milkmaid Braid
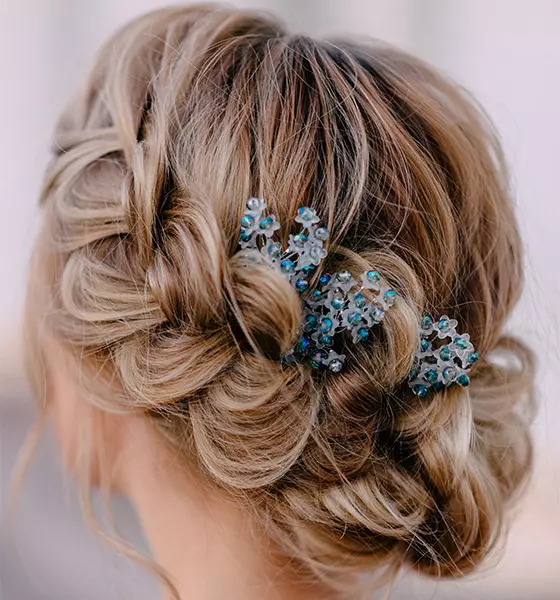
The fishtail milkmaid braid begins at the back. But you can always take it up a notch – like in this hairstyle. Weave a cascading braid at the front until you reach the back and then continue weaving a regular fishtail braid. This gorgeous hairdo looks great on sundresses and boho outfits.
13. Scarfed Crown Braid
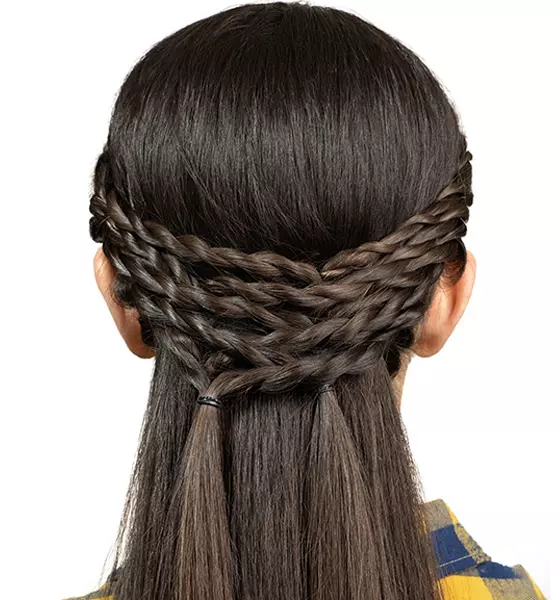
Using a scarf as a part of a braid is a huge trend right now. Take some hair from one side of your head and clip up the rest of your hair. Fold the scarf and hold it at the center. Placing the center behind the middle section, join each half of the scarf to the side sections. Weave the braid into a crown. You can do this crown in a half updo style to create a fun beach-ready look.
14. The U Dutch Crown Braid
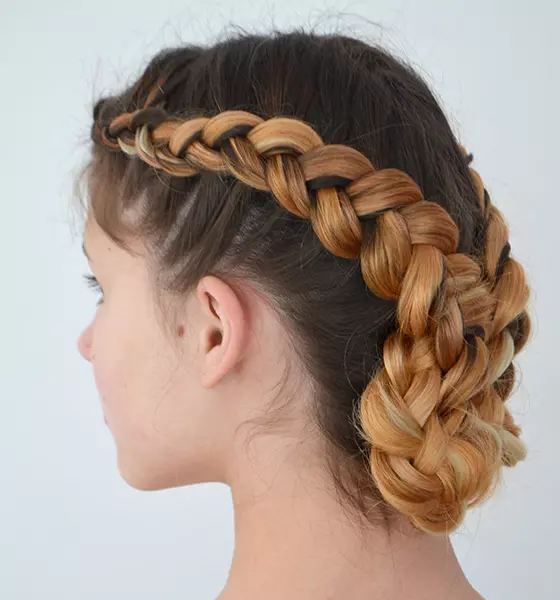
The U Dutch crown braid is one of the most common gym hairstyles, and rightly so. It keeps your hair off your face while looking stylish. There are two ways you can achieve this look. First, you can weave a Dutch braid and curve it to form the ’U’ before continuing to braid till the end. Or, you can weave two Dutch braids (one on either side), and fold them at the back to form the ’U.’
15. Crown Braided Updo
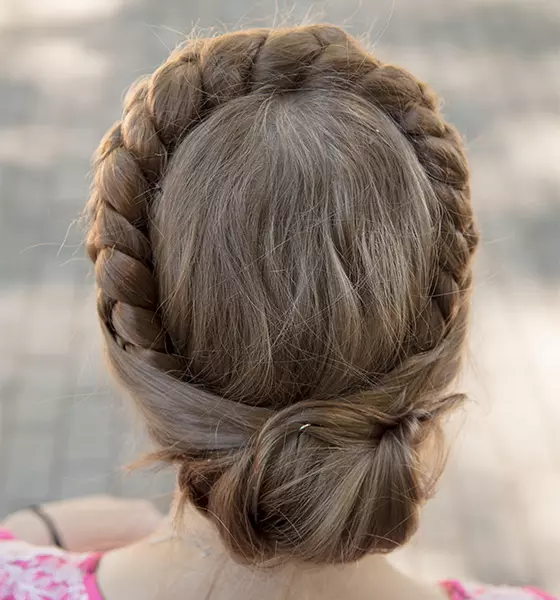
Doesn’t this look hairdo look heavenly? This crown braid is pretty easy to do by yourself. Braid your hair from the front. Once you reach the back, continue to weave the braid until the end of your hair instead of following the circumference of your head. Do this on either side. Wrap the braids at the back to form a braided bun. Use hair pins to secure the updo. Finish off with a hint of hairspray.
16. Pancaked Crown Braid
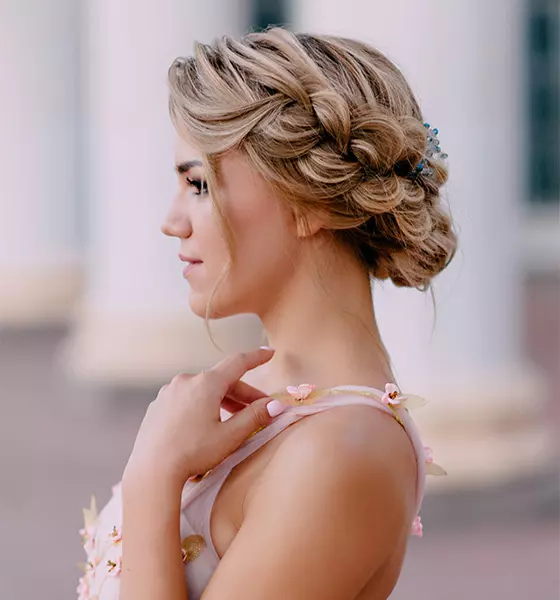
Always in fashion, the trendy side braids look absolutely stunning with dresses. Weave a crown fishtail braid. Once your hair is all secure and pinned up, pancake the inner side of the braid to add volume to it. Pull out some loose strands from the front to frame your face and add a romantic vibe to the look.
 Did You Know?
17. Inside-Out Crown Braid
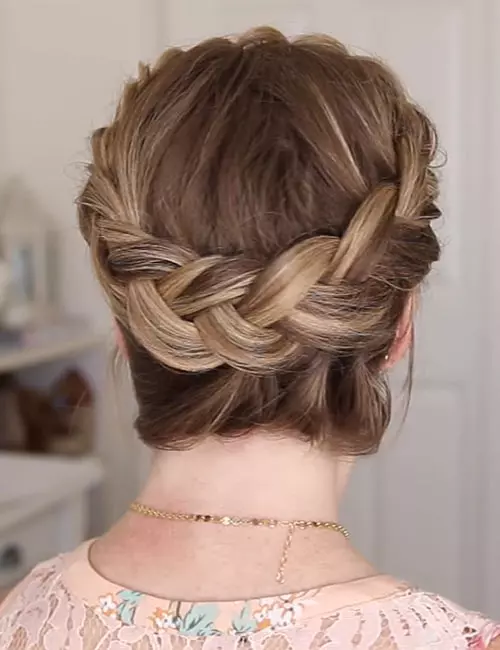
The inside-out crown braid is also called the Dutch braid. The middle section goes over the two side sections in the Dutch braid. Part your hair on one side and begin weaving a Dutch braid. Keep adding hair to the middle section as you weave the braid. Once you reach the front again, weave the remaining hair into a regular braid and tie it with an elastic band. Tuck the end of the braid into the main crown braid and pin it in place. You can pancake the crown braid to make it look bigger.
18. Half Fishtail Crown Braid
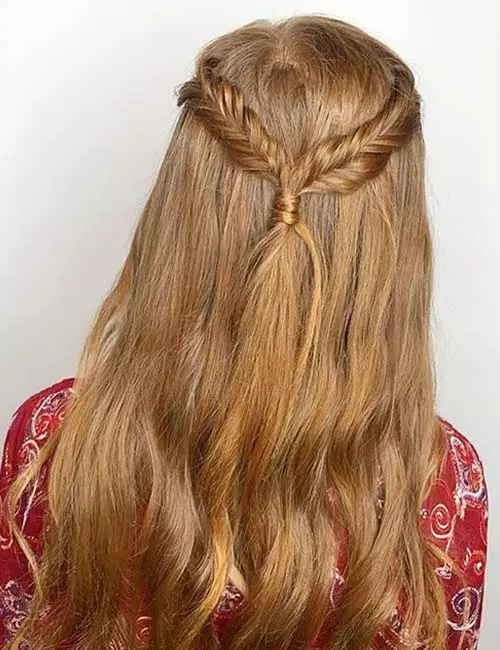
Need a hairstyle to go with your bohemian outfit? Weave two fishtail braids with the hair at the front and tie them together at the back near your crown with an elastic band. Wrap some hair around the elastic band to hide it from view. This hairstyle looks perfect on a floaty maxi dress.
19. The Hippie Crown Braid
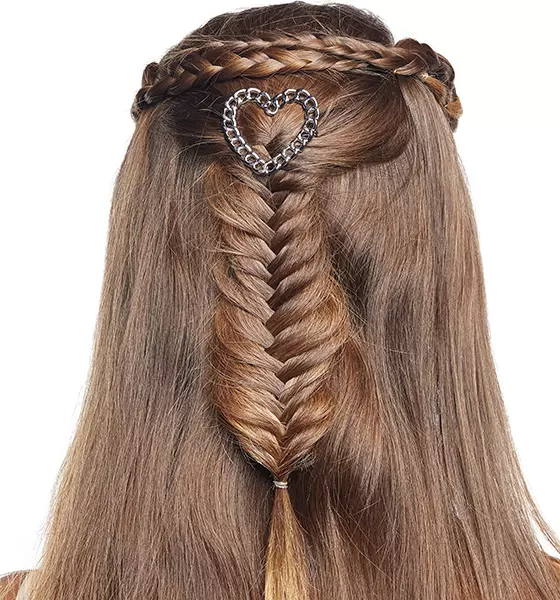
We’ve all been through that phase where we wished we were hippies just grooving to music and roaming free. You can look like a happy hippie with this lovely hairstyle. Pick up some hair from the front on one side of your head and weave it into a simple 3-strand braid. Secure it at the end with an elastic band. Do the same on the other side. Pin both the braids at the back below the crown, with one braid overlapping the other. Twist and tuck the ends, and use bobby pins to secure them in place. You can personalize the style further by adding a fishtail braid and your favorite hairpin to the look.
20. Tri-Braided Crown
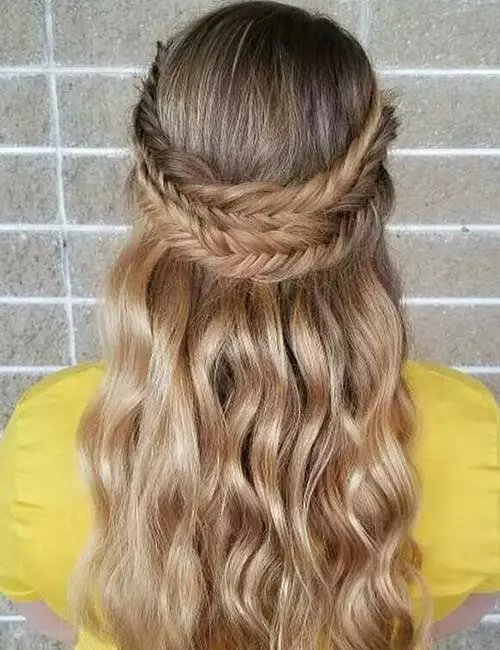
This lovely tri-braided crown is really easy to achieve. All you need to do is weave two fishtail braids with half your hair and pin them at the back of your head. This intricate style is perfect for bridesmaids and first dates.
21. Quadruple Crown Braid
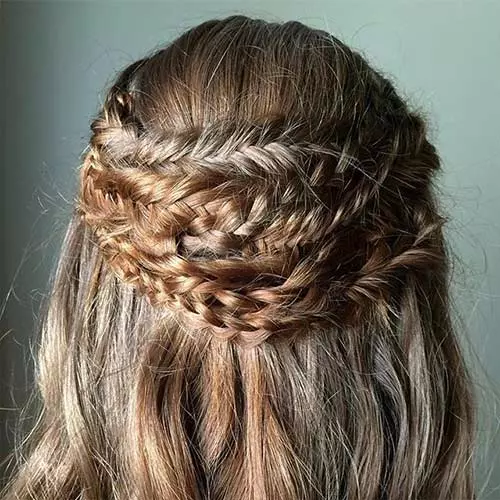
This elegant hairstyle makes for a flawless bridesmaid look. Gather some hair at the front and weave it into a fishtail braid. On the same side, take some more hair and weave a regular three-strand braid. Secure both braids with elastic bands. Repeat the same on the other side. Take one fishtail braid, place it along the back of your head and pin it. Do the same with the other three braids.
22. Multiple Braided Crown Braid
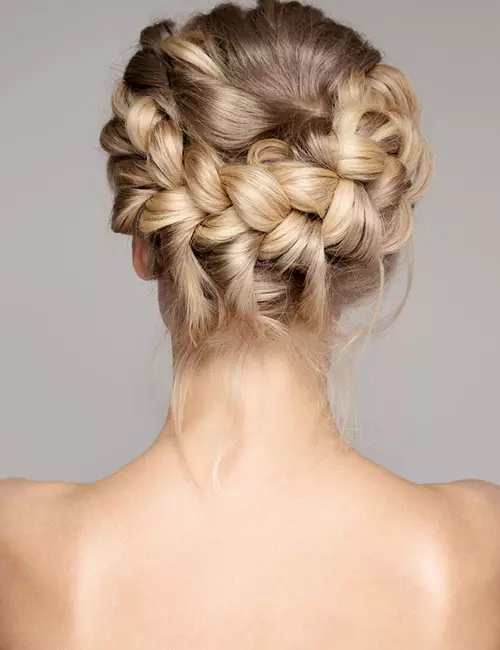
This is one of those surreal bridal hairdos that will leave you (and everyone else) stunned. Part your hair deeply on one side and divide it into multiple small sections. Weave each section into a braid and tie them at the end with elastic bands. Wrap each braid along your head and pin it in place. Alternate the direction you wrap the braids in to give it a well-rounded look. Finish off with a generous spritz of hairspray.
23. Princess Crown Braid
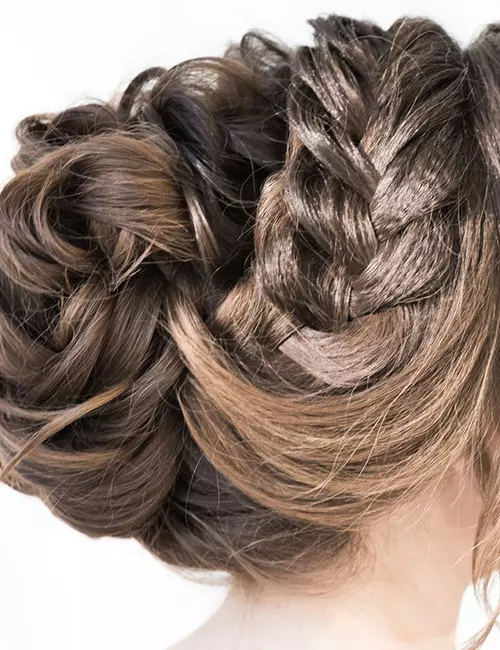
All young girls want to look like a princess, and you can with this crown braid! Divide your hair into three sections: two small front sections and one large section comprising the rest of your hair. Weave one side section into a Dutch braid. Braid the hair along the curve of the head until you reach the front on the other side. Weave the remaining hair from the crown braid into a regular braid and place it in the front to finish the crown. Tie the rest of your hair in a high ponytail and insert a donut bun at its base. Divide the ponytail into four sections and twist each one until the end. Wrap and pin the twists around the donut bun to form a twisted bun. Finish off with a few spritzes of hairspray. You may also read about Dutch braid hairstyle, a stylish and intricate braid that adds more finesse and polish to your craft.
24. Greek Crown Braid
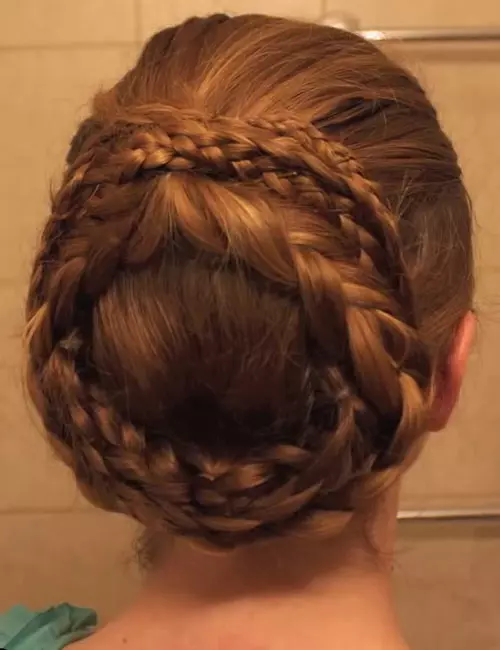
Divide your hair into four sections: two sides sections, a front to crown section, and a lower section. Weave all the hair in all the sections into two braids each. Pin each braid from the front-crown section to its respective side. Lift each of the braids from the lower section and pin it up to the crown, making sure they’re placed along the curve of your head. Now, just wrap the other braid along the circle formed by the front and lower sections. Use hair pins to secure all the braids in place.
25. Rope Crown Braid
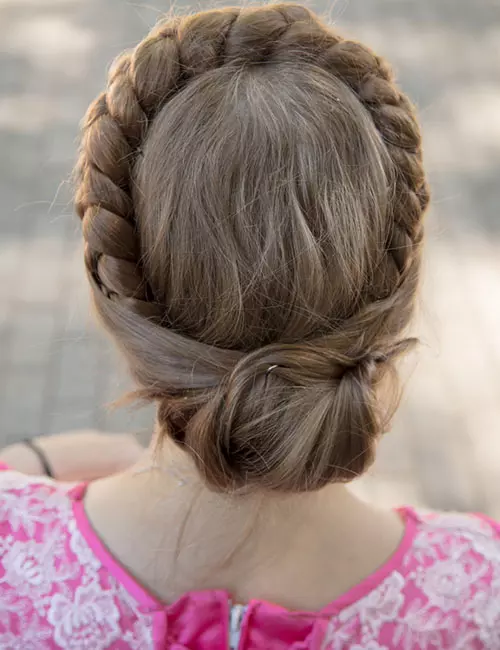
The rope crown braid is made up of a twisted braid. Brush your hair to remove all knots and tangles. Part your hair deeply on one side. Pick up some hair from near the parting, from the side with more hair. Divide that section of hair into two and flip one side over the other to form a twist. Add more hair to the side closest to the front hairline and flip it over the other section again. Keep repeating this step as you weave the braid. Weave the twist until you reach the back of the ear on the other side of your head. Twist the remaining hair without adding more hair to it. Lift this part of the twist it and bring to the front, pinning it there. Pancake the twisted braid and spritz some hairspray onto it.
 Quick Tip
26. Viking Crown Braid
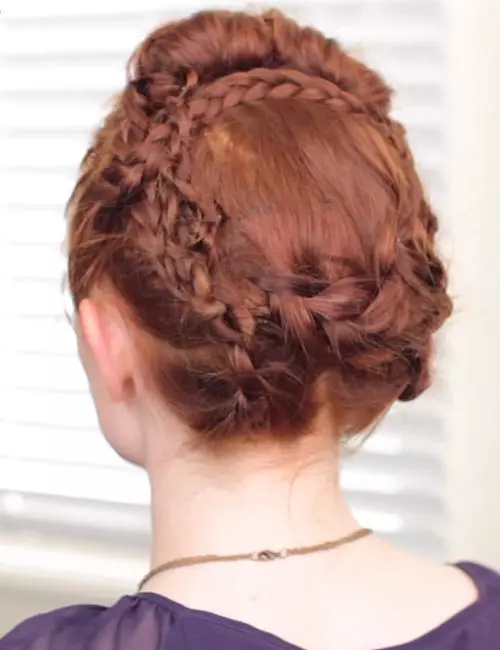
Now, this is a hairstyle that is truly fit for a queen. Part your hair down the middle. Gather the hair at the crown to create a bouffant. You can either backcomb your hair to create the bouffant or use a small chignon maker. Begin weaving a French braid from one side of your head until you reach the top of your ear. Then, weave the remainder of the hair from the braid into a regular three-strand braid. Repeat the same on the other side. Divide the rest of your hair into half to create a top section and a bottom section. Weave the top section into a French braid starting from one side. Once you reach the other side, weave the remaining hair into a four-strand braid. Place this four-strand braid in front of the bouffant, using pins to secure it. Unclip the last section of hair, divide it in half, and braid both sections into knot braids. Lift the braids and pin them to the sides of the bouffant.
27. Waterfall Crown Braid
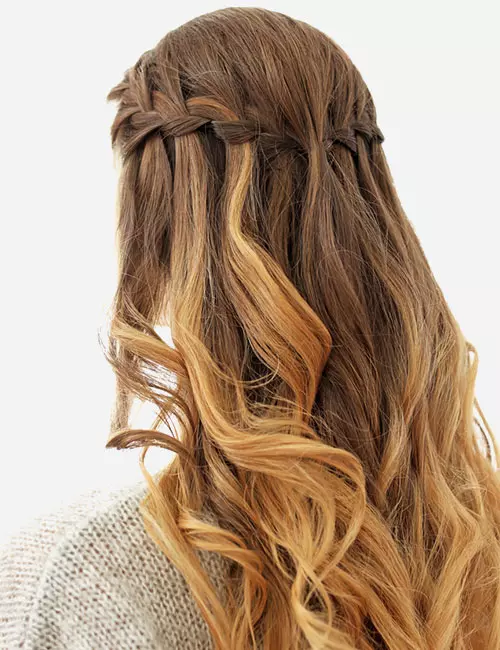
For this hairstyle to really look like a waterfall, you’ll need to start off by curling your hair. Begin weaving a braid on one side of your head. After the first stitch, drop the top section of the braid and pick up a new top section. Keep doing this as you go. The dropping of the top section will make it look like a waterfall braid hairstyle. Once you’ve reached the opposite side, pin the braid in place. Stunning, right?
28. Double Dutch Crown Braid
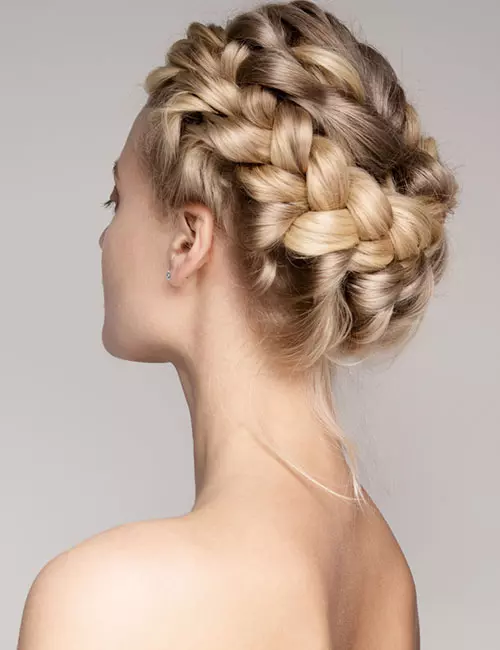
Part your hair in a slanted side parting at the front. Make sure your parting ends at the center of the crown. From the crown down, divide your hair into three sections: two side sections and one triangular center section. Weave the center section into a braid and pancake it. Roll up the braid into a bun and secure it to your head with bobby pins. Weave one side section into a Dutch braid and secure it at the end with an elastic band. Do the same with the other side section. Pancake both the side braids and pin them up near the bun.
29. Faux Crown Braid
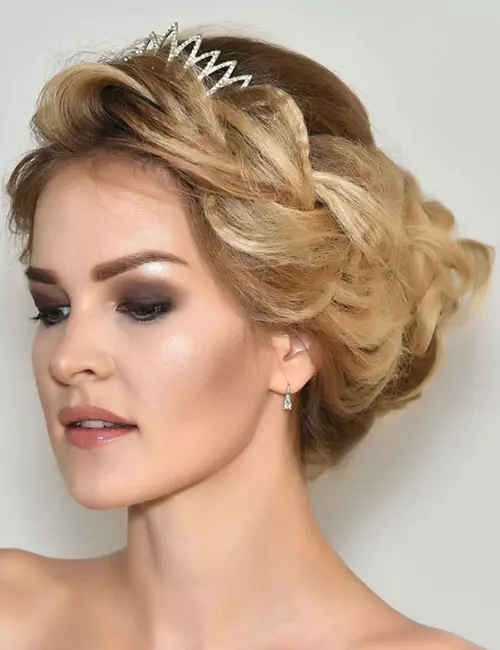
This is also called the pull-through crown braid. Brush your hair to remove all tangles. Divide all your hair into small ponytails placed along the hairline of your head. Divide the ponytail near your left ear (the first ponytail) into two, and pass the ponytail above it (the second ponytail) through it. Join the divided hair of the first ponytail above the second ponytail and secure it with an elastic band. Now, divide the second ponytail into two and pass the third ponytail through it. Keep doing this until you reach the first ponytail again. If you have long hair, weave the rest of your hair in a pull-through braid, and place it along the front. Pancake the braid and spritz some hairspray on it.
30. Goddess Crown Braid
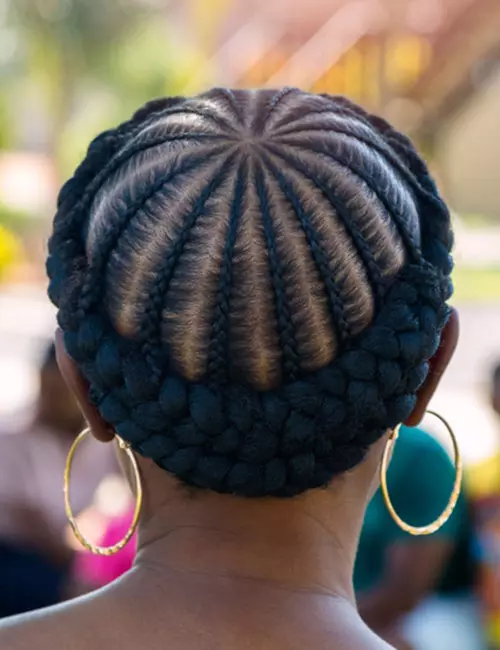
If you have kinky hair, this is the perfect crown braid hairstyle for you. It involves hair extensions, which really simplifies the hairdo. Apply some creme or gel to your hair to smoothen it down, and weave it in a braid. Wrap the braid into a low bun and pin it in place. Get yourself some Kanekalon hair extensions. Don’t remove the elastic band that is attached to the hair extensions. Weave all the extensions into a braid. Wrap the elastic band of the extensions around the bun and align the Kanekalon hair to your head. Secure it in place with hair pins.
Infographic: How To Accessorize Crown Braids
Crown braid hairstyles are worth trying – and now you know why. They instantly give that amazing twist to your look and allow you to steal the show. Of course, you will need a bit of practice to perfect the technique, but you will certainly love the final result.
Now that you have many choices, check out our infographic below to learn how to accessorize these braids. Illustration: StyleCraze Design Team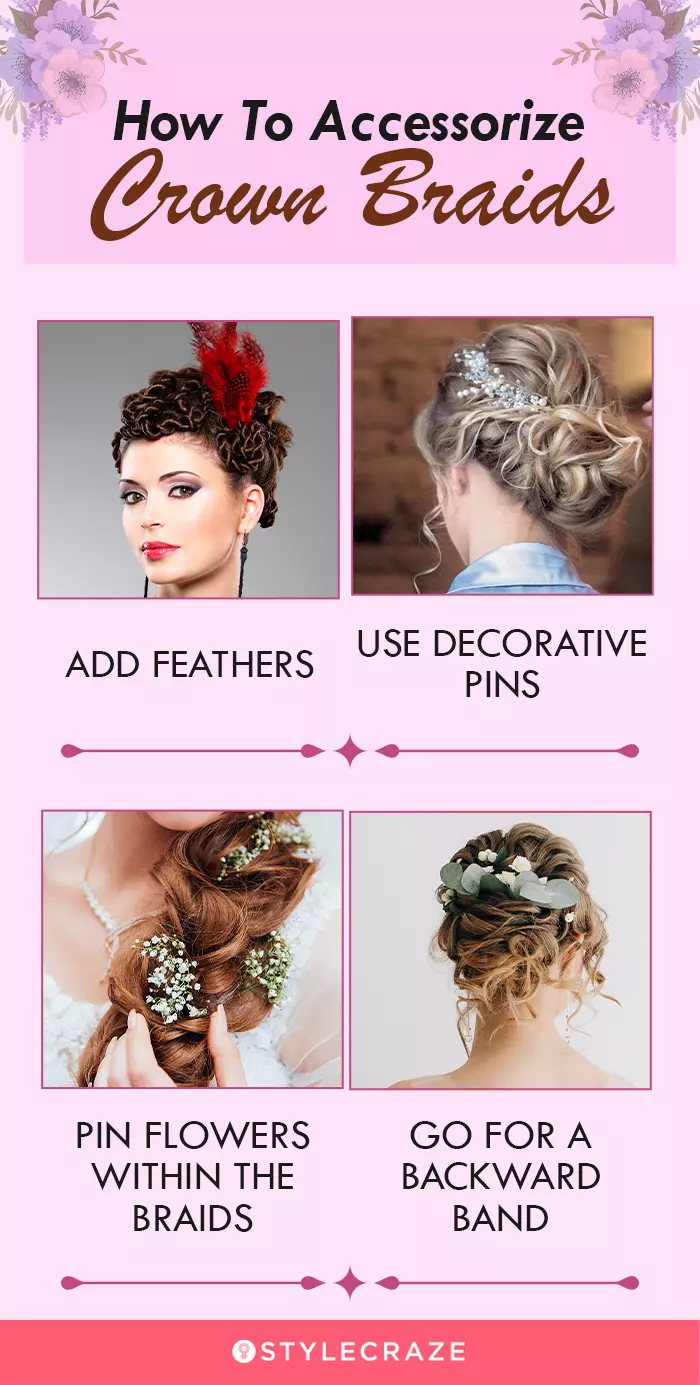
A crown braid is a gorgeous hairstyle that you can adapt in various ways to go well with any occasion. This versatile hairstyle looks uber feminine and chic at the same time. You will find a version if you were going for a hippie look, there is one that makes you look like a queen, and then you will also find a perfect one for a formal office look. We have shared some of the most stunning crown braid hairstyles in this article for you to play around with. Try them out to pick a favorite or create your own version by tweaking the tutorial steps.
Illustration: Stunning Crown Braid Hairstyles For All Occasions
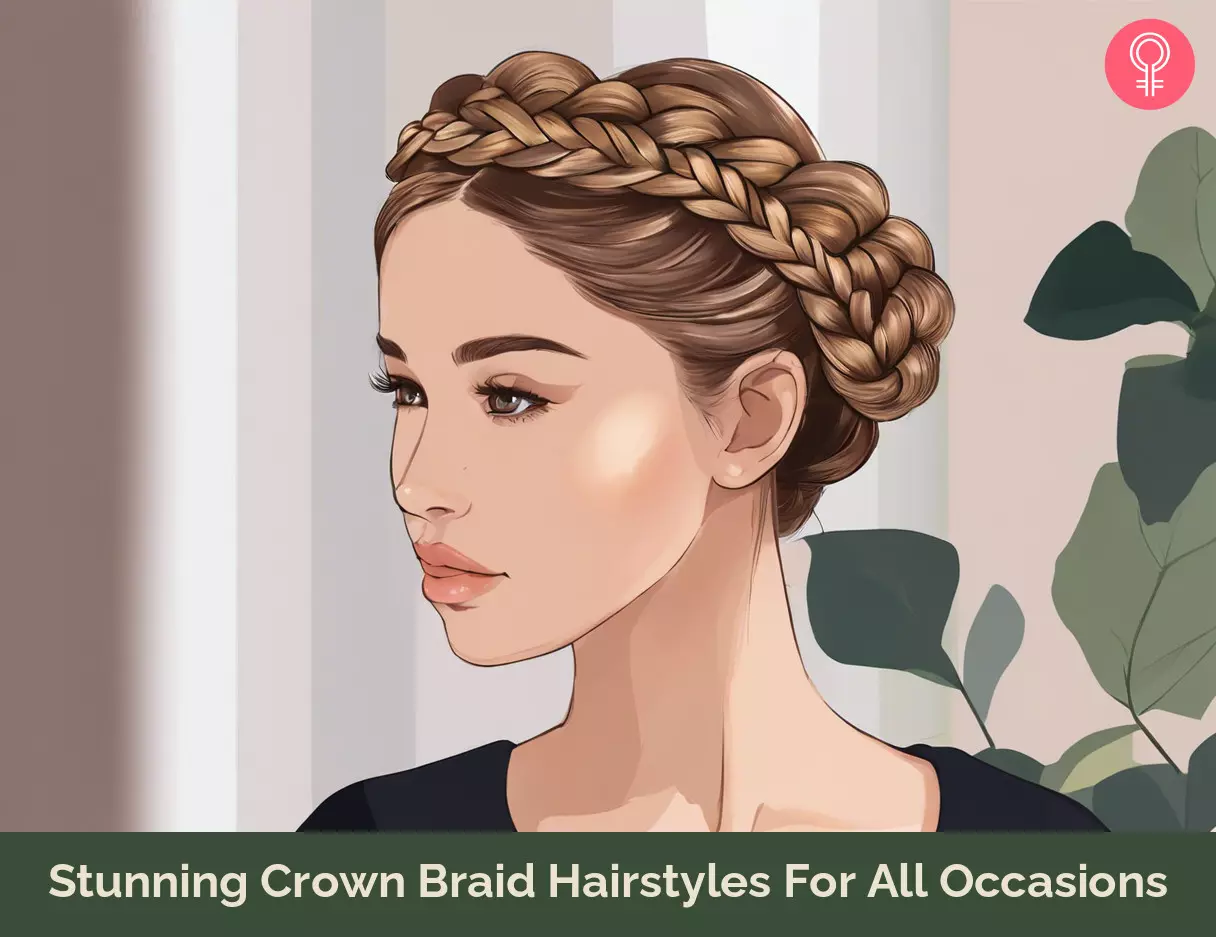
Image: Stable Diffusion/StyleCraze Design Team
Frequently Asked Questions
Where did crown braids originate?
Crown braids are believed to have originated in Medieval Europe. During those times, women were not encouraged to let their hair down. Therefore, they used to braid their hair and wrap it around their head.
Can you do a crown braid with short hair?
Yes, you can do a crown braid with short hair. Fishtail, boho, and starburst are some of the crown braids that you can try.
Can you wear a crown braid with curly hair?
Yes, you can sport a crown braid with curly hair! You can take the help of online tutorials to help you create your own crown braid. An updo and half-do are common braid styles you can try to help add dimension, volume, and depth to your hair.
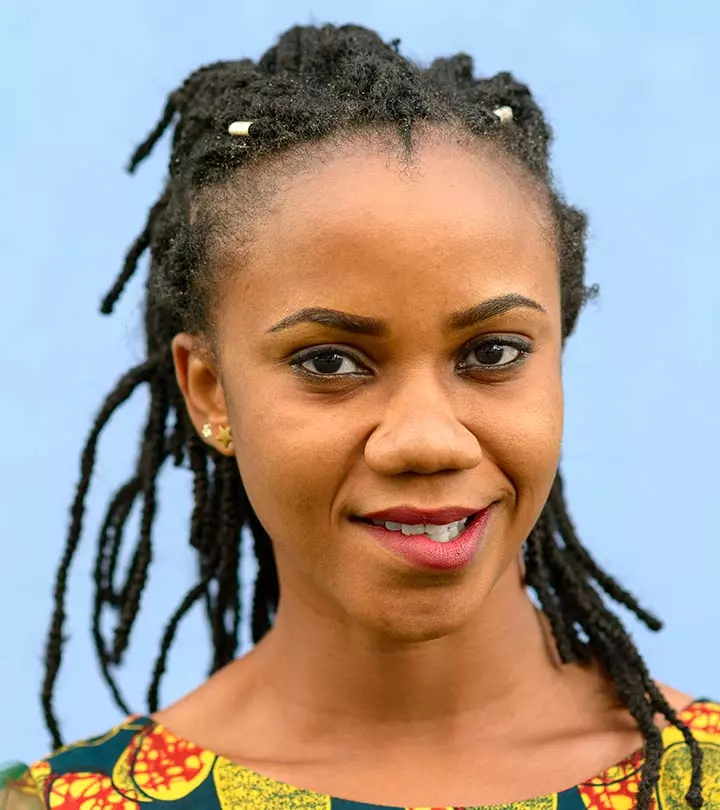
How do you crown braid dreads?
• Start by sectioning off a small portion of hair at the front of your head, on one side of your part.
• Braid this hair section in a traditional three-strand braid using your dreadlocks. To do this, take one dreadlock and place it over the middle strand of the braid, then continue braiding as usual.
• Continue braiding until you reach the back of your head and secure the braid with a bobby pin or hair elastic.
• Repeat the process on the opposite side of your hair.
• Once both braids are complete, tuck the ends of each braid behind your head and secure them with bobby pins.
Gently loosen the braids to create a more natural look. You can also add beads or ribbons to your crown braid to give it a more personalized touch.
Learn how to create a beautiful crown braid in minutes! Check this video for some easy steps to get the perfect regal look for every occasion.
Personal Experience: Source
StyleCraze's articles are interwoven with authentic personal narratives that provide depth and resonance to our content. Below are the sources of the personal accounts referenced in this article.
i. HAIR TUTORIAL// THE DOUBLE CROWN BRAIDhttp://www.freckled-fox.com/2012/07/hair-tutorial-double-crown-braid.html
Read full bio of Samuel Ashcroft
Read full bio of Anjali Sayee
Read full bio of Madhumati Chowdhury
Read full bio of Bhumika Daga



Community Experiences
Join the conversation and become a part of our empowering community! Share your stories, experiences, and insights to connect with other beauty, lifestyle, and health enthusiasts.