30 Beautiful DIY Side-Swept Hairstyles To Check Out In 2025
Simple as well as intricate styles adorning one side of your head, giving you a royal air.
Image: Shutterstock
Like old Hollywood glam? Then you need to try some side-swept hairstyles! They are a red-carpet favorite of many A-listers. This versatile hairstyle works for all face shapes. Side-swept hairstyles with bangs also cover a part of the forehead and cheeks to accentuate the jawline and make you look sultry. Here is a collection of the best side-swept hairstyles you can try out. Scroll down!
 Before You Get Started
- Side-swept hairstyles look great on most face shapes, but they might not be a flattering option for oblong faces.
- Straight as well as curly hair textures can pull off side-swept styles.
- For fine hair, layered bangs are a better choice for a side-swept look.
In This Article
30 Beautiful DIY Side-Swept Hairstyles
1. Curl Sweep
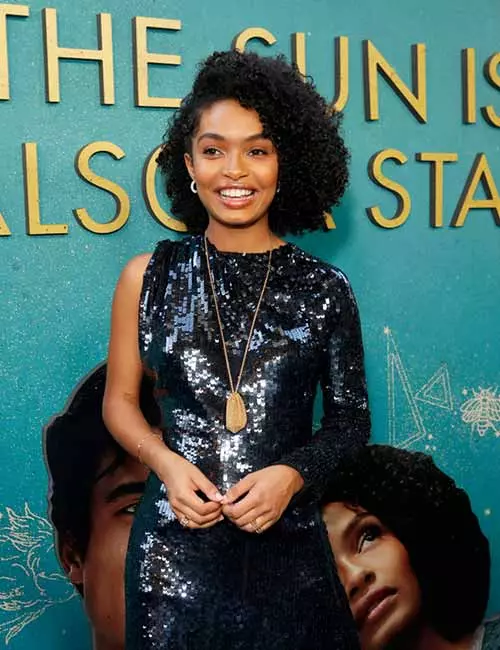
Yara Shahidi let the voluminous side of her natural curls grab all the attention with one huge side swoop.
What You Need
- Curling iron
- Hair brush
- Rat-tailed comb
- Hair mousse
- Hairspray
How To Do
- Brush your hair to remove any knots.
- If you’re not naturally curly-haired, using the curling iron, curl your hair into small sections. Apply mousse before curling your hair. After
- curling, lock the curls in place with some hairspray.
- If you have natural curls then apply some mousse thoroughly to your locks. You can also use a curl defining cream to enhance your curl structure.
- Sweep your hair to one side and blow dry it in place. The mousse will help hold the curls in place.
- Spritz some hairspray to increase the hold.
2. Side-Swept Braids
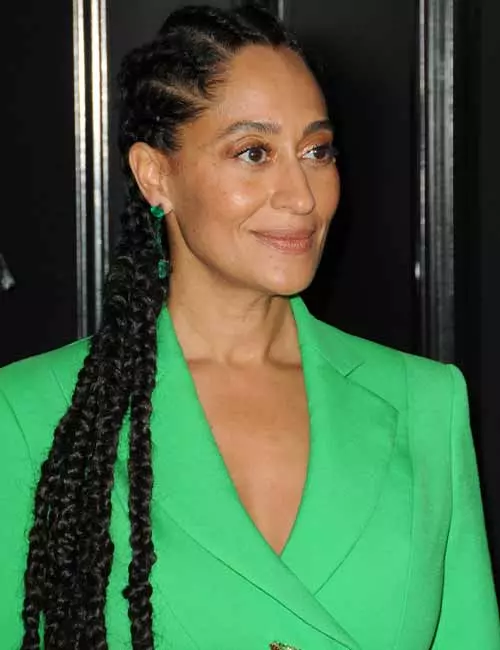
Tracee Ellis Ross’ braids are as remarkable as how she styled them–daring and dynamic.
What You Need
- Fine tooth comb
- Hair elastics
- Hairspray
- Edge Cream
- Oil or mousse
How To Do
- Detangle your hair.
- Pull back your hair and divide it into 6 sections from the scalp.
- Apply mousse or oil to each section.
- Weave each section into thick cornrows.
- Apply the edge cream as you weave the cornrows to avoid flyaways and keep the braids look sleek and tight.
- Sweep all the braids to one side and knot them together a few times near the nape.
- You can also use pins to hold the knots in place.
- Then spritz a generous amount of hairspray to set this side braid hairstyle.
3. Classy Side Sweep
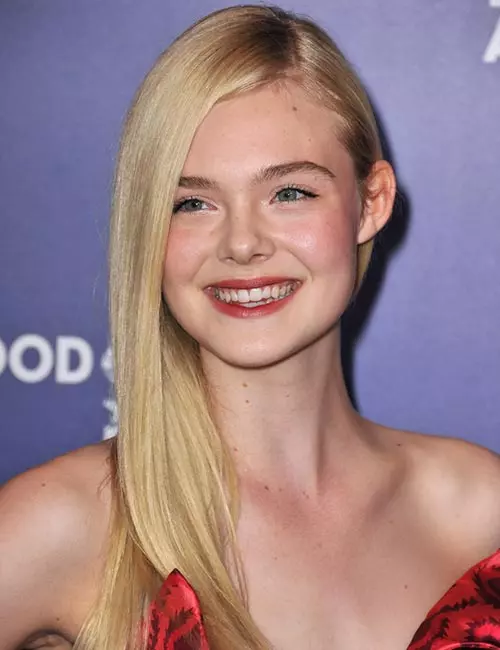
Simple and sweet, this side-swept hairstyle is easy to achieve. It does not require too much time to do, but still looks elegant.
What You Need
- Rat-tailed comb
- Straightening iron
- Hairspray
- Bobby pins
How To Do
- If you have naturally straight hair, lucky you! You can move on to the next step. If you have curly or wavy hair, straighten your hair.
- Use the rat-tailed comb to part your hair deeply on one side.
- Comb your hair and pull it to one side.
- Use the bobby pins to pin up the hair on the side of your parting with less hair.
- Spritz on some hairspray to set your hairstyle in place.
MS, a YouTube vlogger, shared her style of the classic side sweep that involves a bit of beach waves. She explained, “Before this style I decided to do waves but you don’t have to do. You can do straight hair. I just think this style looks best when there’s a little bit of movement and texture going on (i).”
4. Glamorous Side Sweep
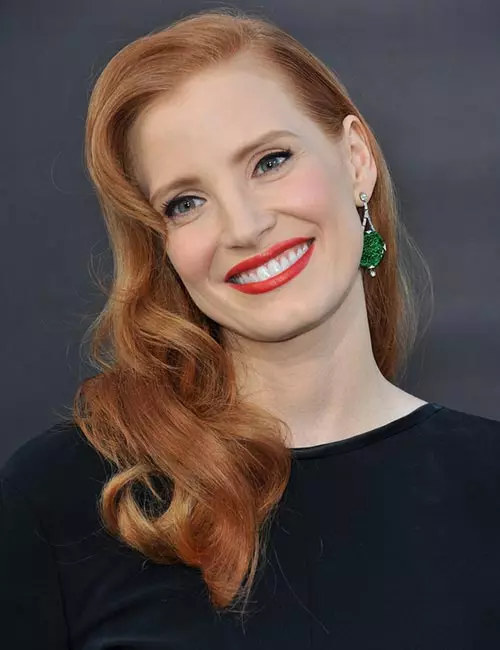
This is a classic hairstyle sported on Hollywood red carpets. Every actress has tried this look at award ceremonies. It is vintage and chic – perfect for any formal event.
What You Need
- Round brush
- Blow dryer
- Hairspray
- Bobby pins
How To Do
- Wash your hair and let it air dry until it is damp.
- Spritz on a good amount of hairspray.
- Using the round brush and blow dryer, style your hair in light curls.
- Part your hair in a deep side parting and sweep all your hair over your shoulder.
- Set your hair in place with the help of hairspray and bobby pins.
Licensed hair stylist and founder of Twisted Scissors Salon, Jessica Shults
says, “Another way to achieve these curls is to start with dry hair and then set your hair in hot rollers for 20 min. Take the rollers out and smooth the curls with a brush.” And then, finish with a spray and pins to keep the style in place.
5. Braided Side Updo
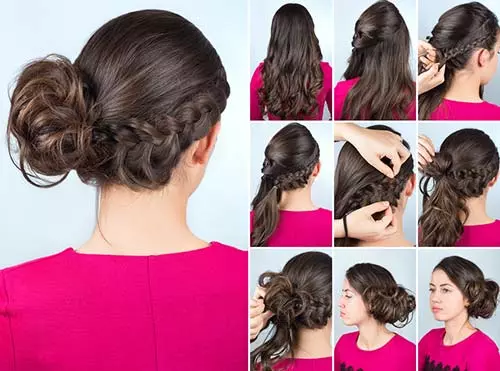
This side-swept braided updo looks stunning. The side bun will flaunt your hair texture, while the braid adds a fashionable touch to your look.
What You Need
- Curling iron
- Hair clip
- Elastic bands
- Bobby pins
- Hairspray
How To Do
- Curl your hair from midway down using the curling iron.
- Divide your hair diagonally into a top and a bottom section. Clip up the top section of hair.
- Weave a Dutch braid with the bottom section of hair. Make sure it stays close to the scalp. Weave the braid until the back hairline and use an elastic band to secure it.
- Pancake the braid, so it looks flatter and bigger.
- Unclip the top section of hair and merge it with the remaining bottom section of hair.
- Wrap the hair in a side bun, leaving the ends hanging out.
- Secure the bun in place with an elastic band, some bobby pins, and hairspray.
6. Big Curls Side Sweep
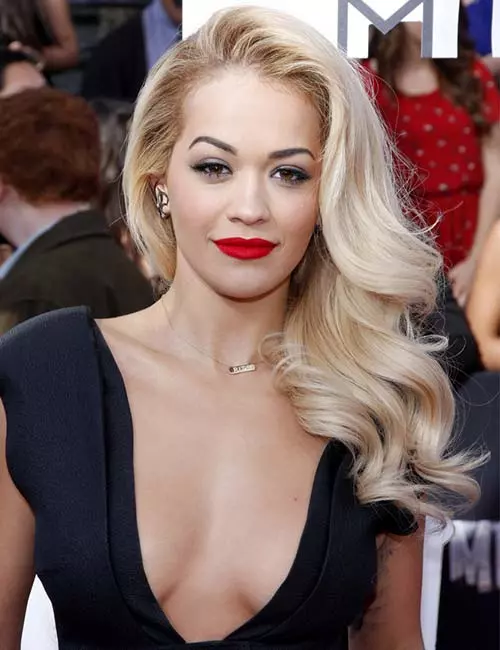
Curls give your hair a more voluminous and thicker look. Your hair will bounce more when curled. Instead of ringlets, opt for big open curls that add less bounce but more volume. This is a great side-swept hairstyle for weddings.
What You Need
- Curling iron
- Hair mousse
- Hair brush
- Hairspray
How To Do
- Wash your hair and let it air dry completely.
- Apply a good amount of mousse to your hair.
- Curl your hair from midway down.
- Spritz on some hairspray and let them cool down.
- With the brush, add some lift to your hair in the front.
- Sweep all your hair to one side. Use bobby pins to keep it in place.
- Finish off with a hit of hairspray.
offers important hair styling advice, “You should not curl hair when it is still wet. If you want to use a curling iron, do it on second day hair, for two reasons. If you wash the hair, immediately blow dry, and then curl, you just put your hair through two heat stressors in a row, which is harsh on the hair. It’s best to give your hair a chance to relax between all heat treatments. Also the hair will hold better on slightly dirty hair, as opposed to clean hair in which the curl will fall out sooner.”
7. Braided Side Bun
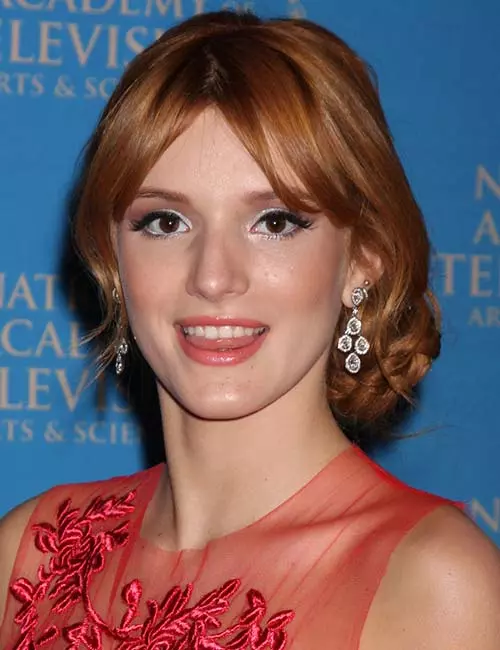
Elegant and quick, the braided side bun is another favorite. If you have a formal event to attend, like prom or homecoming, this hairstyle should certainly be on your list.
What You Need
- Bobby pins
- Thin elastic bands
- Hairspray
How To Do
- Sweep all your hair to one side and divide it into two sections.
- Weave each section into regular three-strand braids.
- Secure the braids with thin elastic bands.
- Pancake the braids to make them look bigger.
- Roll one of the braids to form a bun, then roll the other braid around it to make the bun bigger.
- Secure them in place with bobby pins.
- Don’t forget that final hit of hairspray.
 Quick Tip
8. Loose Side Braid
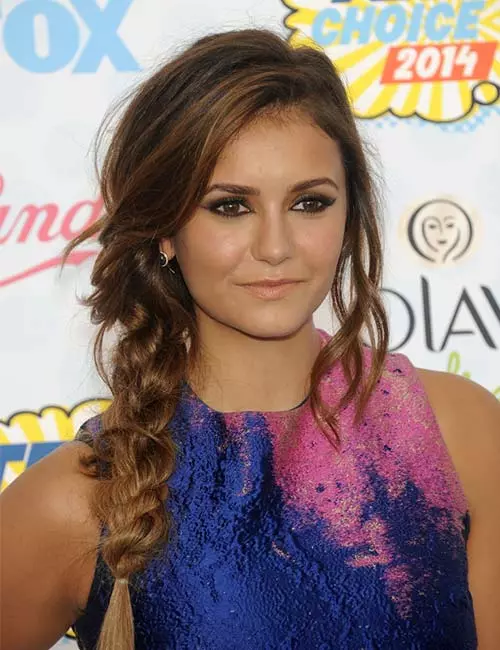
Nina Dobrev looks stunning in this loose side braid look. It’s messy – but not too much – while the braid itself is neat.
What You Need
- Hair brush
- Elastic band
- Hairspray
How To Do
- Pull your hair to one side and brush it to remove any tangles or knots.
- Run your fingers through your hair to make it a little messy, allowing some strands to fall in the front.
- Divide your hair into three sections and weave them into a braid.
- Secure the end of the braid with an elastic band.
- Pancake the braid by gently pulling each stitch apart.
- Spritz some hairspray on the braid, and you are good to go.
9. Big Bouffant And Side Braids
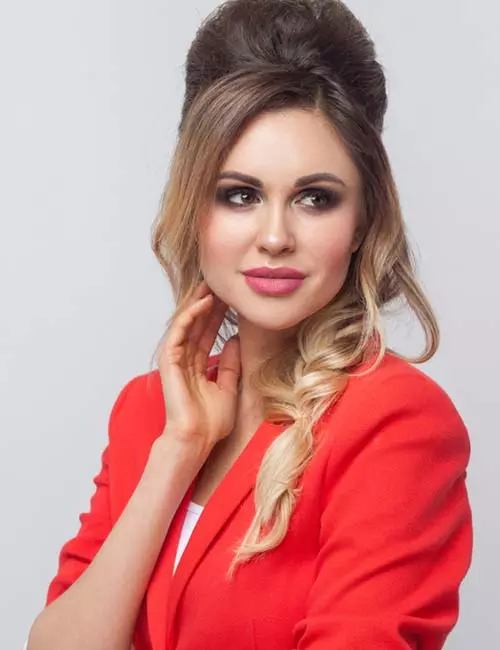
Every woman loves vintage style, so why not add a touch of vintage to your hairstyle?
What You Need
- Comb
- Elastic band
- Bobby pins
- Hairspray
How To Do
- Divide your hair horizontally into two sections.
- Leaving out some hair in the front, backcomb the hair in the top section to create a bouffant. Comb down the top of the bouffant neatly, leaving it messy underneath. This will give it a nice lift.
- Pin the bouffant in place and spritz on some hairspray.
- Part the hair in the front in a side parting.
- Pull the bottom section of your hair to one side and weave it in a loose and messy braid. Secure the end with an elastic band.
- Pancake the braid and give it one more hit of hairspray.
10. Messy Side Updo
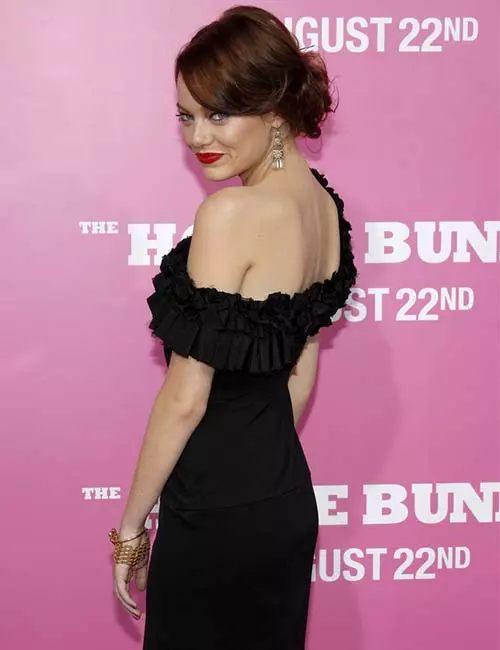
Emma Stone always surprises us with her red carpet hairstyles. Whether it’s going all blonde and sleek or this cute romantic side messy updo, she knows how to make heads turn.
What You Need
- Hair rollers
- Blow dryer
- Elastic band
- Bobby pins
- Hairspray
How To Do
- Wash your hair and let it air dry till it’s damp.
- Spritz on a good amount of hairspray.
- Wrap your hair in sections around the rollers.
- Once all your hair is in rollers, blow dry it on a low setting.
- Keep the rollers in your hair for half an hour to set the curls.
- Remove the rollers and give your hair a hit of hairspray.
- Part your hair in the front in a deep side parting.
- Sweep all your hair to one side and wrap it in a bun, leaving just the ends out.
- Secure it with the help of an elastic band and bobby pins.
11. Crimped Side Swept Updo
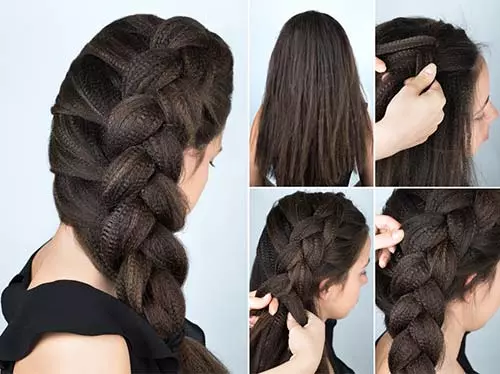
Crimping seems to be making quite a comeback. Instead of being loud, like in the ‘90s, stylists are now adding crimped hair to other hairstyles.
What You Need
- Crimping tool
- Elastic band
- Hairspray
How To Do
- Crimp your hair with the crimping tool.
- Comb your hair to one side of your head.
- Weave your hair in a Dutch braid, making sure to align it with the side of your head.
- Secure the end of the braid with an elastic band.
- Pancake the braid and spritz on some hairspray.
12. Braided Faux Undercut
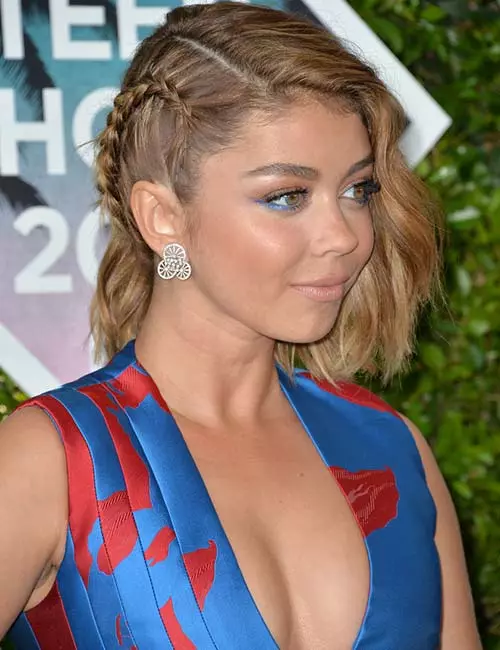
To be honest, I love undercut and sidecut hairstyles, but I’m not on board with shaving my hair. This is a great hairstyle hack if you are like me.
What You Need
- Rat-tailed comb
- Thin elastic band
- Hair mousse
How To Do
- Part your hair in a deep side parting from the front to the back hairline.
- Clip up the hair on the side of your parting with more hair.
- Apply mousse to the loose hair.
- Weave a Dutch braid with the moussed hair, keeping it close to the scalp. Use the tail end of the comb to add hair to the side sections. This will give your hairstyle a neater look.
- Secure the ends of your braid with a thin elastic band.
- Apply a little mousse on the hair right at the parting. This will lock each side in its place.
- Spritz on some hairspray to set the hairstyle.
13. Pretty Side-Swept Updo
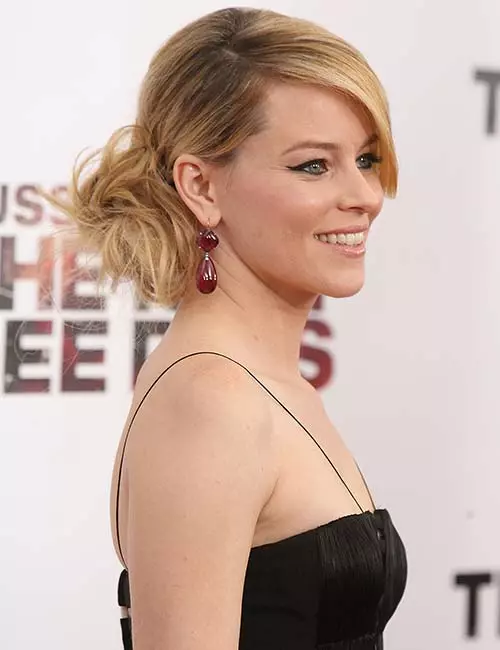
Elizabeth Banks cleans up good! While she mostly plays characters who dress pretty normal, her red carpet hairstyles show us how stylish she really is. This hairstyle works great for medium-length hair.
What You Need
- Hair brush
- Bobby pins
- Hairspray
How To Do
- Brush your hair to remove any tangles and knots.
- Part your hair with your fingers in a deep side parting.
- Hold your hair as if it were a ponytail at the nape of your neck. With your other hand, pick up the ends of your hair and lift them over and under the first hand. This creates a circle of hair over your first hand. Depending on the length of your hair, you might have to do this a few times.
- Pass the rest of your hair through the hair circle. Pin the hair circle in place and let the ends hang loose.
- Finish off with some hairspray.
14. Classy Side Ponytail
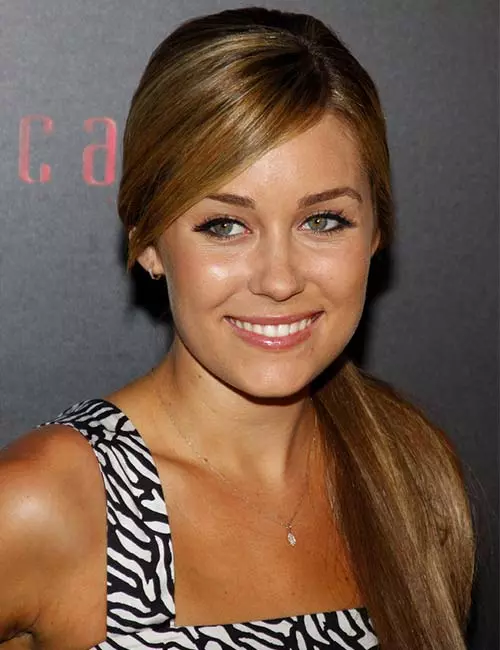
Lauren Conrad shows us how you can be stylish while keeping things simple with this hairstyle. This hairstyle can be achieved with long, medium, or short hair.
What You Need
- Elastic band
- Comb
- Hairspray
How To Do
- Spritz some hairspray all over your hair.
- Part your hair at the front in a deep side parting.
- Sweep all your hair to one side and tie it in a low ponytail.
- Lock the hairstyle in with a little more hairspray.
15. Half Ponytail Side Sweep
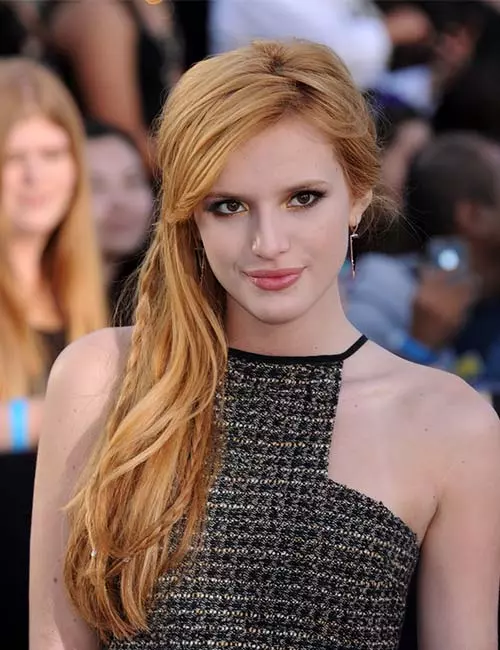
A half ponytail makes for a great side-swept hairstyle. It accentuates your cheekbones. This hairstyle is great if you are looking for a bridesmaid hairstyle or something for your winter formal.
What You Need
- Barrette
- Hair mousse
- Hairspray
How To Do
- Apply mousse to your hair.
- Pull back the hair at the top of your head and loosen it a bit. Use your fingers to do this to create a messy parting.
- Secure the half ponytail with a barrette.
- Sweep all your hair to one side and use bobby pins to secure it in place.
16. Wavy Side Sweep
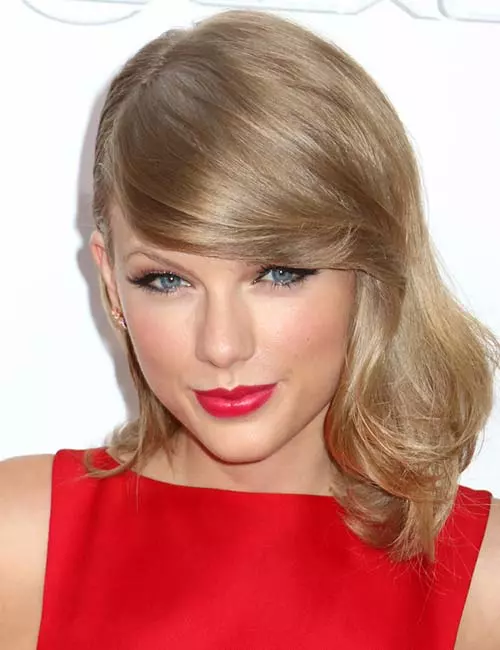
Queen of music, Taylor Swift shows us why she’s numero uno even when it comes to style.
What You Need
- Hair mousse
- Comb
- Round brush
- Blow dryer
How To Do
- Apply mousse to your tangle-free hair and brush it down.
- Part your hair on one side.
- Apply a little more mousse to the side with lesser hair and comb it down, sweeping the ends towards the other side. Use bobby pins to secure the sweep.
- Roll your hair around the round brush in big sections and blow dry them to form curls.
- Arrange your hair in place and spritz on some hairspray.
17. Natural Curly Side Sweep

America’s sweetheart, Sandra Bullock, looks ravishing in this messy side-swept hairstyle.
What You Need
- Comb
- Thin hair rollers
- Blow dryer
- Hairspray
- Bobby pins
How To Do
- Wash your hair and let it air dry until it’s damp.
- Comb your hair to detangle it and part it in a slanted side parting.
- Using the thin rollers, curl your hair in thin sections. Make sure to roll your hair from the ends up.
- Blow dry the rolled hair on a medium setting.
- Spritz on some hairspray.
- Remove the rollers and brush your hair gently to make the curls look more natural.
- Gather your hair and sweep it to the side, keeping it tucked behind your ear.
- Pull out some hair from the front, so it falls gracefully.
- Wrap the rest of your hair in a side bun. Use bobby pins to keep it in place.
- Spritz on some hairspray to finish off the look.
 Quick Tip
18. Country Side Sweep
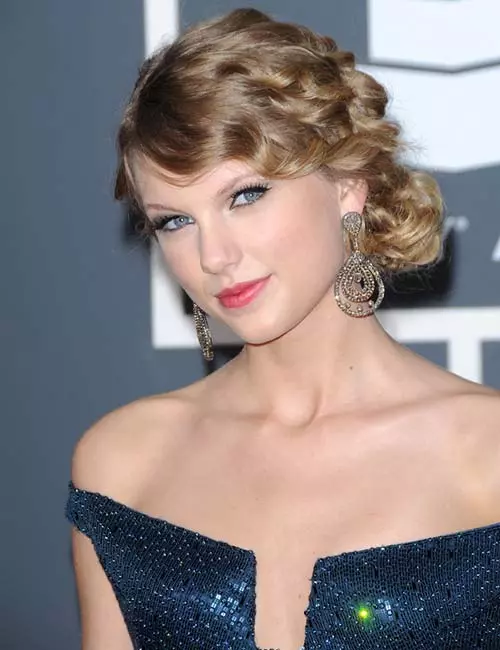
Country music and curls go hand in hand. Taylor Swift’s long curls were iconic. This side-swept curly updo floored everyone.
What You Need
- Comb
- Curling iron
- Hairspray
- Bobby pins
How To Do
- Wash your hair and let it air dry until it is damp.
- Comb your hair to detangle it and part it in a slanted side parting.
- Curl your hair in thin sections.
- Spritz on some hairspray and let the curls cool down for a few seconds.
- Sweep all your hair to one side.
- Wrap your hair in a side bun and use bobby pins to secure it in place.
- Spritz on some hairspray.
19. Simple Classy Side Bun
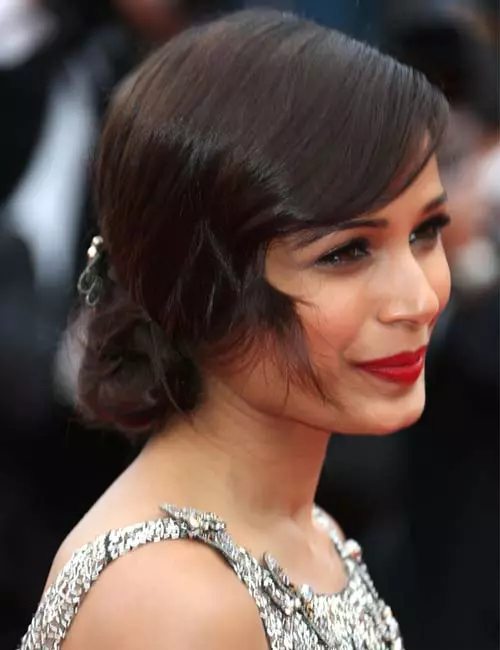
You don’t always need to go big with your hair to make an impression. All you need is a classy and neat side bun.
What You Need
- Comb
- Hair mousse
- Curling iron
- Long steel clip
How To Do
- Comb your hair to remove any knots and tangles.
- Pump some mousse onto your palm and apply it to your hair.
- Part your hair in a deep side parting.
- Apply a little more mousse to your deep side-swept bangs.
- Style your bangs in an S wave with the curling iron.
- Keep your bangs in the curling iron for about 3 seconds, then pin them in place with the steel clip to achieve the S.
- Pull the rest of your hair to the side and wrap it in a bun.
- Remove the steel clip and spritz on some hairspray.
20. Messy Curls Side Sweep
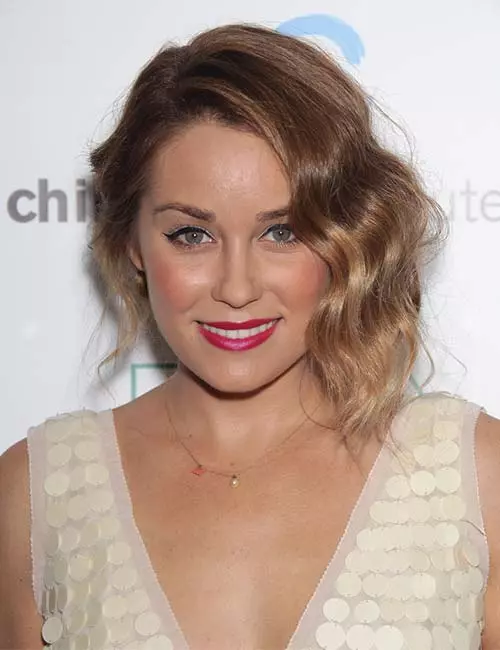
Lauren Conrad proves once again why she is at the top of her game with this chic hairstyle.
What You Need
- Curling iron
- Hair brush
- Bobby pins
- Hairspray
How To Do
- Brush your hair to remove any knots.
- Spritz hairspray all over your hair.
- Using the curling iron, curl your hair in big sections.
- Spritz on some more hairspray to lock the curls in place.
- Brush down your curls gently, making sure to not disrupt them entirely. This will give your curls a flowy pattern.
- Brush your hair to one side and secure it with pins.
- Pull out some hair at the front to fall to one side.
- Wrap the rest of your hair in a side bun and pin it in place.
- Give the hairstyle one final hit of hairspray.
21. Slight Side Bubble
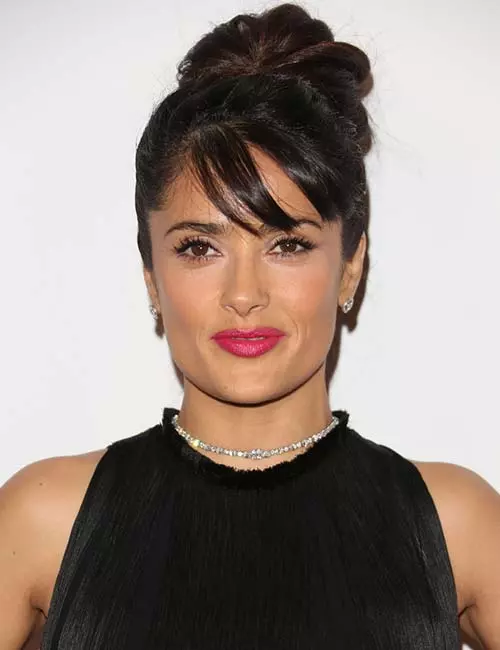
Selma Hayek keeps things modern yet classy with this slight side bubble hairstyle.
What You Need
- Comb
- Elastic band
- Bobby pins
- Hairspray
How To Do
- Comb your hair to remove any knots.
- Leaving out your bangs, gather all your hair to the crown of your head.
- Hold your hair as you would a ponytail, pulling it a little below the crown and to the side.
- Pass an elastic band over the ponytail and twist it once.
- Keeping the elastic band away, hold the base of your ponytail with the same hand.
- With the first hand, fold the ponytail forward to form the bubble of the updo.
- Pass the elastic band over the bubble to secure it, twist it, and pass it over again.
- Wrap the ends of your hair around the base of the bubble to cover the elastic band.
- Use bobby pins to secure the bubble and the base.
- Pancake the bubble to make it look bigger.
- Secure the hairstyle in place with some hairspray.
22. Three-Strand Side Braid
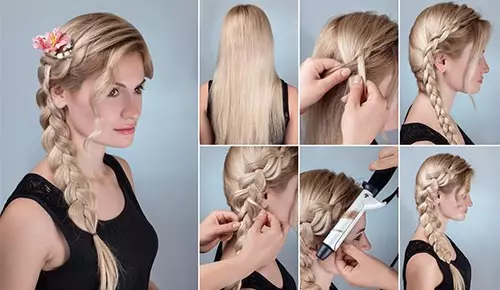
Instead of a simple side braid, opt for this side braid that uses the French braid technique.
What You Need
- Comb
- Elastic band
- Flower hair accessory
- Curling iron
- Hairspray
How To Do
- Comb your hair to remove all tangles and knots.
- Sweep all your hair to one side.
- Weave a Dutch braid with it, adding more hair from the sides to the side sections with each stitch of braid.
- Secure the ends with an elastic band.
- Pancake the braid to make it look flatter and bigger.
- Curl your bangs with the curling iron.
- Add in the flower to accessorize the braid.
- Spritz on some hairspray to finish off the look.
23. Teased Side Braid
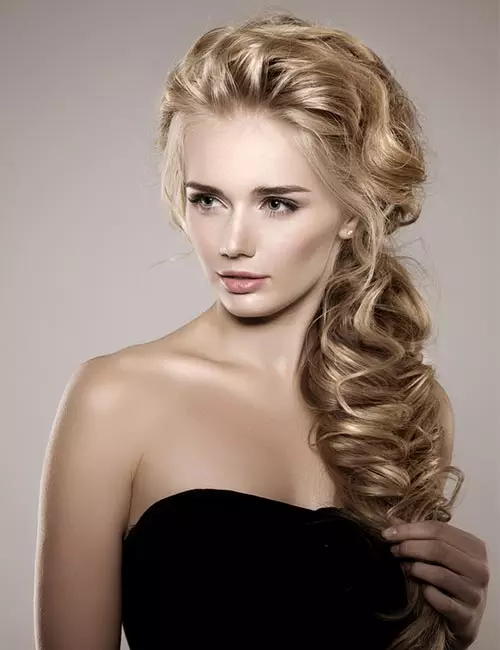
Volume, volume, volume! That’s what women want! We want our braids to look big and not like rat tails. This hairstyle is a brilliant fix for that.
What You Need
- Comb
- Bobby pins
- Elastic bands
- Hairspray
How To Do
- Pick up some hair from the top and tease it at the front to add some lift to it.
- Weave a braid with the rest of that section of hair. Secure the end with an elastic band.
- Tease the rest of your hair with the comb to make it look fuller.
- Add more hair to the braid by passing it through the stitches of the braid. This will give it a mermaid braid look.
- Use bobby pins to secure the hair in place.
- Finish off with a hit of hairspray.
24. Double Side Braids
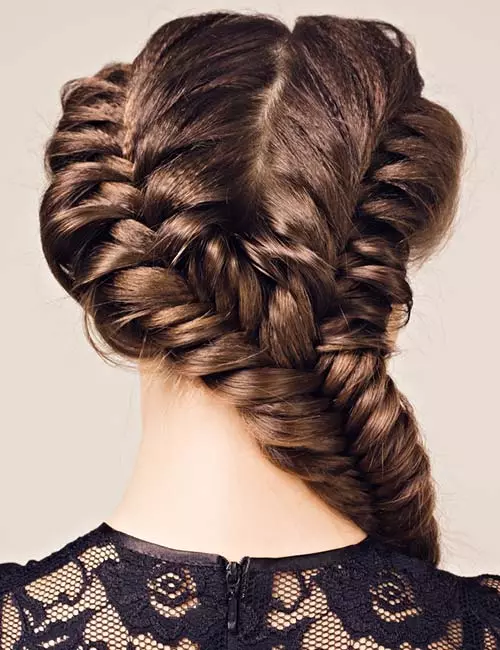
Add a cool twist to a regular fishtail braid with this hairstyle!
What You Need
- Comb
- Bobby pins
- Clip
- Elastic bands
- Hairspray
How To Do
- Comb your hair and part it down the middle from the front to the back hairline. Clip up one section of hair.
- From the open section of hair, pick up a little hair from the center at the front and weave a regular braid until the back hairline. Secure the ends with an elastic band.
- Add in hair from both sides of the braid to create a mermaid braid.
- Repeat the same with the other section of hair.
- Secure the ends with elastic bands and spritz on some hairspray.
25. Pouf Side Updo
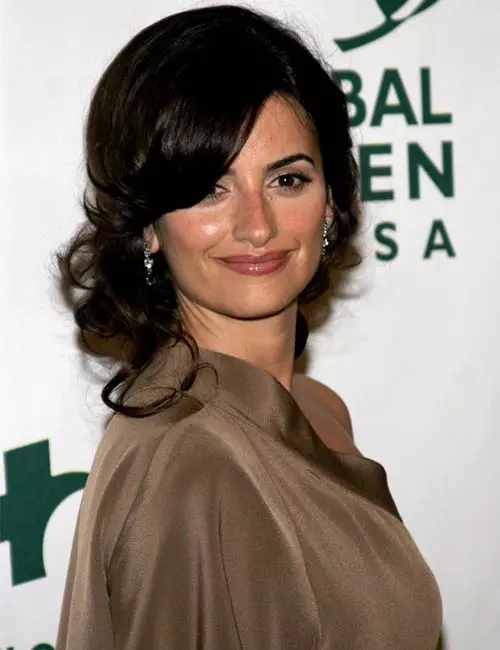
Penelope Cruz has stunning hair. It is shiny and thick. And when she styles her hair in a side updo, you know you need to try it as well!
What You Need
- Comb
- Bobby pins
- Elastic bands
- Hairspray
How To Do
- Comb your hair, so it falls behind your shoulders.
- Tease the hair at the crown of your head. Comb the top neatly, so the mess underneath is not visible.
- Gather all your hair and tie it into a side bun, leaving out the ends.
- Push the bun higher to make the pouf bigger.
- Secure the bun with bobby pins and hairspray.
26. Deep Side-Swept Bangs
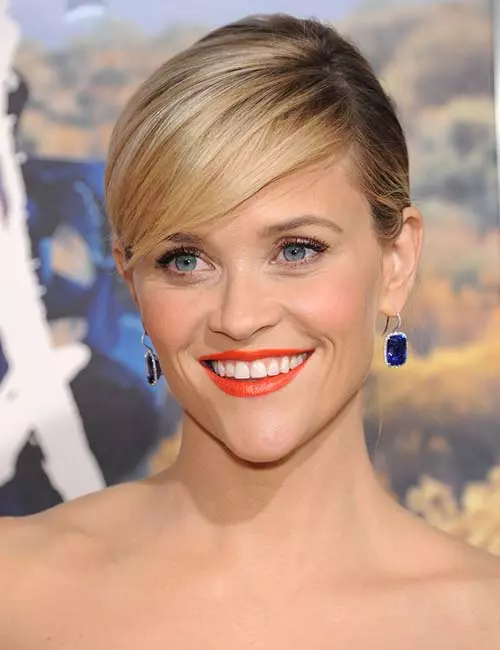
Reese Witherspoon is not just the poster child for blonde hair. She’s also the brand ambassador for side-swept bangs!
What You Need
- Rat-tailed comb
- Elastic band
- Bobby pins
- Hairspray
How To Do
- Comb back all your hair while removing all tangles and knots.
- Place the tail end of your comb near the end of your eyebrow and slide it up, to part your hair on one side.
- Comb the hair on each side of the parting to create the side-swept bangs.
- Tie your hair in a bun at the nape of your neck and spritz on some hairspray to finish off the look.
27. Slanted Tri-Knotted Bun
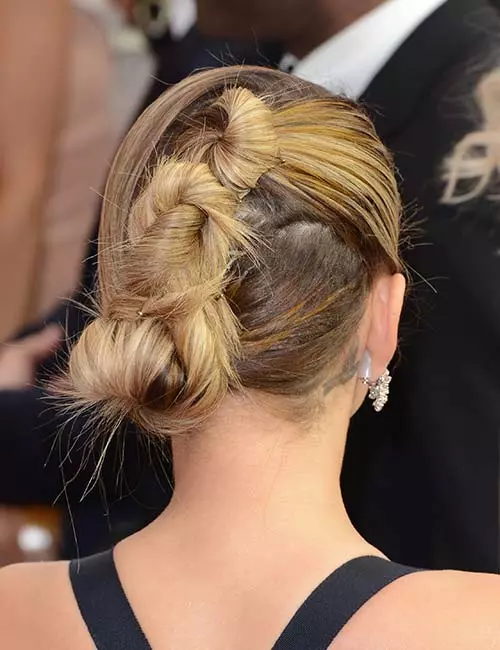
Knotted hairstyles are all the rage right now! So, of course, I had to add this stunning hairstyle to the list.
What You Need
- Comb
- Hair mousse
- Bobby pins
How To Do
- Apply some mousse to your comb and comb your hair back, so it falls behind your shoulders.
- Divide your hair horizontally into three sections: top, center, and bottom.
- Sweep the bottom section of hair to one side and knot it to form a bun. Use pins to keep it in place.
- Sweep the middle section of hair slightly away from the bottom section. Knot it to form another bun. Use hairpins to secure it.
- Comb the top section of hair and knot it into a bun slightly away from the middle section. Use bobby pins to secure the bun.
- With some more bobby pins, merge the three buns to create the slanted updo.
28. Hollywood Side Updo
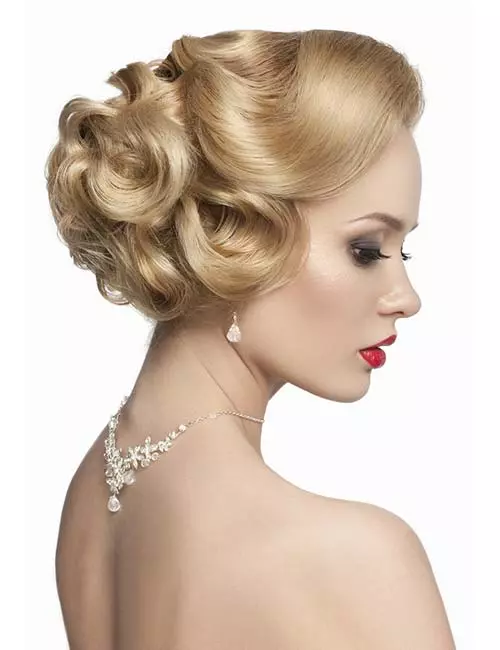
Take Hollywood curls to the next level with this side updo! Hair fashion at its finest, opt for this hairstyle for any gala or event.
What You Need
- Round brush
- Blow dryer
- Hair mousse
- Long steel clips
- Bobby pins
- Hairspray
How To Do
- Apply mousse to your hair.
- With the round brush and blow dryer, style your hair in waves and lock them in place with the long steel clips.
- Spritz some hairspray on the clipped waves and leave them on for a few minutes.
- Remove the clips without disrupting the waves.
- Neatly arrange your hair, so it falls to one side.
- Use bobby pins to fashion the waves into a side bun.
- Arrange the wavy bangs on one side, and give the hairstyle a final hit of hairspray.
29. Wispy Side-Swept Bangs
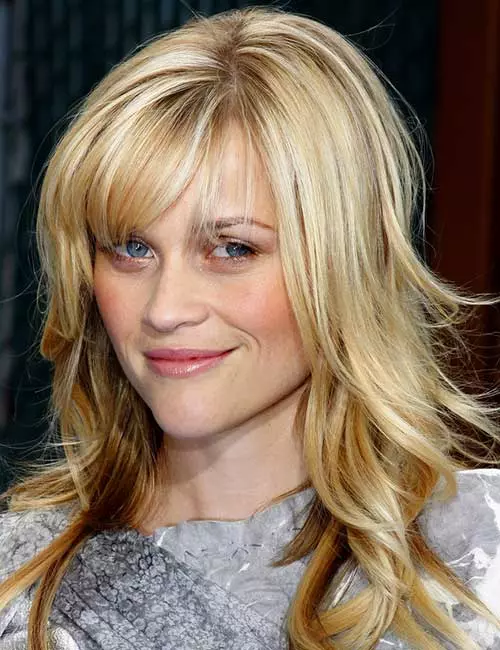
No one pulls off side-swept bangs like Reese Witherspoon. Side-swept bangs are God’s gift to people with a heart-shaped face. If you don’t have bangs, but desperately want them, read through the haircut process below! Here’s how you can get the perfect side-swept bangs.
What You Need
- Rat-tailed comb
- Sharp hair-cutting scissors
- Hair clip
- Straightening iron
How To Do
- Blow dry your hair before you start. It will give your hair the needed texture and lightness for wispy bangs.
- Gather the hair from the mohawk section and straighten it in thin sections.
- Comb your hair down, allowing it to fall on your face. Arrange your hair as you would like the bangs.
- You will be cutting your bangs slightly longer than the length you want them at, keeping its bounce in mind. Take a thin section of hair at the center of the bangs. Make sure it’s close to your face, so it’s cut at the right height.
- Take a pair of scissors and point it downwards. Open the scissors so that the hair is almost at the end. Open and close the scissors lightly as you move it down your hair, making sure to never close it fully. This will give your bangs a feathered look.
- Cut the rest of your bangs in a similar manner, shorter in the middle and longer at the sides.
- Once it is cut, comb and style it as you please.
30. Loose Side Bun With Thick Bangs
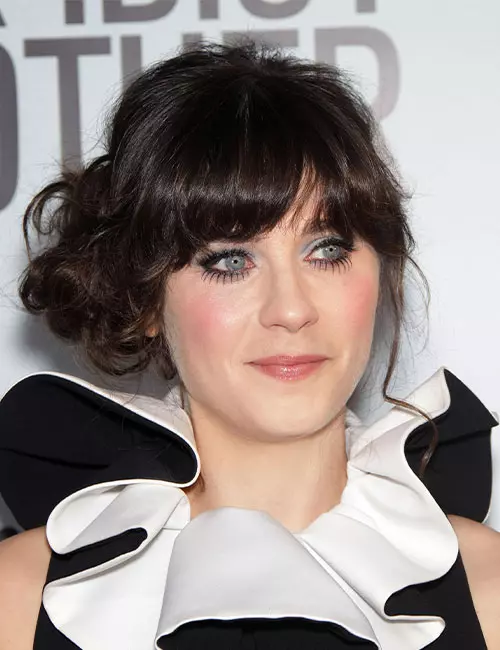
Loose side bun hairstyles are quite common on the red carpet and this look on Zooey Deschanel explains why! This effortlessly chic hairdo combines the classic charm of a loose side bun with the bold statement of thick, eye-grazing bangs.
What You Need
- Hair rollers
- Hair straightener
- Blow dryer
- Elastic band
- Bobby pins
- Hairspray
How To Do
- Wash your hair, let it air dry, and spritz some hairspray.
- Divide your hair into small sections, wrap them around rollers, and blow dry on them.
- Remove the rollers after half an hour and use hairspray to set the curls.
- Then, comb back your curls, sweep it to one side, and wrap it in a loose bun.
- Secure it with an elastic band and bobby pins.
- Use a straightener to straighten your bags and let them fall on your forehead.
When it comes to side-swept hairstyles, you should learn how to work with your hair type to really oomph up your style. Learn some easy styling tips in the next section.
Key Takeaways
- From classy and messy to braids and bouffant, side-swept hairstyles go well with many.
- Celebrities like Emma Stone, Salma Hayek and Elizabeth Banks have flaunted their side-swept hairstyles.
- It is essential to clean your hair and detangle them to create a perfect side hairstyle.
Styling Tips For Different Hair Types
Here are some quick and easy styling tips for different hair textures:
- Straight Hair: For a sleek look, use a light mousse for volume, then sweep your hair to the side. Flat iron your locks to give it a sleek straight look and finish with hairspray to keep it in place.
- Curly Hair: Apply curl defining cream to enhance your hair texture. Once your curls are set, then gently sweep your hair to one side. Secure with pins or a clip or you can leave some curls loose for a softer look.
- Wavy Hair: Use a texturizing spray to enhance your waves, then loosely sweep your hair to the side. You can leave it down or add a braid for a fun twist.
Infographic: 6 Must-Try Side Swept Hairstyles
Side-swept hairstyles are trendy and chic. They can be dressed up or down for any occasion and styled in multiple ways. In the infographic below, we have compiled a list of the top side-swept and over-the-shoulder hairstyles we absolutely love! They are perfect for formal and dressy occasions and are easy to recreate. Scroll down and check them out.

Illustration: StyleCraze Design Team
Side-swept hairstyles are super versatile and look amazing on all face shapes. You can try this type of hairstyle on various occasions, like weddings and festive celebrations. These hairstyles are quick and easy to achieve. The classy side sweep, glamorous side sweep, braided side updo, and braided side bun are some popular DIY side hairstyles that you can try out. These hairdos can make everyone’s heads turn when you do them right. Check out this article to try your hand at a gorgeous side-swept look!
Frequently Asked Questions
How do you cut a side-swept undercut?
Get an undercut hairstyle on your back and sides and leave a long section of bangs on top. Use a rat tail comb to define your hair and style it to your flattering side.
How do you cut Korean side bangs?
Section your hair and trim it so that the centermost smallest length falls below your nose and the outermost longest falls just past your lips. Volumize your bangs with hair rollers. If you follow popular hair trends, this one most certainly should be in your list.
Can I incorporate accessories into my side-swept hairstyle?
Yes, you can add hair accessories such as flowers, pearl clips, and beaded pins to elevate your looks to the next level.
What is the difference between side-swept bangs and a regular side-swept hairstyle?
Side-swept bangs refer to deep bangs that fall prominently on one side of your forehead and help soften your facial features, whereas regular side-swept hairstyles are hairdos where the hair is swept to one side (either side of the neck) and styled.
Illustration: Beautiful DIY Side-Swept Hairstyles To Check Out
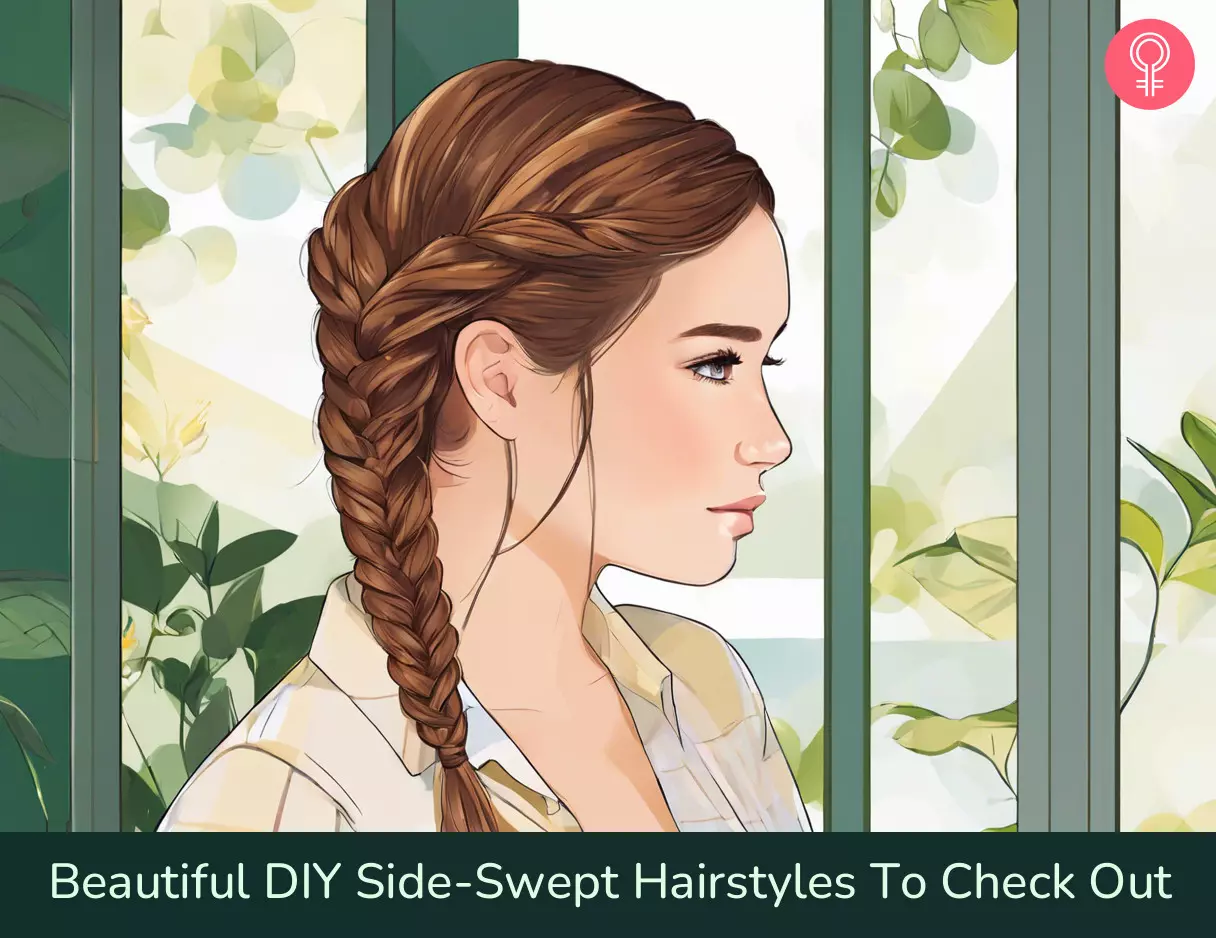
Image: Stable Diffusion/StyleCraze Design Team
Learn a quick and easy trick to get a side-swept hairstyle without using any pins! Perfect for a night out or a special occasion, this modish look is bound to make heads turn, so check out the video below now!
Personal Experience: Source
StyleCraze's articles are interwoven with authentic personal narratives that provide depth and resonance to our content. Below are the sources of the personal accounts referenced in this article.
i. Side Swept Hairstylehttps://www.youtube.com/watch?v=01Z7pyM5XnA
Read full bio of Jessica Shults
Read full bio of Anjali Sayee
Read full bio of Subhrojyoti Mukherjee
Read full bio of Anu Pallavi






Community Experiences
Join the conversation and become a part of our empowering community! Share your stories, experiences, and insights to connect with other beauty, lifestyle, and health enthusiasts.