16 Arm Workouts Without Weights To Lose Arm Fat Fast At Home
Reduce fat and tone your muscles to get those sculpted arms and chiseled look.
Image: StyleCraze Design Team
Arm exercises are good for shedding arm fat. They strengthen and tone the arms as well. Thankfully, you can do arm exercises without weights at home to get the same benefits of weighted arm exercises. Yes, you heard that right! You don’t need dumbbells, pilates equipment or any other equipment – just your body weight. Do these 15 effective arm exercises without weights to lose arm fat fast. Let’s begin!
In This Article
How To Build Arm Muscles Without Weights
Jesse Feder, RD, CPT, CSCS, says, “You can most definitely build arm muscle without lifting weights. Besides sufficient protein and calorie intake, all you need to build arm muscle is resistance. This can be in the form of your own body weight, resistance bands, and even water resistance.”
Matt Claes, Personal Trainer, explains, “For bigger and stronger muscles like the ones in your legs, it can be challenging to create enough resistance with just your body weight. However, because the arm muscles are smaller and weaker, you don’t need as much resistance to activate muscle growth processes. If you get creative, your body weight can be more than enough.”
Jesse adds, “Calisthenics is a very popular form of exercise that typically only uses your own body weight to get stronger and bigger. Common upper body movements that can build arm muscle include push-ups, dips, pull-ups, and chin-ups. Additionally, you can use resistance bands to do bicep curls, shoulder presses, shoulder front raises, and lateral raises.”
AM Costanzo, a blogger, shares three arm exercises on her blog that helped her achieve strong and toned arms. She recommends regularly performing tricep dips, push-ups, and planks and writes of them, “These three moves single handedly allow me to have strong and toned arms, and I’m certain of this due to the mere fact that I don’t do much else when it comes to arm workouts. Now I’m not guaranteeing similar results as to mine, but I’m confident that if you do these moves on a regular basis (read: daily or every other day) you will notice a difference in the look and feel of your arms after one month (i).”
Here are some of the easiest exercises one can follow to achieve picture-perfect toned arms in no time.
Key Takeaways
- Doing arm exercises without weights helps strengthen and tone the arms.
- Push-ups, tricep dips, and plank taps are some exercises you can do to lose arm fat.
- Make sure you warm up before doing these exercises and gradually increase the number of reps according to your fitness level and stamina.
16 Effective Exercises For Toned Arms Without Weights
1. Arm Circles (Warm-up)
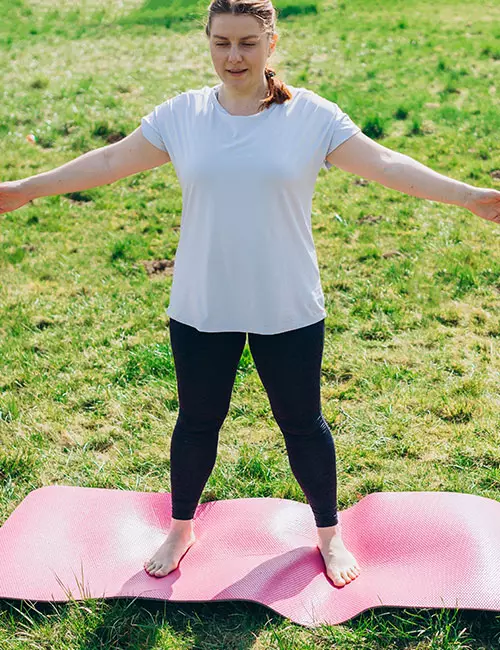
Steps To Do Arm Circles
- Stand straight with your arms by your sides.
- Lift your arms laterally to the shoulder level, with the palms facing away.
- Start circling your arms in the forward direction without bending or flexing your elbows.
- Complete 10 reps and then circle your arms in the opposite direction for 10 reps. Do 3 sets of 10 reps.
2. Wall Push-ups
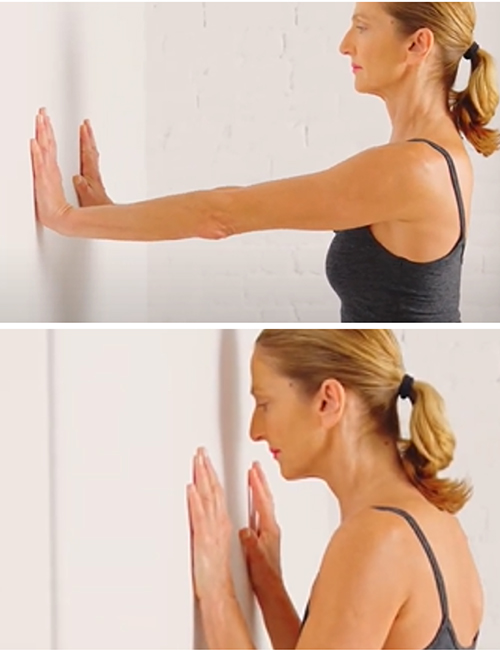
Wall push-ups are great arm toners. They work on the shoulders, lats, biceps, and triceps.
Steps To Do Wall Push-ups
- Stand in front of a wall, about 1-2 feet away.
- Raise your arms and place your palms on the wall, slightly wider than shoulder-width apart. Your fingertips should point up.
- Keeping your legs stationary, bend your elbows, and bring your chest and chin close to the wall. This is your starting position.
- Take a deep breath, exhale, and push the wall until your elbows are slightly bent, and your chest and chin are away from the wall.
- Inhale and go back to the starting position. Do 3 sets of 10 reps.
3. Push-ups
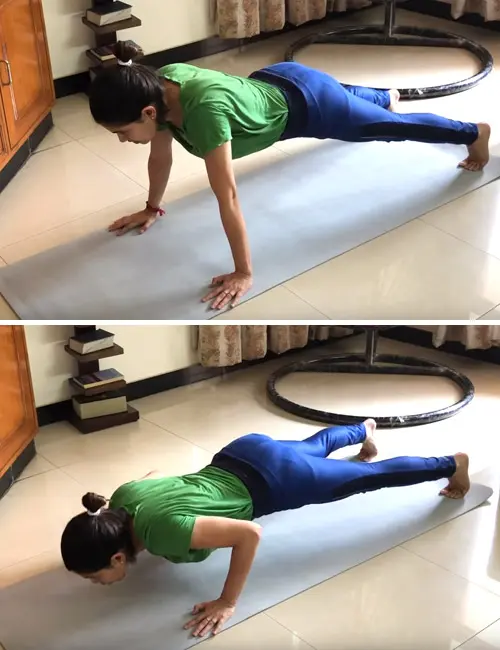
This exercise is slightly challenging because you will need to balance your body on your palms and toes. Your core strength is put to the test. Jordi Sadurní, a cycling coach and a personal strength trainer, says, “Push-ups are a good option for developing the back of the arms (triceps). This is especially true when the push-ups are performed with a narrow stance as the wider you go the more you activate the pecs and the less the triceps.”
Steps To Do Push-ups
- Lie down on the mat, facing the floor.
- Place your palms flat on the floor, beside your chest, arms shoulder-width apart, elbows bent and pointed toward your feet, and fingertips pointing forward.
- Keep your feet together, flex your toes, keep your chin on the floor, and look ahead.
- Count 3, 2, 1, and raise yourself by straightening your elbows. Look down at the mat. Keep your core engaged and your head in a straight line with your heels. Basically, you will be on an arm plank.
- Exhale, flex your elbows, and lower your chest and chin back to the starting position. Do 3 sets of 8-10 reps.

 Quick Tip
Variations
You can do knee push-ups, wide arm push-ups, or diamond push-ups to strengthen your arms, chest, and shoulders.
Jesse says, “However, it is important to note that push-ups only work your shoulders and triceps in your arms and not your biceps or forearms. Therefore, you will not be able to build all the muscles of the arms. But you can definitely build parts of your arms by just doing push-ups.”
4. Tricep Dips
These target your triceps or the muscles present at the back of your upper arms. While there are several other exercises for flabby arms you may try to tone the arm muscles and make them appear slim, you can follow the steps below to do floor dips.
Steps To Do Tricep Dips
- Sit on a bench or sofa. Keep your knees flexed, legs close to each other, feet flat on the mat, arms behind you, elbows slightly flexed, and fingers pointing toward your body.
- Balancing your body on your arms, lift your hips off the bench or sofa, and take two steps forward.
- Slowly lower your hips.
- Right when your hips are about to touch the floor, lift them by extending your arms. This completes one repetition.
- Bend your elbows and lower your hips. Do 3 sets of 10 reps.
5. Inchworm
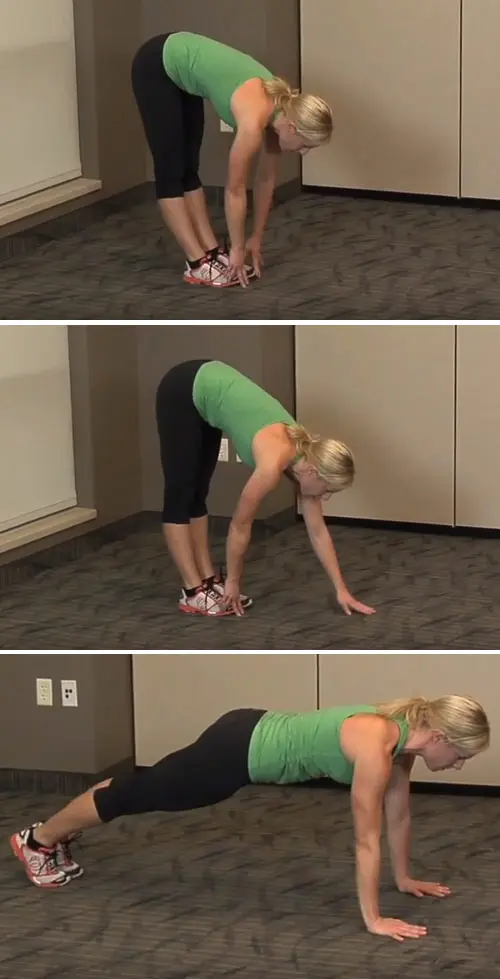
This is a great exercise to do after doing a few arm exercises, especially floor dips. It will help stretch your entire body.
Steps To Do Inchworm
- Stand straight and keep your feet close together. Bend over and place your hands near your feet. Keep your legs straight.
- Start walking forward with your hands. Keep your legs straight.
- Stop when you are in an arm plank or push-up position.
- Start taking small steps forward with your legs. Stop when your feet are near your hands. Do 3 sets.
6. Floor Dips
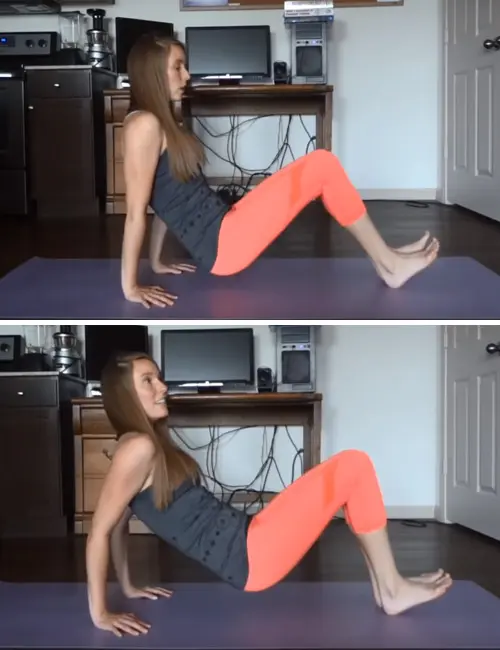
These target your triceps or the muscles present at the back of your upper arms. Toning these muscles will prevent flabby arms.
Steps To Do Floor Dips
- Sit on the mat. Keep your knees flexed, legs close to each other, feet flat on the mat, arms behind you, elbows slightly flexed, and fingers pointing toward your body.
- Lift your body until your arms are fully extended.
- Hold this pose for a moment. Bend your elbows and bring your body back to the starting position. Do not allow your hips to touch the floor before completing one set. Do 3 sets of 10 reps.
7. Plank Up-Downs
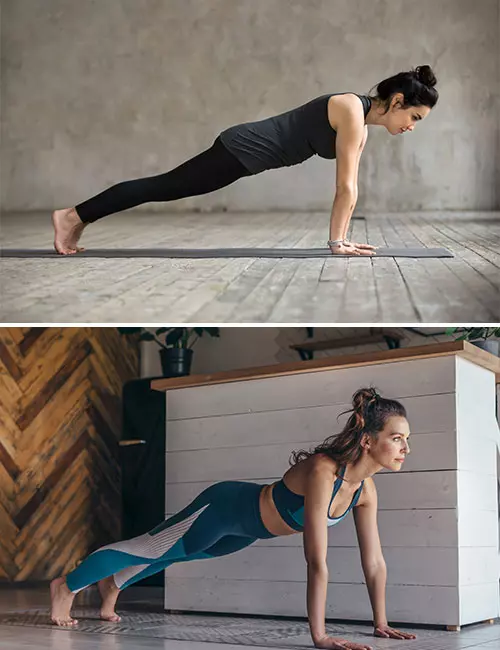
Planks help build your core strength. Plank up-downs help improve the shape and strength of your arms. They target the biceps, triceps, shoulders, and core.
Steps To Do Plank Up-Downs
- Assume the Dog Pose by placing your palms flat on the mat, knees flexed, spine straight, and neck in a neutral pose.
- Extend your legs behind, one at a time. Keep your arms extended and the head, spine, and hips in a straight line. This is your starting position.
- Supporting your upper body on your left palm, fist your right palm, flex your right elbow, and place your right forearm on the floor (like elbow plank). Bend your left elbow a little to support this move.
- Fist your left palm, flex the left elbow, and place the left forearm on the floor. You are in the elbow plank position now.
- Place your right palm flat on the floor, followed by the left palm. Do 3 sets of 10 reps.
8. Plank Taps
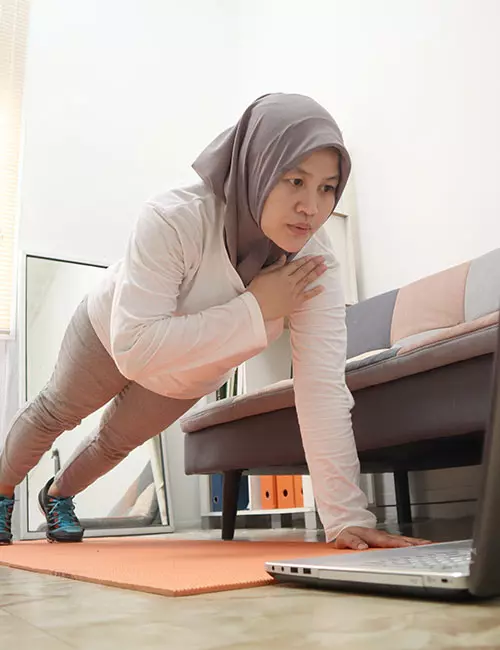
These are excellent for building arm strength.
Steps To Do Plank Taps
- Assume an arm plank position.
- Keep your core engaged, neck in a neutral position, and look at the mat.
- Tap your left shoulder with your right palm and place it back on the mat.
- Tap your right shoulder with your left palm and place it back on the mat. Do 3 sets of 10 reps.
 Quick Tip
9. Half-Cobra Push-up
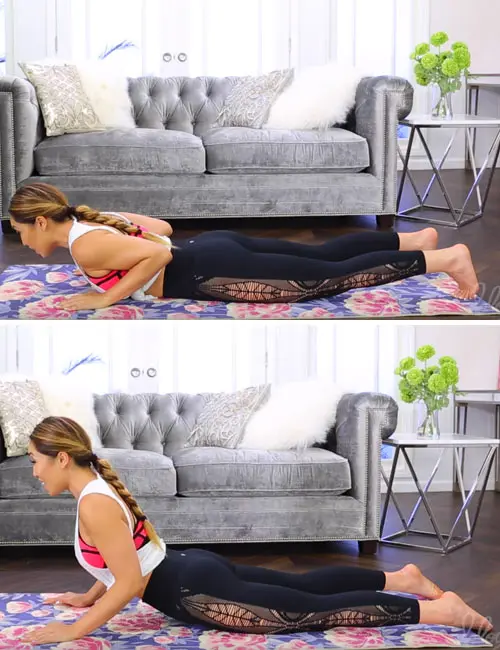
This is an amazing exercise that will get rid of all that flab in no time. Avoid it if you have a lower back injury.
Steps To Do Half Cobra Push-up
- Lie down on your stomach with your elbows arched back and close to your body and hands on either side of your chest.
- Push yourself up (engaging your triceps muscles) into a half-cobra position by lifting your chest off the ground. Make sure your belly button is still touching the ground.
- When you push yourself up, use your arms and not the torso and hips.
- Hold the position for 2 seconds and then return to the starting position. Do 3 sets of 5 reps.
10. Lateral Plank Walks
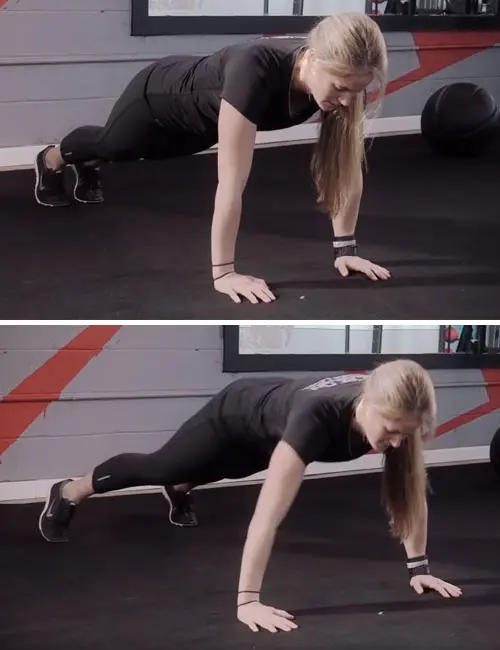
Just like step climbers, lateral plank walks require you to be in a plank position and walk laterally.
Steps To Do Lateral Plank Walks
- Assume an arm plank position.
- Keep your core engaged and place your right palm and foot about 15-20 cm to your right.
- Bring your left foot and palm to the position where your right palm and foot were initially.
- Do the same on your left, i.e., move from your right to your left. Do 3 sets of 2 reps.
11. Plank Rotation
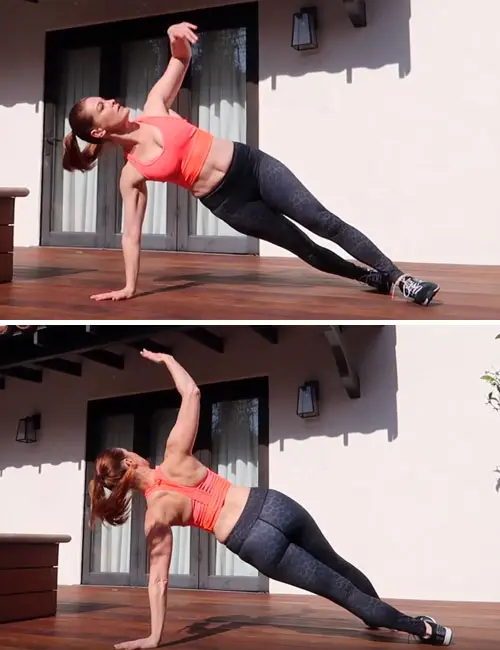
Planks are great for your core, shoulders, and arms. Plank rotation is an advanced plank pose, and you must start with slow plank rotations before proceeding to the fast version.
Steps To Do Plank Rotation
- Assume the plank position – body in a straight line, abs and arms tight, and elbows locked.
- Lift your body into a side plank – heel on heel, one arm reaching to the sky, and the other locked tight into position.
- Return to the plank and do it on the other side.
Plank rotation can be done in two ways – slow and fast.
- When you do it slowly, you get to hold the position for a minimum of 8 seconds and feel the stretch. Try reaching as far back as you can, expanding, opening up the chest, and squeezing those shoulder muscles. The slow version tones up the muscles and makes you stronger, burns the fat, and boosts your metabolism.
- While doing it fast, you are turning the rotations into a cardio move. End the reps in the fast version by holding the pose for 2 seconds on each side for one rep. Do3 sets of 12 reps.
12. Spiderman Push-Up
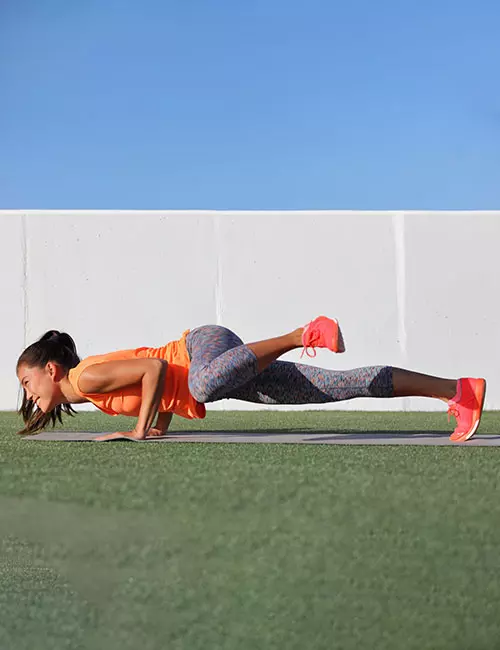
This move works on your biceps and triceps along with the glutes.
Steps To Do Spiderman Push-ups
- Start in the plank/push-up position. Keep your abs tight and involved.
- Extend one hand out to the side, reaching as far as you comfortably can, and lift your leg.
- Bending your elbows, go down in a push-up, bending the leg and touching the knee to the elbow at the same time.
- Beginners, or those who cannot balance while lifting their leg completely, should bend the knee and put the foot near the hand and do the push-up.
- Return to the original position and do it on the other side. Do 3 sets of 10 reps.
13. Reverse Plank Leg Lift
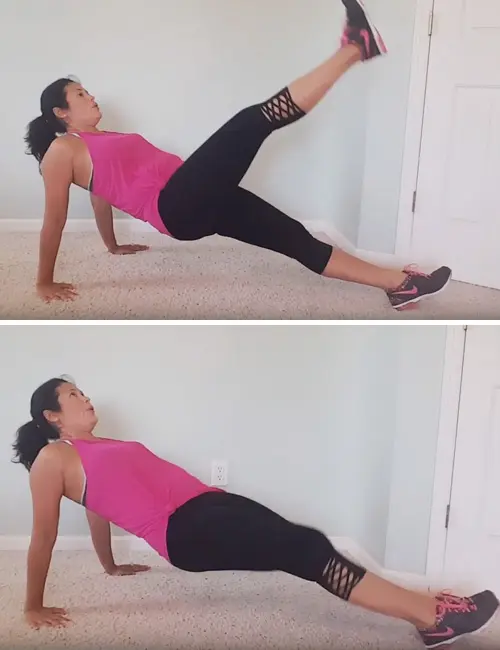
This arm exercise without weights works on the arms, glutes, and abs.
Steps To Do Reverse Plank Leg Lift
- Get into the inverse plank position. Your body must be raised in a straight line, with only the palms and feet on the floor.
- Make sure your arms are locked into position. Balance your weight on your arms. Engage the abdominal muscles all the time.
- Lift one leg high in the air, depending on your flexibility, and then lower it. Do it with the other leg.
- Alternate the move on each side and repeat at least 10 times with each leg. Do 3 sets of 10 reps.
14. Plank With Leg Lift
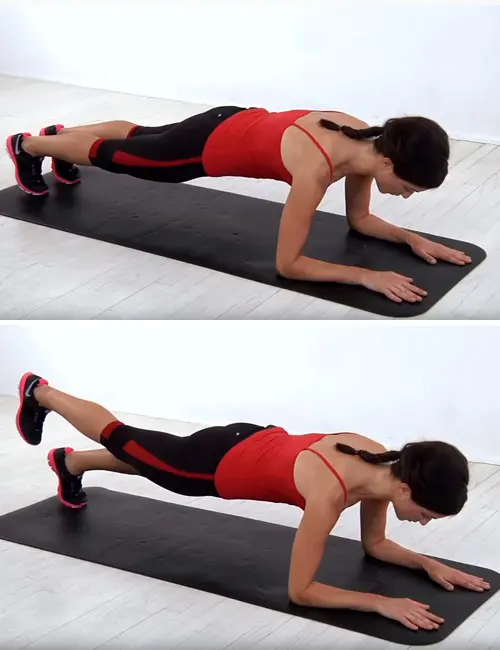
This exercise is the opposite of the reverse plank leg lift. It is a great core exercise and activates the biceps, triceps, and wrist extensors and flexors.
Steps To Do Plank With Leg Lift
- Get into a plank position, hold your core up, keep your elbows right below your shoulders. Keep breathing.
- Lift your left leg off the floor. Keep the leg extended, and hold it in this position for 3 seconds.
- Lower your left leg and raise your right leg off the floor. Hold it there for 3 seconds and lower it.
- Do 3 sets of 8 reps.
15. Single-leg Triceps Dips
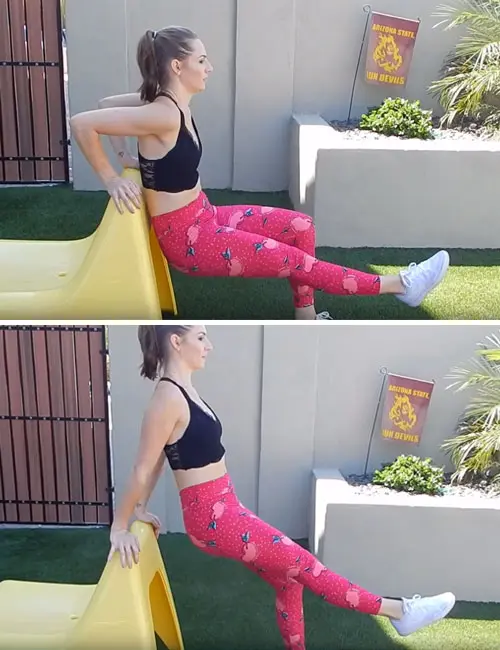
Single-leg tricep dips are simple and effective, and one of the best things you can do for your arms.
Steps To Do Single-leg Triceps Dips
- Stand 2 feet away from a bench, sofa, or any sturdy object. Place your hands on it.
- Lift one leg off the floor and keep it extended.
- Flex your elbows and lower your hips.
- Get back up to the starting position.
- Do 10 reps and then lower the leg. Repeat with the other leg. Do sets of 10 reps.
16. Forearm Plank
Forearm plank is an excellent exercise to build a strong core, arms, and back.
Steps To Do A Forearm Plank
- Get on the floor and perform a push-up with your weight on your forearms. Your elbows should be just beneath your shoulders.
- Maintain a straight posture from your head to your heels, engaging your core.
- Keep your hips level, and don’t let them sink or rise. Relax your neck and look at the floor.
- Try to hold the position for about 20-30 seconds. Remember to breathe while holding the plank.
- For the advanced level, you can raise one leg or one arm, or both. This engages more muscles and increases the intensity.
- Do 3 sets of 10 reps.
These 16-arm workouts without weights are an effective solution for how to lose arm fat fast. Incorporating these exercises into your routine is a great way to tone your arms and boost your upper body strength. These exercises focus on specific muscle groups, such as the biceps and triceps, while also engaging your core and improving stability. Also, by strengthening these muscles, you promote better posture, making everyday activities easier and reducing the risk of injury. Here’s what you should keep in mind when you do these exercises.
Points To Remember
- Breathe through every move. Inhale every time you start doing an exercise and keep alternating throughout.
- Warm-up and stretch. Make sure you start any routine with a nice warm-up. Do the following:
(a) Arm circles
(b) Shoulder rotation
(c) Forearm circles – Rotate the elbows clockwise and anticlockwise.
(d) Wrist rotation – Make mini golf-ball-sized circles in both directions.
(e) End with a nice stretch like Gomukhasana. - Spot reduction doesn’t happen. You have to work out your entire body to get the desired results. These bodyweight exercises are important because they help tone, sculpt, and strengthen your target spots. At the same time, they work on other minor muscles.
- Keep all the moves progressive. The exercises suggested above are beginners’ reps. You can increase the reps or time limit according to your level of fitness and stamina. The idea is to challenge your body constantly. It is okay if you cannot lift your leg straight. Do as much as you can, and push your limits slowly but steadily.
- In all the above arm exercises without weights, holding the position continuously is important. If you get tired while doing the spiderman push-ups, don’t just lie flat on the ground. Make plank your rest position, i.e., take a breath for a couple of minutes, holding the plank, and then start being the spiderman again.
- You may also add different versions of each exercise to make your daily workouts more interesting. Try out variations on different days to keep things fun. This helps target different muscle groups, improving your overall muscle development.
Want to know how to reduce arm fat besides doing the above-listed exercises? Apart from them, you can also perform different activities to shed your stubborn arm fat.
Jesse says, “Swimming is another great resistance workout that can build your arm muscles since they are pushing and pulling against the water. This provides a great stimulus to the muscles to allow them to grow.”
Jordi adds, “You could do bodyweight rows holding on to a table or a chair. Or just building some isometric strength by holding different positions while contracting at the maximum intensity the muscles.”
To prevent muscle strains and pains, one must make sure that these actions are not overdone. Your body needs enough time to relax in order to recover and perform at its best during exercise.
How Often Should You Work Out?
Jordi advises, “I wouldn’t recommend training every day as that would mean not being able to train hard or not being able to recover properly. Two to three times per week with a decent intensity would be ideal. In order to grow your arms the sets should be with a high level of exertion and close to failure.”
While the general consensus seems to be that one must work on their arm at least 3 times a week, consulting your trainer is important. They would help plan an upper body exercise routine catered specifically for your body. This is due to the possibility that certain individuals may benefit more from a daily arm exercise routine.
Matt says, “While you do typically want to give bigger muscles at least one rest day, it is typically OK to work the smaller muscles in your arms every day. In resistance training exercises, you damage the muscles you work. That being said, your body is also able to repair smaller muscles like the ones in your arms more quickly. In turn, it will be OK for most people to work their arms every day.”
In order to create a strategy that works for you, you need generally pay attention to your body’s needs and limitations.
Jesse concludes, “As long as you provide your body with proper rest, nutrition, and care, it is okay to work out your arms every day. However, I only recommend doing this gradually if it is something you want to do. Start off by working them 1-2x a week and increase this slowly over a few months until you are able to handle doing them every day. Additionally, I would not push to the max on every workout if you plan to work your arms every day. Use a lower volume and intensity, specifically weights that are not super heavy, and not too many sets. This will ensure you do not overuse your muscles and joints, which can lead to injury.”
A U.S. cohort study that included 116,221 Adults found that those who worked out two to four times had a 21% to 23% lower risk of all-cause mortality and a 28% to 38% lower risk of cardiovascular mortality.
If you are looking for motivation or need help to plan a workout routine for yourself, here are a few tips. Read on!
Tips For Structuring Your Arm Workout
Here is how you can get the most out of your arm workouts:
- Begin with a warm-up, like arm circles and shoulder rotation, to get your blood flowing.
- Next, include 5-6 exercises that target various muscle groups in your arms, such as biceps, triceps, and shoulders.
- After your workout, finish with a cool-down stretch to help your muscles recover.
For best results, do this routine 2-3 times a week. Here are a few additional tips to enhance your workouts:
- Drink some water before and after your workout to keep your muscles functioning well. You can keep a bottle of water with you as you workout.
- Pay attention to your technique to avoid injuries and ensure that you are effectively working the right muscles.
- Keep a log of your workouts to monitor your improvements and adjust your routine as needed.
- Allow time for your muscles to recover between workouts. This is necessary for growth and strength.
- Mix in different exercises and weights or change your grip to target muscles in new ways and keep things interesting.
While structuring your arm workout is important, you should also follow some necessary precautions to ensure your safety and lower the risk of injury. Scroll down to know more.
Precautions To Follow When Doing Arm Exercises Without Weights
It is important to approach arm exercises without weights carefully, especially if you have any specific medical conditions, to avoid strain or injury, such as:
- Avoid repetitive or high-impact motions that can make joint pain or inflammation worse. Instead, concentrate on full-range, low-impact exercises.
- Avoid exercises that involve rotating or over-the-shoulder (such as hands in the air) motions should be avoided when lifting weights, as they may put undue strain on tendons or injured muscles.
- Avoid lifting weights too often. Limit the frequency and length of your workouts to prevent straining your muscles. Include weight training in your exercise regimen once or twice a week.
- If you are pregnant, then avoid exercises that need you to lie flat on your back or put too much strain on your arms and core, especially after the first trimester. Adhere to safe, physician-approved movements.
- Avoid isometric hold exercises since they may cause a brief rise in blood pressure.
Infographic: 7 Best Yoga Asanas For Losing Arm Fat
A few simple yoga poses and stretches can help you target and work on arm flab in the same way as the exercises outlined in this article.
The following infographic focuses on how to lose arm fat with yoga. Check it out to learn which yoga asanas you need to include in your workout regime to burn your arm fat.Some thing wrong with infographic shortcode. please verify shortcode syntax
While lifestyle and diet changes are vital to help prevent weight accumulation in your arms, exercises that target your bicep and tricep muscles can also help bring out visible changes. While you may be tempted to pick up dumbbells, heavy weights or resistance band exercises for the same, many exercises and stretches don’t require any equipment and can thus be done from the comfort of your home. These not only help reduce the fat deposits, but also tone, stretch, and strengthen your arm muscles to make them look shapely and feel strong. Push-ups, tricep dips, arm circles, and inchworm are a few of the exercises mentioned above in detail that target your arm fats and muscles. Including any of these bicep exercises for women in your workout routine would help get your arms back in their best form and shape.
Frequently Asked Questions
What are some common mistakes to avoid when doing bodyweight arm exercises?
Some common mistakes include using improper form that can lead to injury, not engaging your core, affecting stability, and rushing through repetitions instead of focusing on controlled movements. Make sure you always prioritize technique over speed to maximize effectiveness and prevent strain.
How long will it take to get toned arms?
It may take about a month to get toned arms. You need to follow a strict exercise routine that targets your upper arms and a healthy, balanced diet to observe visible results within 6 weeks.
Does walking tone your arms?
Yes, but only if you incorporate a certain range of motions. Walking, squats, and lunges generally tone your leg muscles (1). However, you could wear wrist weights and work on your arms as well.
Will skipping reduce arm fat?
Yes. While you skip, you use your arms to carry your weight and move them in circular motions, thus toning them. If not, you can always explore tricep workouts for women that target upper arm fat and help tone them.
Get ready to tone your arms with this no-equipment workout. Learn how to strengthen and sculpt your arms without any equipment. Check this video to know more!
Personal Experience: Source
StyleCraze's articles are interwoven with authentic personal narratives that provide depth and resonance to our content. Below are the sources of the personal accounts referenced in this article.
i. Three excellent exercises for building arm strengthhttps://medium.com/mindfully-yours/three-excellent-exercises-for-building-arm-strength-6c1b68bc8201
References
Articles on StyleCraze are backed by verified information from peer-reviewed and academic research papers, reputed organizations, research institutions, and medical associations to ensure accuracy and relevance. Read our editorial policy to learn more.
- Post-exercise cold water immersion attenuates acute anabolic signalling and long-term adaptations in muscle to strength training
https://pmc.ncbi.nlm.nih.gov/articles/PMC4594298/
Read full bio of Dr. Sudhansu Singh
- Jordi Sadurní is a sports scientist and a specialist cycling trainer with over three years of experience in cycling coaching. He earned his bachelor's degree from the University of Barcelona and master's degree from the University of Murcia. Currently, he is managing his own online cycling training business, JS Cycling Training.
 Jordi Sadurní is a sports scientist and a specialist cycling trainer with over three years of experience in cycling coaching. He earned his bachelor's degree from the University of Barcelona and master's degree from the University of Murcia. Currently, he is managing his own online cycling training business, JS Cycling Training.
 - Matt Claes, CPT, is the head coach and founder of Weight Loss Made Practical. He is certified by the American College of Sports Medicine, has over 4 years of experience, and helps busy professionals lose weight and keep it off no matter what they have tried before. He focuses on weight loss, muscle growth, muscle strengthening, longevity, and more.
 Matt Claes, CPT, is the head coach and founder of Weight Loss Made Practical. He is certified by the American College of Sports Medicine, has over 4 years of experience, and helps busy professionals lose weight and keep it off no matter what they have tried before. He focuses on weight loss, muscle growth, muscle strengthening, longevity, and more.
 - Jesse Feder, RDN/LDN, is a Clinical Dietitian at the Memorial Regional Hospital. He is also a certified by the American College of Sports Medicine as a personal trainer (ACSM-CPT) and the National Strength and Conditioning Association as a Certified Strength and Conditioning Specialist (NSCA-CSCS).
 Jesse Feder, RDN/LDN, is a Clinical Dietitian at the Memorial Regional Hospital. He is also a certified by the American College of Sports Medicine as a personal trainer (ACSM-CPT) and the National Strength and Conditioning Association as a Certified Strength and Conditioning Specialist (NSCA-CSCS).
Read full bio of Ravi Teja Tadimalla
Read full bio of Payal Karnik








Community Experiences
Join the conversation and become a part of our empowering community! Share your stories, experiences, and insights to connect with other beauty, lifestyle, and health enthusiasts.