24 Amazing French Braid Tutorials
Discover the art of French braiding with our detailed tutorials, ideal for every occasion!
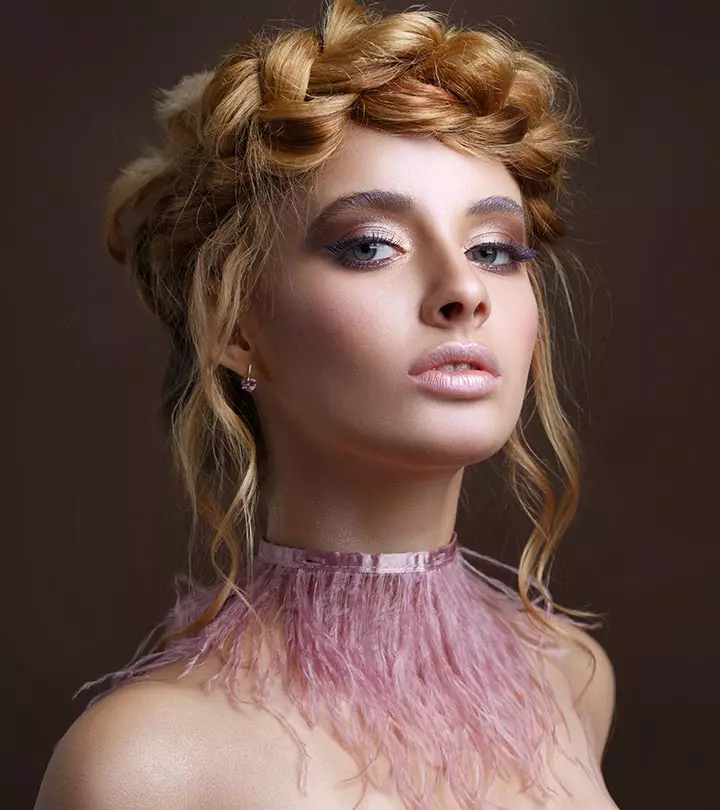
Image: Shutterstock
Everything brilliant is French – French fries, French toast, and (most importantly) French braid!
French braids are one of the most popular hairstyles. From kids to adults – everyone loves looking up French braid tutorials to style their hair. It is a beautiful way to keep your hair out of your face and up your hairstyling and beauty game easily!
French braid is perfect for hot summers, the gym, playing sports, for fancy occasions, and even just for a casual day. Read on to learn how to weave French braids in different styles to suit the occasion. Scroll down!
 Before You Get Started
- Dry hair is highly suitable for doing French braids. Weaving a French braid on wet hair prevents complete drying and damp hair creates bouncy waves after detangling the braid.
- A 2-day washed hair is suitable for having a grip on French braids with the natural oil. If it is freshly washed, use a texturizing spray for an effective grip.
- If you are a beginner, grab larger sections of hair to complete the braid quickly. Taking smaller sections needs more patience and time.
- Use a volumizing spray or mousse when weaving a French braid on thin or fine hair to get a thicker look without falling flat.
In This Article
What Is A French Braid?
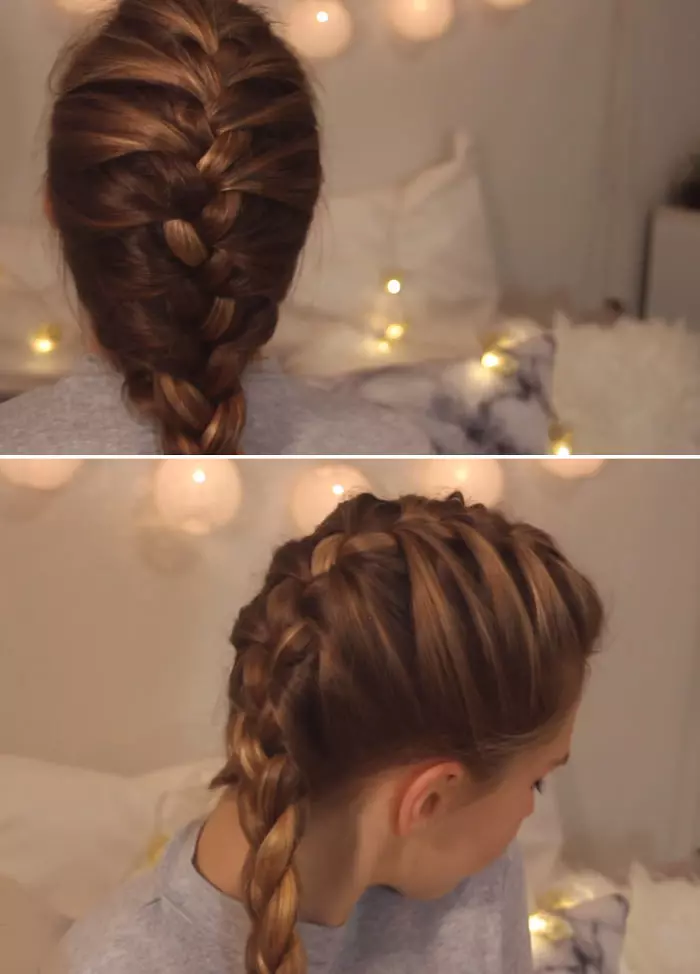
A French braid is one of the most popular types of braids and usually has three strands. You have to cross the middle section under the side sections and add more hair to the side sections with each subsequent stitch of the braid.
Casey Simmons, a curly hair expert with over 20 years of experience, says, “French braids are perfect for curly haired folks not ready for a wash-day or just being active. Pull pieces from your face and twist with your favorite curl cream.”
What You Need
- Hair brush
- Elastic band
- Texturizing spray
- Bobby pins
How To Do
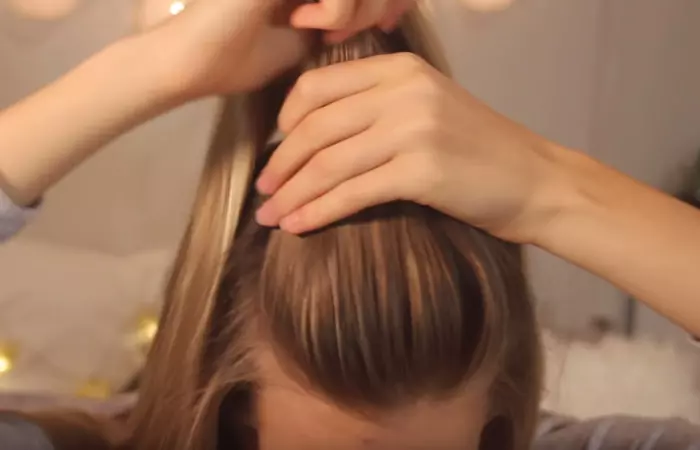
- Detangle your hair with a brush. Apply some texturizing spray to your hair to make it manageable and have a better grip on it.
- Pull some hair back as you would in a half ponytail.
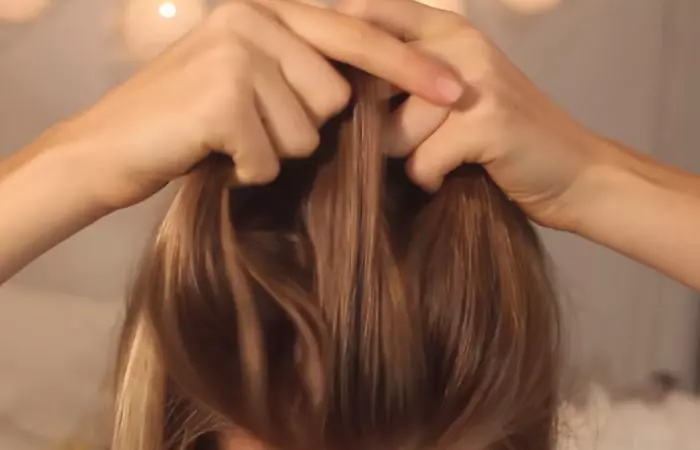
- Divide this section into three sub-sections: the left, the middle, and the right.
- Do one stitch of braid. The middle section always goes under the left and right sections.
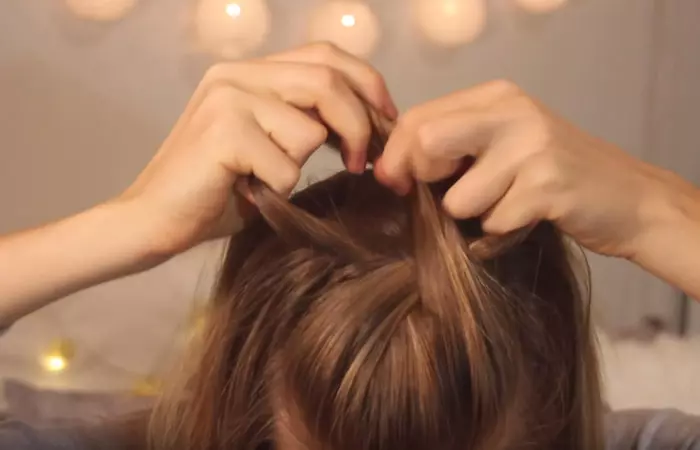
- Add hair from the side to the left and right sections before flipping them over the middle section.
- Keep adding hair to the braid with each subsequent stitch until you reach the nape of your neck.
- Simply braid your hair the rest of the way down until you reach the end and tie an elastic band to keep it from unraveling.
- Adjust the braid as you like. If you want the braid a bit loose, pancake it carefully. Secure loose strands with bobby pins for a polished appearance.
Martha Luthein, a blogger who likes to experiment with her go-to hairstyle of French braids, and enjoys making her own iterations of the popular hairstyle, states, “The style I wear the most is that I usually add the paranda at the top when I start braiding, sometimes I add it when the braiding reaches the nape (i).” Paranda is a traditional decorative element or hair accessory that helps to enhance the beauty of the mane. The blogger includes it to add a pop of color to her hairstyle and make it look unique.
The Dutch braid has been gaining popularity in recent times, which comes as no surprise because it looks stunning. Though it looks quite similar to the French braid, there are some key differences between the two. Here’s what you need to know.
Key Takeaways
- The three-strand French braid style is perfect for any fancy occasion or a casual day.
- French braid hairstyle is often confused with Dutch braids. However, both have different weaving patterns.
- You can weave French braids in different styles like pigtails, ponytails, double French braid, and messy French braid.
Difference Between French Braid Vs. Dutch Braid
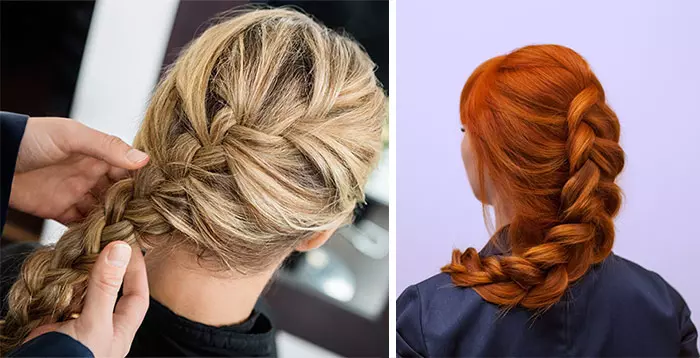
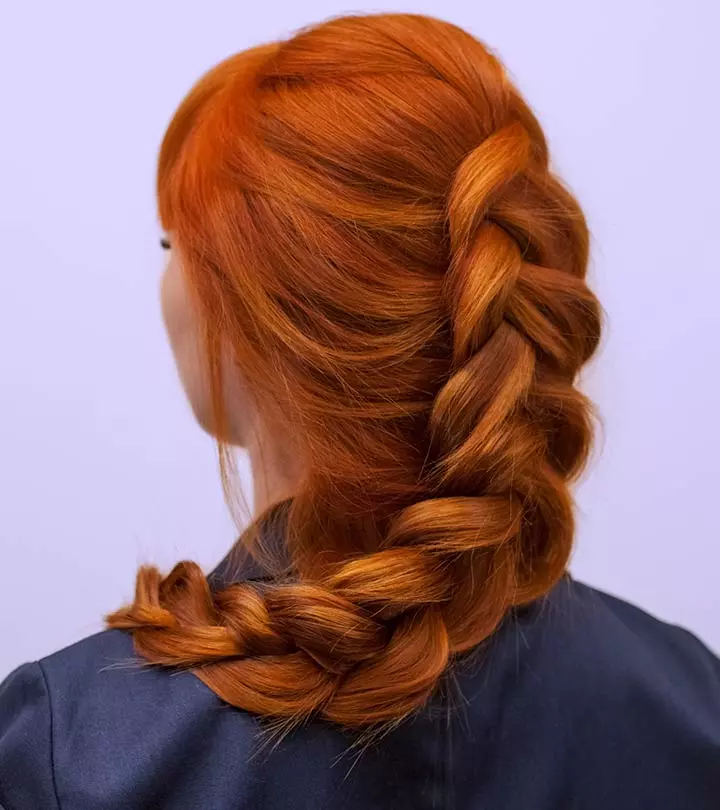
The major difference between French braid and the Dutch braid hairstyle lies in the way you weave the middle section of the braid. In the French braid, you pass the middle section under the side sections. In the Dutch braid, you pass the middle section over the side sections.
You can tell the difference just by looking at both the braids. The French braid looks like it is underneath your hair while the Dutch braid looks like it is lying on top of it.
To find out how to weave a Dutch braid, check out this article.
Now that you know all about the French braid and how to do a basic one, let’s check out some gorgeous styles you can do with it!
24 Best French Braiding Styles
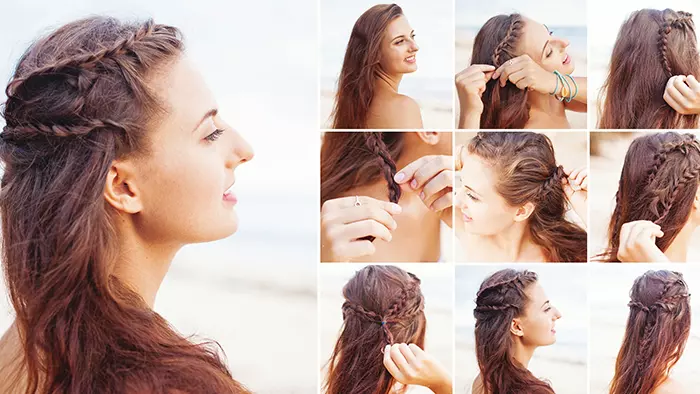
1. Double French Braids With Beach Waves
What You Need
- Hair brush
- Elastic band
- Bobby pins
How To Do
- Brush your hair to get rid of any tangles and part it on the left side.
- Separate a 2-inch hair section from the hairline of the right section.
- Weave it into a French braid close to the scalp, from the front to the back. Secure the end with an elastic band.
- Similarly, separate two hair sections from both the temples and braid them.
- Gather all the braid ends at the back and tie them into a ponytail.
- You may leave the ends loose to merge with your flowing hair or combine the three braids into one braid at the back.
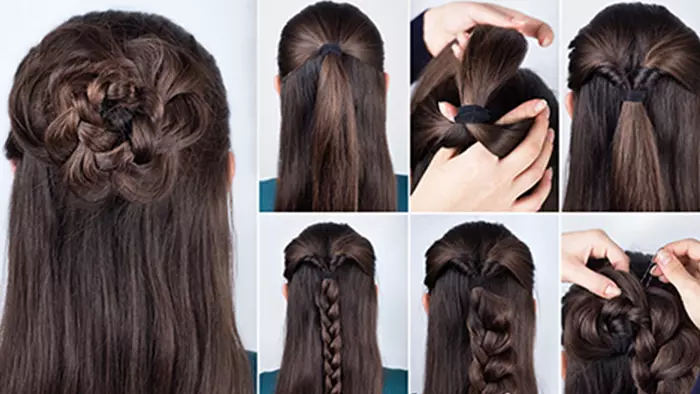
2. Braided Half Updo
What You Need
- Comb
- U- pins
- Elastic bands
How To Do
- Brush your hair to remove any knots and tangles.
- Divide the hair into two sections from ear to ear at the back of the head and tie the top half into a ponytail.
- Loosen the ponytail base, separate it right above the elastic band and loop the ponytail through it.
- Weave the ponytail in a French braid and secure the ends. Gently pull the braid sections to volumize it.
- Wrap the braid around the base of the ponytail to create a bun. Keep securing it with U-pins as you wrap.
- You may use an elastic band to secure the bun in place.
3. French Braid Pigtails
What You Need
- Hair brush
- Elastic bands
How To Do
- Brush your hair back, so it falls behind your shoulders.
- Divide your hair into half from the front to the back to form two equal sections.
- Pick up some hair from the front of one section, near the parting. Divide it into three sections and French braid it.
- Once you reach the nape of your neck, secure the braid with an elastic band.
- Repeat the same with the other section of hair.
4. Double French Braid
What You Need
- Comb
- Elastic bands
- Clip
How To Do
- Brush your hair back, so it falls behind your shoulders.
- Divide your hair vertically into two sections.
- Take some hair from the front of one section and right next to the parting.
- Divide this section into three parts and French braid it.
- Once the French braid reaches the nape of your neck, braid it regularly the rest of the way down. Secure the ends with an elastic band.
- Repeat the same with the other section of hair.
5. French Braid Ponytail
What You Need
- Comb
- Elastic bands
How To Do
- Brush your hair to remove all tangles and knots.
- Gently backcomb the top of your hair to form a slight pouf. Begin weaving a French braid with this section of hair.
- Weave around 5 to 6 stitches of the braid. Once you reach near the middle of your head, secure the braid with an elastic band along with the rest of your hair. This creates the high ponytail.
6. Messy French Braid
What You Need
- Elastic band
How To Do
- The key to getting a perfect messy braid is not to use a comb. Use your fingers to gather all your hair.
- Weave a loose French braid. Allow stray strands of hair to fall freely.
- Spritz some hairspray after securing the braid with an elastic band.
7. Mermaid French Braid
What You Need
- Elastic bands
- Brush
How To Do
- Brush your hair down to remove any knots.
- Gather your hair as you would for a half ponytail and weave it into a braid. Secure this braid with an elastic band.
- Pick up a little hair from the top right of your head and pass it through the topmost left stitch of the braid.
- Pick up some hair from the left side and pass it through the topmost right stitch.
- Keep weaving hair into your braid this way until all your hair is in the mermaid braid.
8. Side-Swept French Braided Bangs
What You Need
- Comb
- Brush
- Bobby pins
- Elastic band
How To Do
- After brushing your hair, part it on one side.
- Leaving out your bangs, gather the rest of your hair and tie it in an elastic band to keep it out of the way.
- Gather hair from the front of the side with more hair.
- Weave it into a French braid, guiding it from the front to the side of your head.
- Keep adding hair only from the front to your bangs.
- Once the braid is done, secure it with bobby pins.
9. French Braided Updo
What You Need
- Comb
- Elastic bands
- Bobby pins
How To Do
- Part your hair from the front to the crown in a middle or a side parting.
- Weave the side with more hair in a French braid until after your ear.
- Weave the rest of the way down into a regular braid.
- Secure the braid with an elastic band.
- Gather the rest of your hair and weave it into a regular braid.
- Wrap the braid in a low bun and secure it with bobby pins.
- Wrap the first braid around the bun and pin it in place.
 Quick Tip
10. Faux French Braid
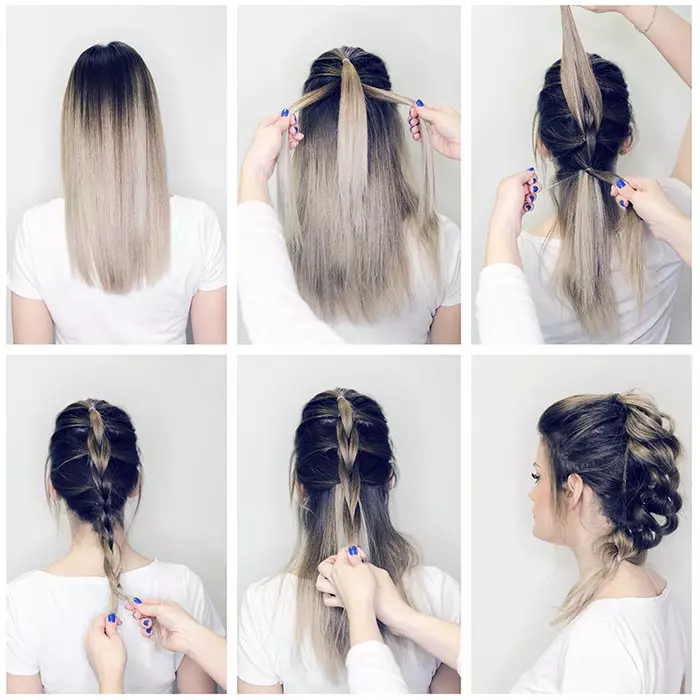
What You Need
- Comb
- Bobby pins
How To Do
- Brush your hair to remove all knots and tangles.
- Gather hair from the top and sides and tie it in a half ponytail.
- Tie another half ponytail right under the first one.
- Split the second ponytail in half, pull both the sections in front of the first ponytail, tie them together with an elastic band.
- Tie a third ponytail under the second one and repeat the above.
- Keep doing this until the end. Secure the faux braid with an elastic band. Pancake the braid to make it look voluminous.
11. French Braid Half Top Knot
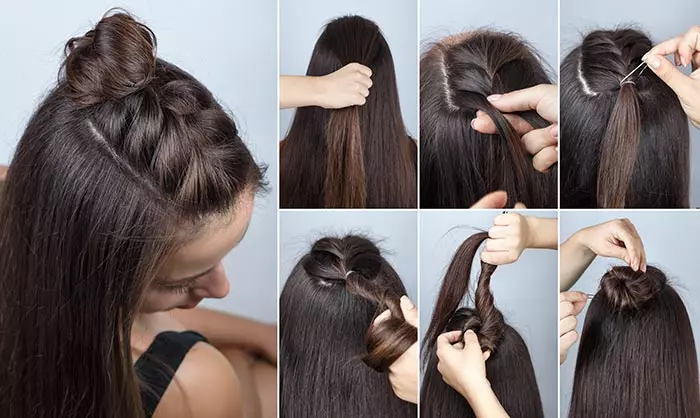
What You Need
- Rat-tailed comb
- Elastic band
- Bobby pins
How To Do
- Using the pointed end of the comb, section off the mohawk part of your hair and clip away the rest to keep it out of the way.
- Weave a French braid with the mohawk section of hair until you reach the crown. Secure it with an elastic band.
- Wrap the tail of the braid into a top knot and secure it in place with the help of bobby pins.
12. Low Side French Bun
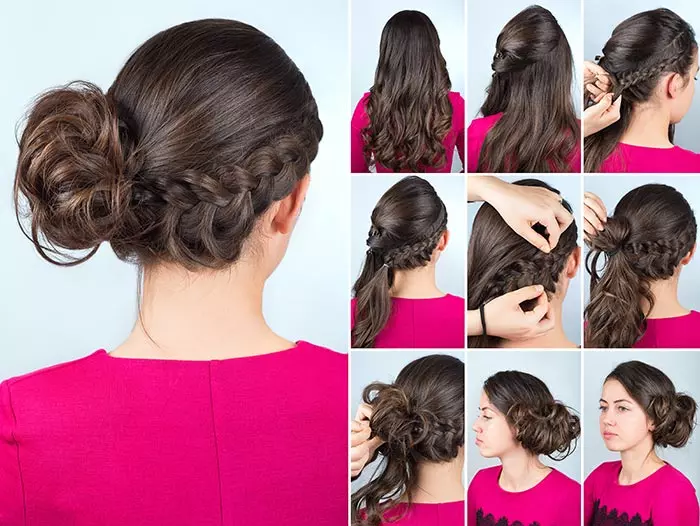
What You Need
- Rat-tailed comb
- Bobby pins
- Thin elastic bands
How To Do
- Section your hair in a curve from your left temple to your right ear. Clip the top section up.
- Weave the lower section of hair in a French braid by adding hair to only the right side of the braid.
- Weave the braid until you reach the opposite side of the back hairline. Secure it with an elastic band.
- Gather all your hair and wrap it in a low bun. Secure it with an elastic band and bobby pins.
13. French Knot Tuck Updo
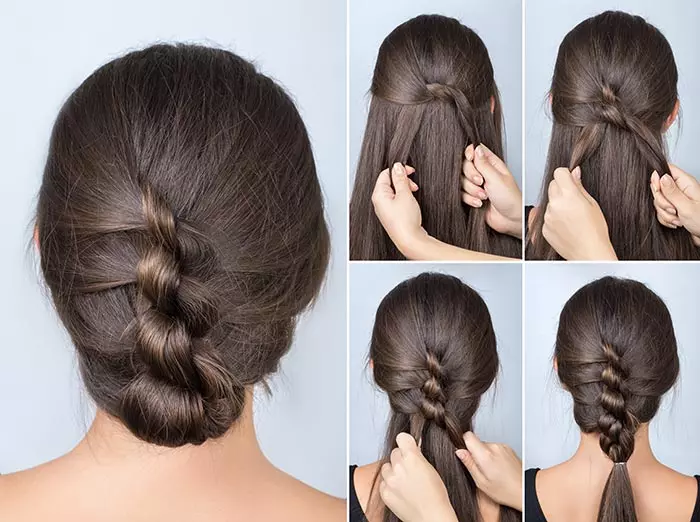
What You Need
- Hair brush
- Elastic bands
How To Do
- Brush your hair to remove any knots and tangles. Brush your hair back behind your shoulders.
- Gather hair from the top and a little from the sides. Divide it into two sections and tie it in a single knot.
- Add more hair to each side and tie another knot.
- Keep repeating this until you reach the nape of your neck.
- Secure the end with an elastic band. Tuck the remaining hair underneath the French knot braid. Use pins to secure it.
14. Double Braided ‘Do
What You Need
- Comb
- Bobby pins
- Elastic bands
How To Do
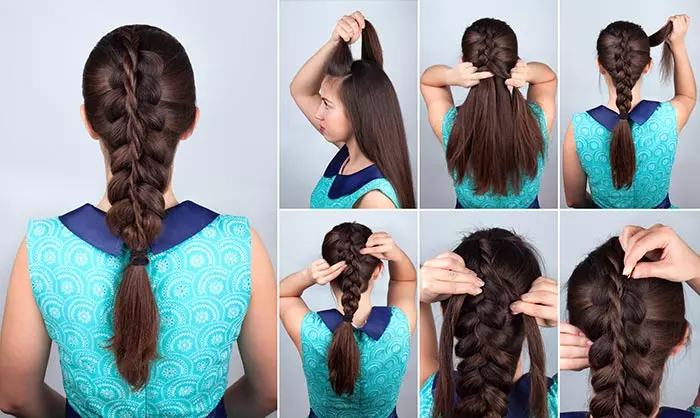
- Gather some hair from the front and clip it up.
- Weave the rest of your hair in a French braid and secure the ends with an elastic band.
- Unclip the front section and divide it into two. Twist the sections and intertwine them with each other until the end.
- Pin the twisted braid down the center of the French braid.
15. Half French Braid
What You Need
- Comb
- Elastic band
How To Do
- Gather hair from the mohawk region and clip up the rest of your hair.
- With the hair from the mohawk section, weave a French braid until you reach the crown.
- Once you reach the crown, secure the braid with an elastic band.
- Pancake the braid to make it look bigger.
16. French Braid Wreath
What You Need
- Comb
- Bobby pins
- Elastic band
How To Do
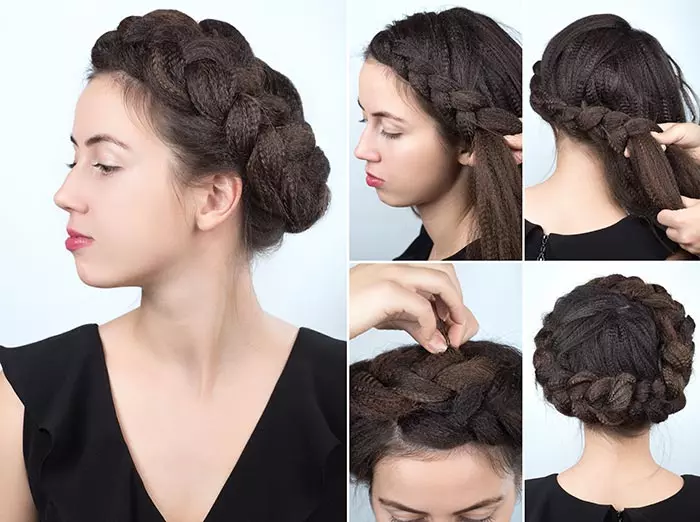
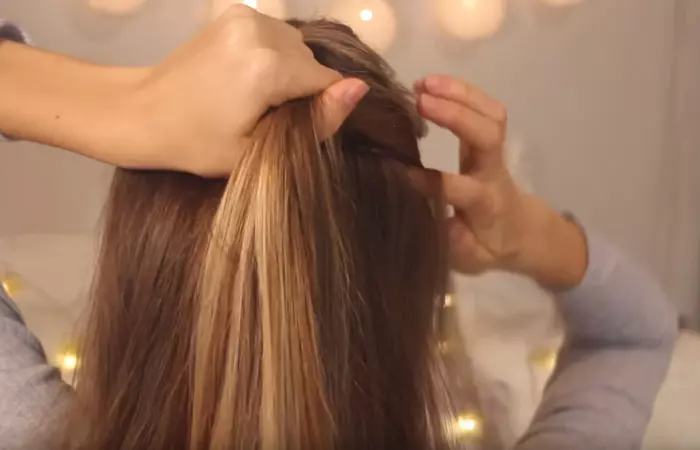
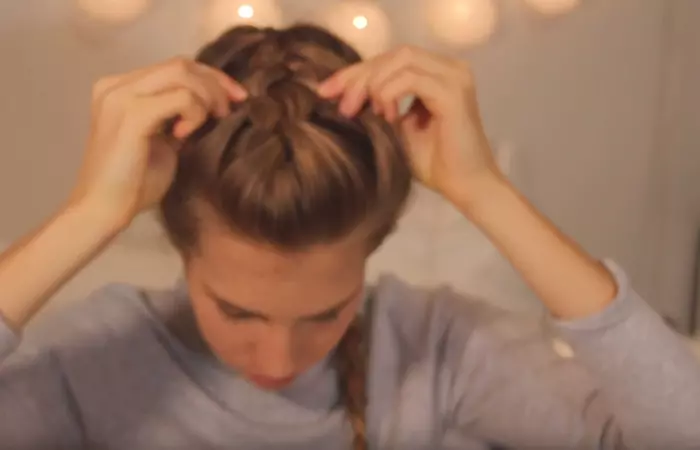
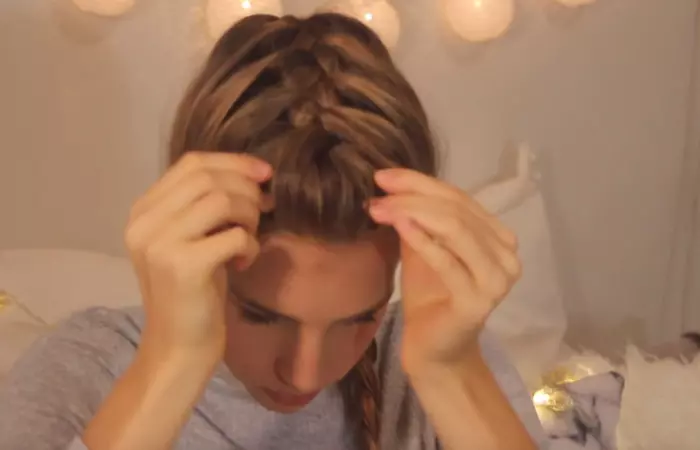
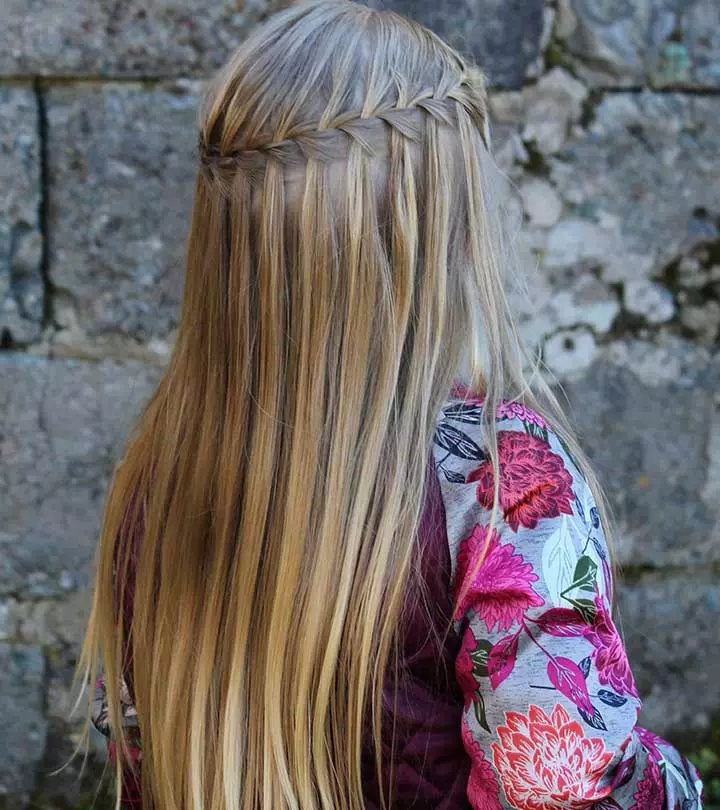
- Comb your hair to detangle it. Part it on one side.
- Start weaving a French braid from the front, on one side. Keep the braid parallel to your hairline, curving it around your head as you go.
- To make sure that your hair looks neat while you add it in the braid, use a mirror or ask a friend to help.
- Once you reach the front again, secure the ends with an elastic band and tuck it within the braid with hair pins.
17. One French Braid
What You Need
- Hair brush
- Elastic bands
- Bobby pins
How To Do
- Brush your hair to get rid of any tangles and knots.
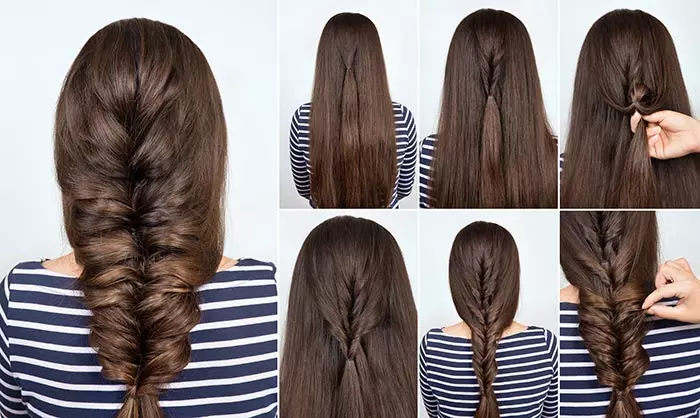
- Gather hair from the top and tie it in a half ponytail.
- Topsy tail the ponytail a few times.
- Pick up some hair from the sides and tie it in a ponytail over the first ponytail.
- Topsy tail that ponytail a few times as well.
- Keep repeating this until you reach the end.
- Weave the lower half of the ponytails in one fishtail braid.
- Secure the ends with an elastic band and pancake the braid.
18. Goddess French Braid
What You Need
- Thin elastic bands
- Comb
How To Do
- Brush your hair to remove all knots and tangles.
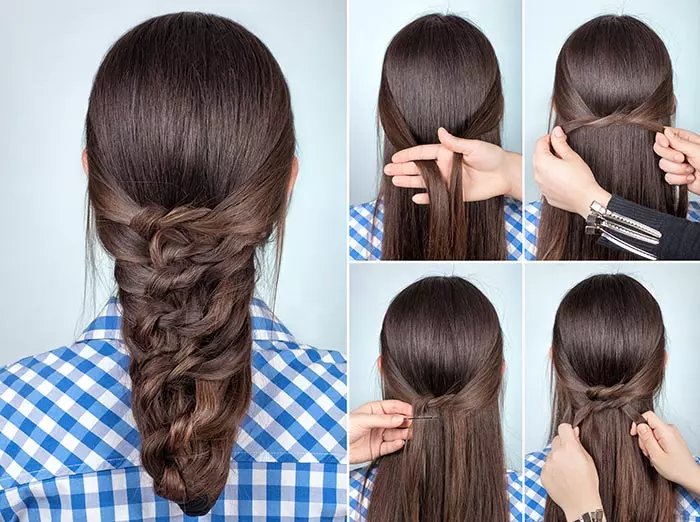
- Gather hair from the top and a little from the sides. Divide it into two sections and tie it in a single knot. Pin it down with a bobby pin.
- Add more hair to each side and knot it again.
- Keep repeating this until you reach the back hairline.
- Divide the remaining hair into two and keep tying knots. Keep the braid as flat as possible.
- Secure the end with an elastic band and pin it underneath the braid.
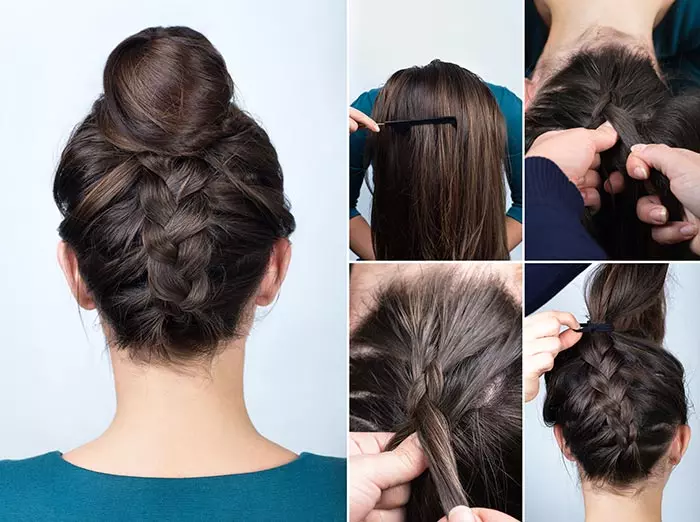
19. Upside Down French Braid Bun
What You Need
- Comb
- Bobby pins
- Elastic bands
How To Do
- Bend over and flip your hair forward. Brush it down to remove any knots.
- Begin weaving a French braid from the back hairline towards the front.
- Once you reach the crown, wrap all your hair in a top knot.
- Use an elastic band and bobby pins to secure the bun in place.
20. Double Messy French Braid Bun
What You Need
- Comb
- Elastic bands
- Bobby pins
How To Do
- Divide your hair into four sections: top, left, bottom, and right.
- Clip up the left and right sections.
- Weave the top section in a French braid until the crown. Secure it with an elastic band.
- Flip your hair forward and weave the bottom section in a French braid from the nape of your neck until the crown.
- Unclip the side sections, gather all your hair at the crown, and wrap it in a bun.
- Secure the bun with an elastic band and bobby pins.
21. Celebrity French Braid
What You Need
- Hair brush
- Rat-tailed comb
- Elastic bands
- Bobby pins
How To Do
- Divide your hair vertically into two equal sections.
- Braid both sections in French braids.
- Once you reach the back hairline, weave the rest of the braid in a regular fashion.
- Secure the ends with elastic bands.
- Wraps the braids in a single bun and secure it to your head with bobby pins.
 Fun Fact
22. The Fancy French Braid
What You Need
- Comb
- Bobby pins
- Elastic band
How To Do
- The reverse French braid is also known as Dutch braid.
- Brush all your hair back and weave it into a reverse French braid. This means that you need to pass the middle section of the braid over the side sections when hair braiding. You also add hair to the middle section of hair and not the side sections.
- Once you reach the nape of your neck and run out of hair to add to your braid, weave a regular braid the rest of the way down.
- Secure the ends with an elastic band and use bobby pins to keep your hair in place.
23. Double Side French Braid
What You Need
- Comb
- Bobby pins
- Elastic bands
How To Do
- Part your hair on one side.
- Gather some hair from the front and side and clip it up.
- Weave the rest of your hair in a side French braid. Secure it at the end with an elastic band.
- Unclip the front hair and weave it in a French braid parallel to the first one.
- Tuck the end of the second (small) braid under the first one and conceal it with a bobby pin.
- Pancake the braid to make it look
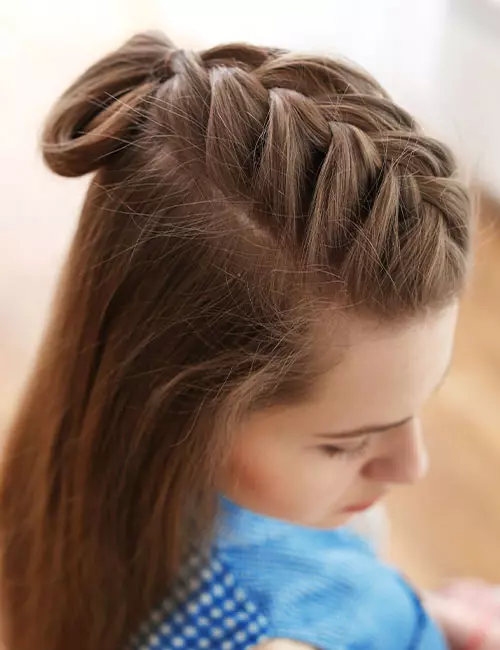
24. Half-Up French Braid
What You Need
- Comb
- Section clips
- Elastic bands
How To Do
- Divide your hair into three sections. Keep the middle section as wide as you desire. You may even work with all the top hair if you want a French braid that covers your crown.
- Clip the outer sections with section clips to keep them out of the way as you work with the middle section.
- Start your French braid on the middle section, right from your hairline. Continue the braid until you reach the back of your head.
- Secure the halfway-done French braid with an elastic band and leave the remaining hair free, or you may tie it up into a knot.
Getting your French braid right on the first go is tricky. You need practice and have patience. Certain mistakes like not sectioning the hair properly and forgetting to secure the end, can ruin the look. Below, we have compiled the mistakes people make when doing French braids. Check them out.
Mistakes To Avoid When Doing A French Braid
Here are some mistakes to avoid when tying a French braid-
- Not sectioning the hair in three even parts. This can result in the braid looking messy and imbalanced.
- Pulling the hair too tightly. This will strain the scalp and make your hair look unkempt.
- Skipping to add parts of hair from both sides when creating braids one after the other. This gives the hair a sloppy appearance.
- Not braiding from the crown and starting too low. This will make the hair look untidy and unflattering.
Infographic: History Of French Braid
We are sure the above step-by-step instructions for French braids would have given you some inspiration for your next intricate hairstyle. However, do you know that ‘French’ braids did not really originate in France? Check out the infographic below to learn more about the historical roots of this braided hairstyle. Illustration: StyleCraze Design Team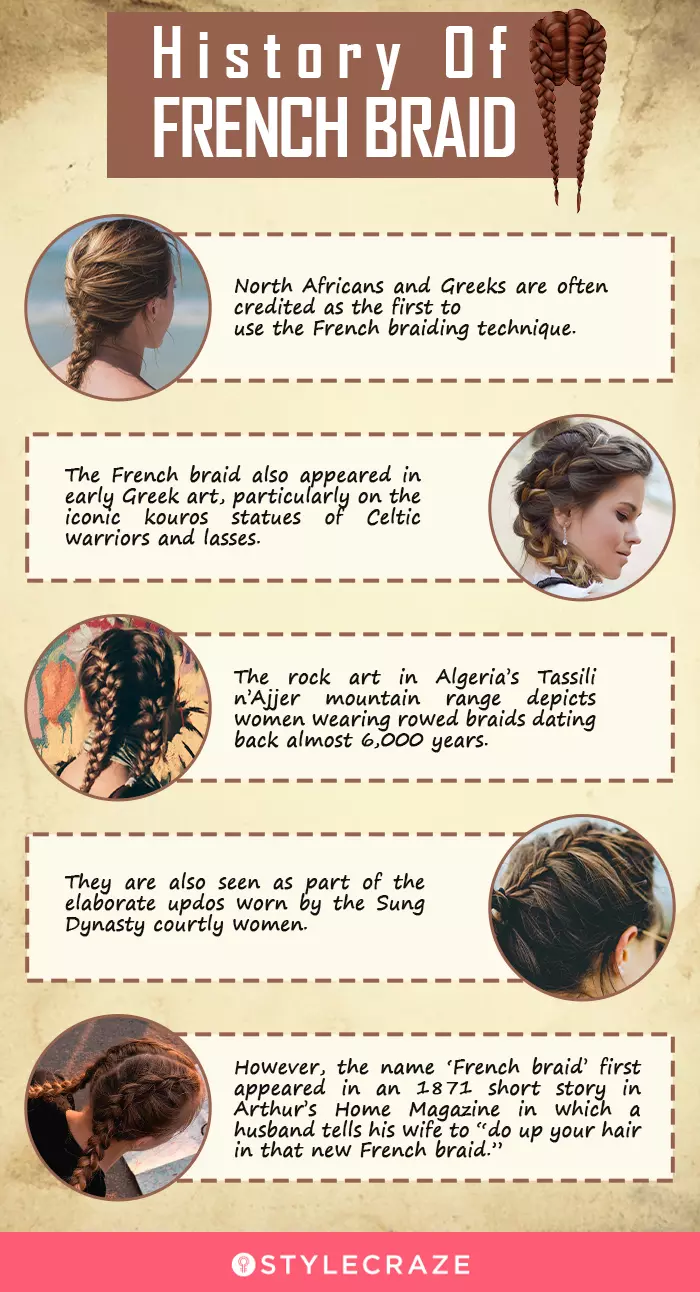
French braids are a favorite hairstyle for many. If you are looking for a perfect French braid, these simple DIY French braid tutorials will help you get one easily. French braid pigtails, double French braid, French braid ponytail, messy French braid, mermaid French braid, side-swept French braided bangs, faux, French braid, French braid half top knot, low side French bun, French knot tuck updo, half-French braid, and one French braid are a few popular styles in braids. The tutorials mentioned above can help you get a perfect-looking ponytail.
Frequently Asked Questions
Is it easier to do a French braid with wet hair?
No. Making a French braid is easier on dry hair. Wet hair is weaker, and braiding may cause further damage to its structure.
How long should I leave French braids in?
You can leave your French braids in for 3-4 days if the braids are tight, and you protect them in satin wraps at night.
Does a French braid damage hair?
Not in the short term. However, if you constantly braid your hair in the same style tightly and do not follow a proper hair care routine, it could hurt your scalp and weaken the hair roots.
What is a reverse French braid called?
A reverse French braid is called a Dutch braid.
Need help to create a super elegant side French braid hairstyle? Follow these steps to create the perfect French braid for your hair in minutes.
Illustration: Amazing French Braid Tutorials
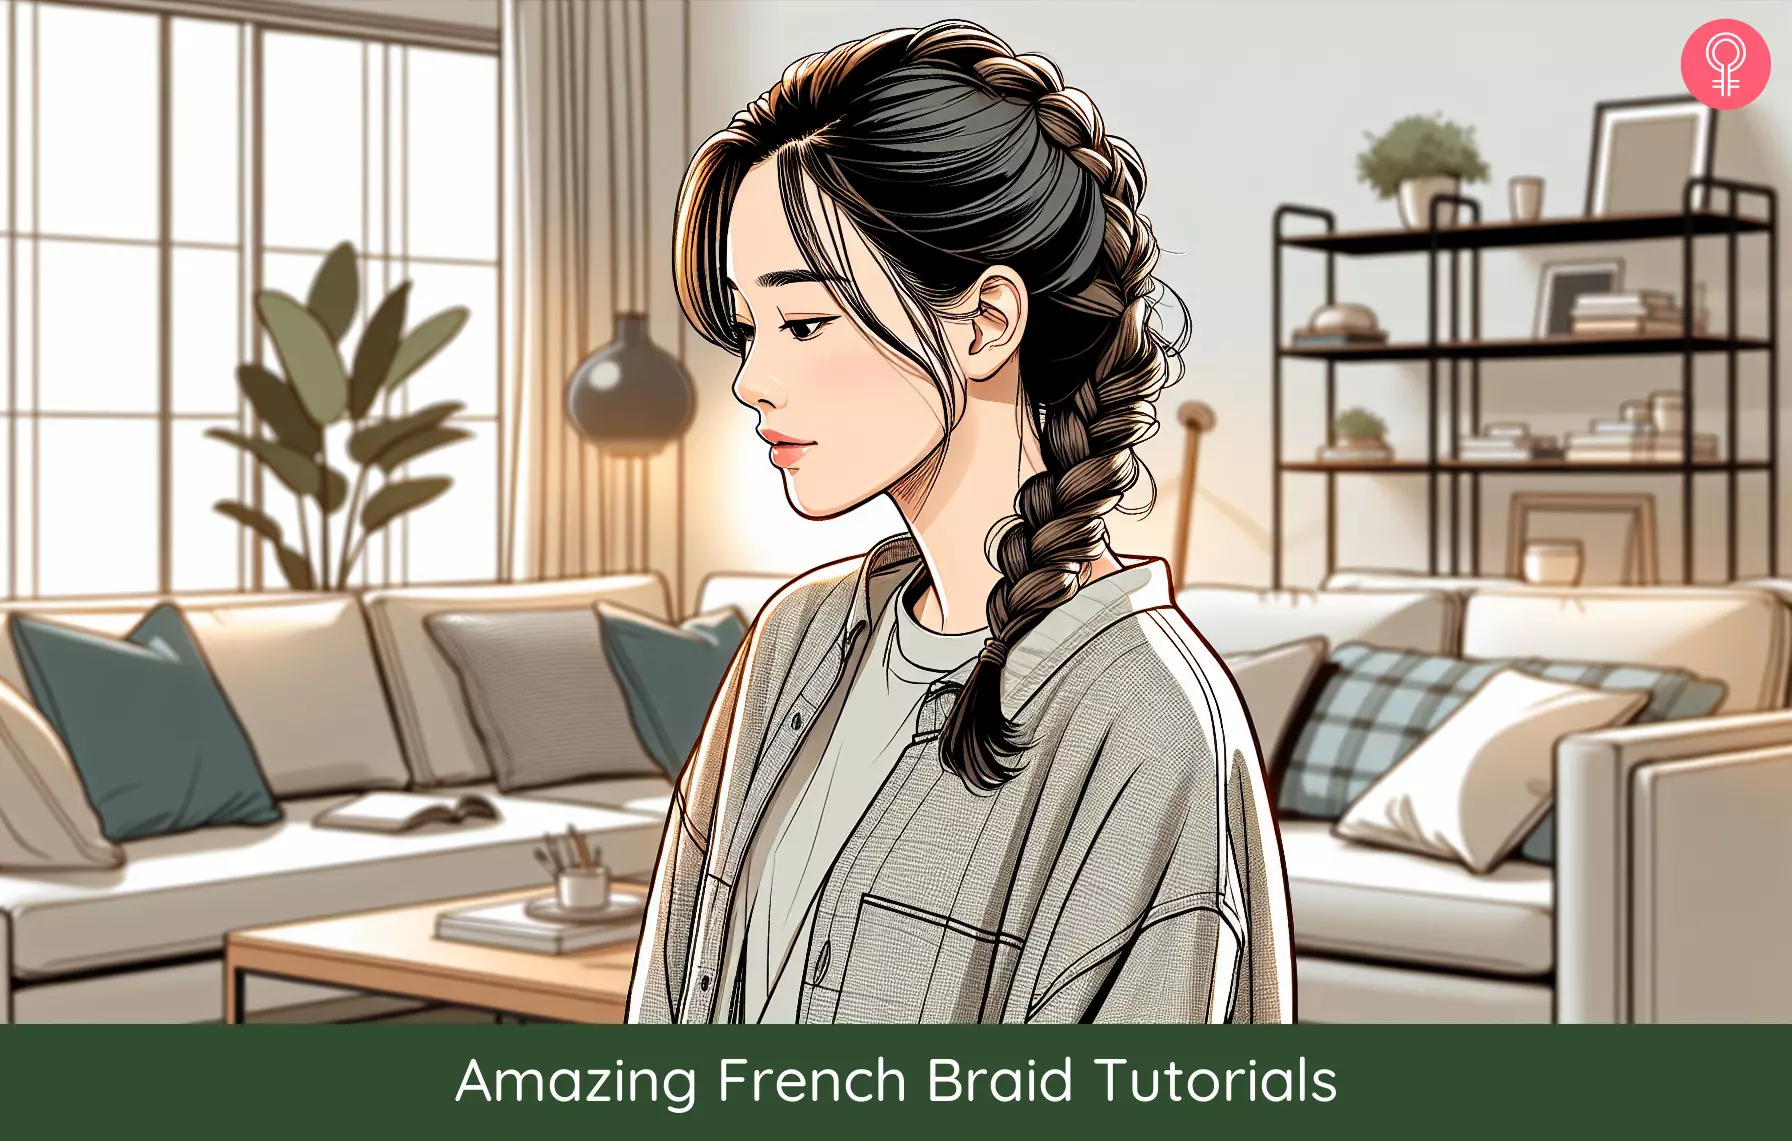
Image: Dall·E/StyleCraze Design Team
Personal Experience: Source
StyleCraze's articles are interwoven with authentic personal narratives that provide depth and resonance to our content. Below are the sources of the personal accounts referenced in this article.
i. Hairstyles – French braidshttps://rionashairblog.blogspot.com/2015/08/french-braids.html
Read full bio of Casey Simmons
Read full bio of Anjali Sayee
Read full bio of Asmita De
Read full bio of Bhumika Daga









Community Experiences
Join the conversation and become a part of our empowering community! Share your stories, experiences, and insights to connect with other beauty, lifestyle, and health enthusiasts.