23 Stunning DIY Prom Hairstyles For Short Hair
Flaunt your tresses and be the diva with these fresh, beautiful, & versatile options.
Image: Shutterstock
Ever since high school started, you probably dreamt of the perfect prom. You may have your date, dress, shoes, and makeup, but you think there isn’t much you can do to zhuzh up your look because you have short hair.
Here are the 22 incredible prom hairstyles for short hair to prove you wrong. Scroll down to discover a world of elegant, classy, chic, and edgy short hairstyles to flaunt at your prom. These hairstyles are easy to achieve at home, making them popular choices among everyone. After seeing you in any of the below-listed styles, everyone will wish they had short hair too.
So, without further ado, keep reading to check out these fabulous short hairstyles you need to try out. Swipe up!
 Before You Get Started
- Avoid too tight updos on prom night. You do not want a headache to ruin prom for you.
- A few pins and a good holding spray will work efficiently to keep a loose updo in place.
- If you have natural curls or a wispy hairstyle, use an anti-frizz spray or serum. This will keep your hair looking neat all night long.
- Waves, twists, and messy hairstyles can get depth and bounce with a bit of dry texture spray. This product can save your messy but stylish look from looking unkempt.
In This Article
23 Stunning DIY Prom Hairstyles For Short Hair
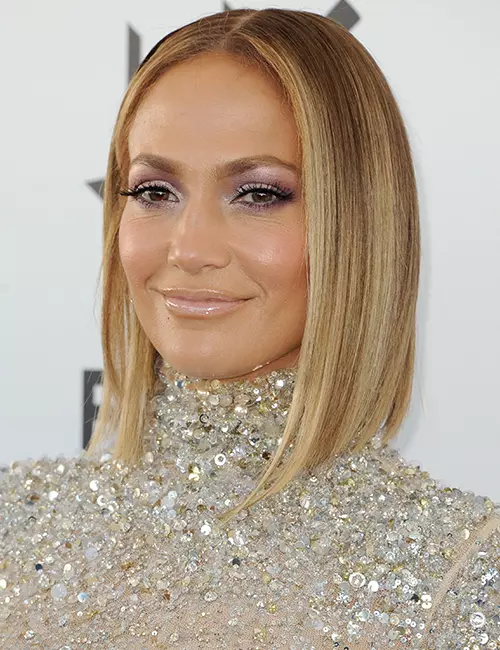
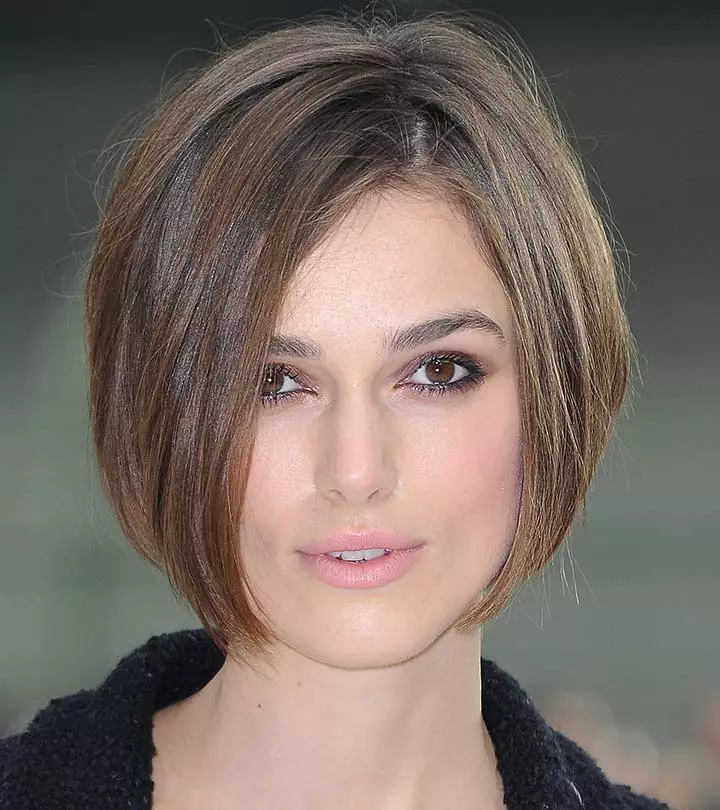
1. Center-Parted Sleek Bob
What You Need
- Rat-tail Comb
- Hair Brush
- Heat Protectant
- Styling Foam
- Straightener
Procedure
- Comb your hair using a brush to get smooth, tangle-free tresses.
- Spay a heat protectant over your tresses to limit damage and get a frizz-free, shiny mane.
- Divide your hair into smaller sections and apply hair styling foam to each section.
- Begin straightening the lower or back sections using a straightener and then move to the upper sections.
- Once done, using a rat-tail comb make a center parting and comb down all your hair.
- Finish off by spritzing a shine spray to get a glossy mane.

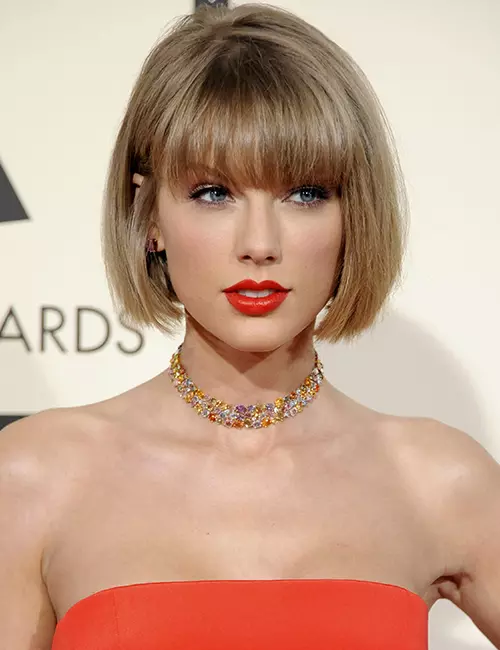
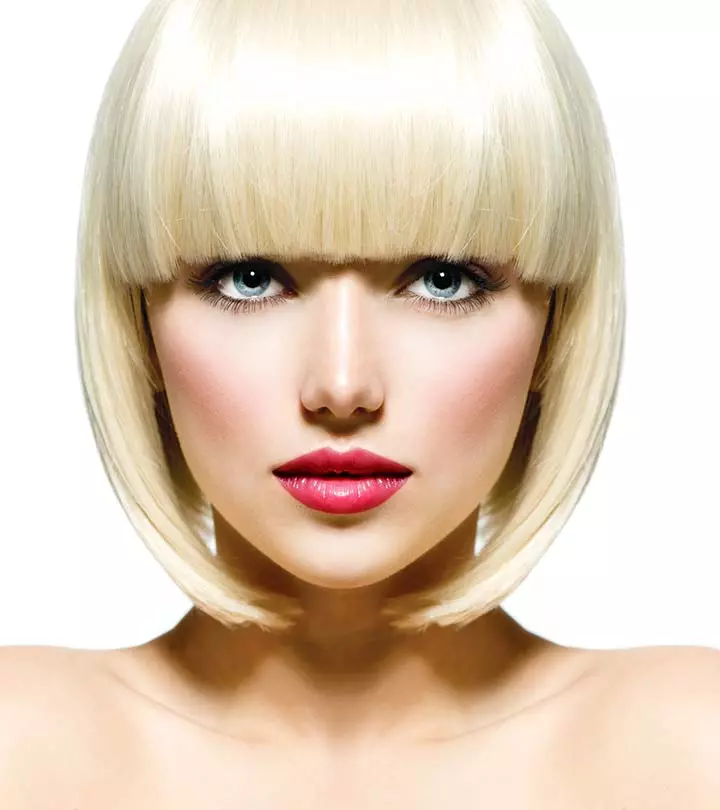
2. Blunt Bob With Bangs
What You Need
- Comb
- Hair Mousse
- Round Hair Brush
- Heat Protectant
- Blow Dryer
Procedure
- Detangle your mane using a comb.
- Apply mousse to your hair thoroughly.
- Spray heat protectant on your freshly washed mane.
- Now blow dry your hair by pointing the nozzle downwards. Use the round brush to roll your hair and bangs inwards.
- Begin styling from the lower section and gradually move upwards.
- Simultaneously, use a round hair brush to give the mane shape and a nice lift.
Lastly, you can again brush your hair gently to get that smooth, polished look.
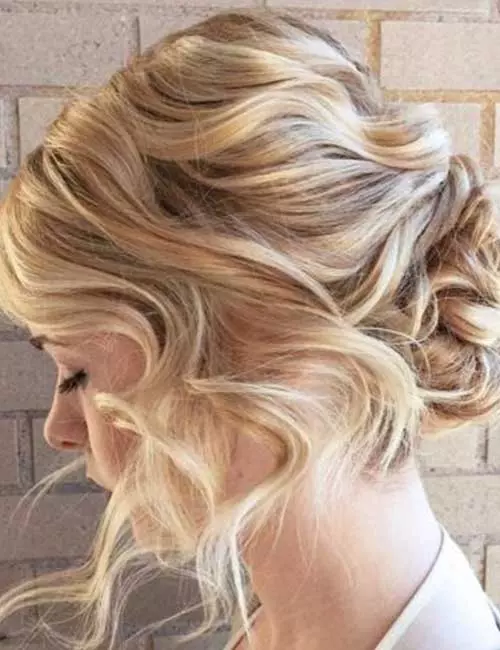
3. The Elegant Tri Updo
What You Need
- Hair pins
- Elastic bands
- Sectioning clips
- Comb
- Curling iron
- Hairspray
Procedure
- Begin by curling your hair. You want to get nice big curls in the front that look natural. Keep big sections of your hair in a curling iron for 7-18 seconds to curl them. Decrease the timing for fine or coloured hair.
- Divide your hair into three sections: top, center, and bottom. Leave some hair out in the front to act as side bangs.
- Clip off the other two sections and begin with the bottom section. Wrap the bottom section of hair in a messy low bun. Pin it securely in place.
- Repeat the same with the other two sections, making sure they’re aligned one above the other.
- Spritz on some hairspray and use hair pins to secure this chic updo for short hair.
 Quick Tip
4. Double Braid With A Twist
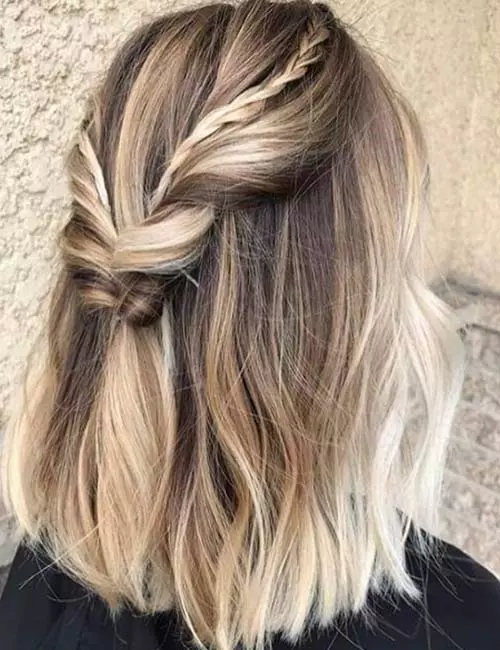
What You Need
- Hair pins
- Elastic bands
- Comb
Procedure
- Comb your hair to detangle it.
- Part your hair down the middle.
- Take a small section of hair from the front on one side. Weave it into a regular braid and secure the end with an elastic band.
- Repeat the same on the other side.
- Take mid-sized sections of hair from both sides. Twist both sections and secure them together at the back of your head with an elastic band.
- Flip the twisted half ponytail up and over itself just above the elastic band.
- Take the two small braids and pin them within the twisted half ponytail.
5. The Half Bouffant
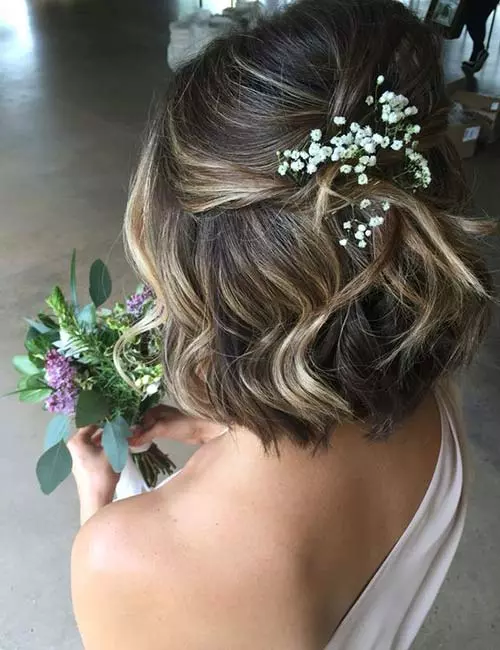
What You Need
- Hair pins
- Elastic bands
- Comb
- Hairspray
- Texturizing spray
- Fresh flowers
Procedure
- Detangle your hair and spritz some texturizing spray on it.
- Pick up some hair from the top of your head and backcomb it from the middle to the roots. This will give it a bouffant look. Comb the top of this section and neatly tie it at the back as a half ponytail.
- Take a small section of hair from one side and twist it and pin it over the half ponytail.
- Repeat the same on the other side.
- Allow your bangs and some stray hair to fall to the sides and frame your face.
- Accessorize the look with some fresh flowers.
Celebrity hairstylist, Andrea Claire
says, “Baby’s Breath as pictured will last all prom but you can also try small roses.”
6. Double Braids Side Hairdo
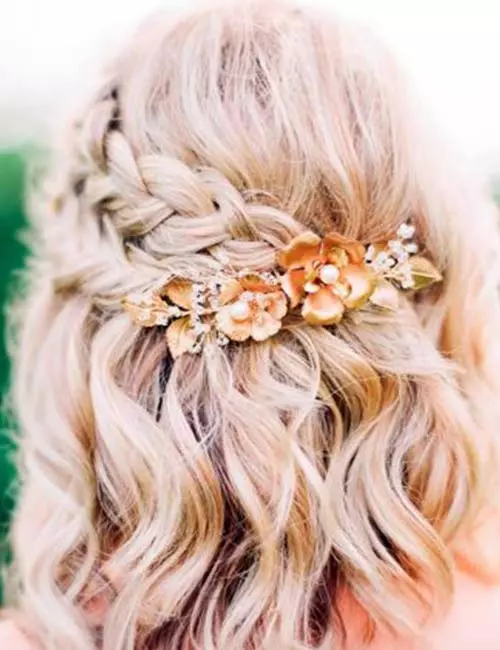
What You Need
- Hair pins
- Elastic bands
- Comb
- Fresh/artificial flowers
Procedure
- Take a thick 4-inch section of hair from one side and weave it into a regular braid. Secure the end with an elastic band.
- Pick up another section of hair from below the first section. Weave this second section into another regular braid.
- Pancake the braids (stretching out the stitches in the finished braid) to make them look voluminous.
- Pin both the braids at the back to keep them in place.
- Allow some stray hair to fall through as it will add to the appeal.
- Accessorize with some flowers.
7. The Heightened Bouffant
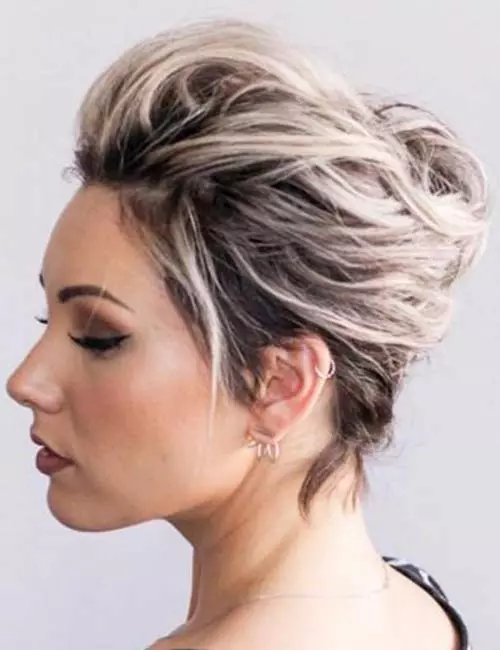
What You Need
- Hair pins
- Elastic bands
- Comb
- Hairspray
Procedure
- Backcomb the hair at the crown of your head. This will create a bouffant look. Comb the top of this section and neatly pin it in place.
- Take the rest of your hair into one fist as if you were to create a pony tail, holding it securely. With your other hand, twist the tail until you feel the twist in your fisted hand and then pin it up along the seam into a French twist.
- If you have shoulder length hair, you can simply wrap your hair in a messy bun and pin it in place.
- Finish off with some hairspray to tame any flyaways.
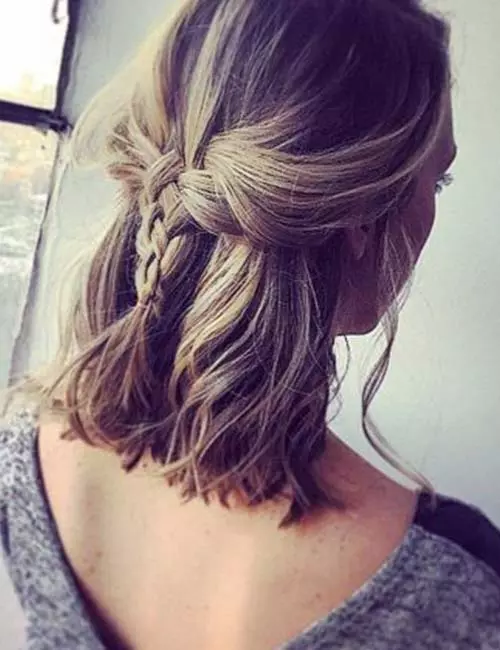
8. The Half Four Braid
What You Need
- Hair pins
- Elastic bands
- Comb
Procedure
- Comb your hair to detangle it completely.
- Take some hair from the front and sides and hold it at the back.
- Weave a four part braid with it. Divide your hair into four sections. Take one of the corner sections, pass it under the section closest to it and over the next section. Switch it with the other corner section to make it the corner section on the other side.
- Now, take the section that you crossed the first corner section with and pass it over the section closest to it and then under the other corner section. This will make it a corner section on the opposite side.
- Keep weaving the braid until the end. Secure the end with an elastic braid.
- You can use pins to pin the braid in place.
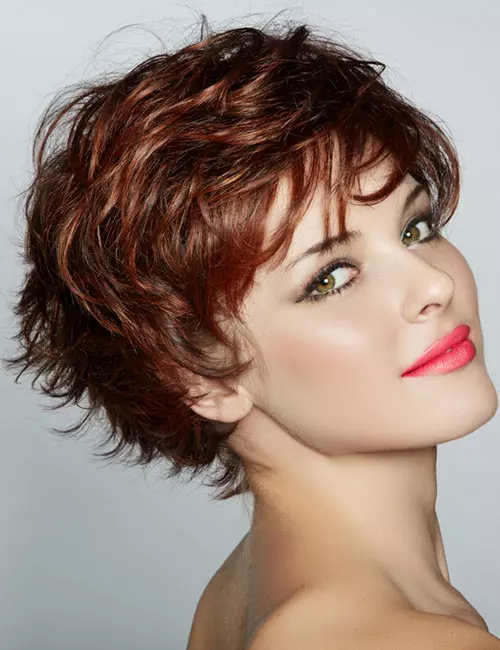
9. The Wavy Pixie
What You Need
- Comb
- Heat protectant
- ¼ – ½ inch Curling iron
Procedure
- If you have short hair and are looking for an elegant look for prom, consider this uber cool pixie.
- Spritz some working hairspray through your hair.
- Wrap your hair into the curling iron and set for about 8-12 seconds.
- Use a comb and your fingers to style your hair as you wish.
Kim, a blogger, shared how she tried a pixie cut for her prom. She wrote, “For my senior prom, I decided that I wanted a new look; I did not want a generic prom hairstyle. I decided to be risky and ask for a pixie cut. At that time, my hair was already short and reached just underneath my ears. I got a pixie cut (though I was very, very nervous throughout the process) and absolutely LOVED it (i).”
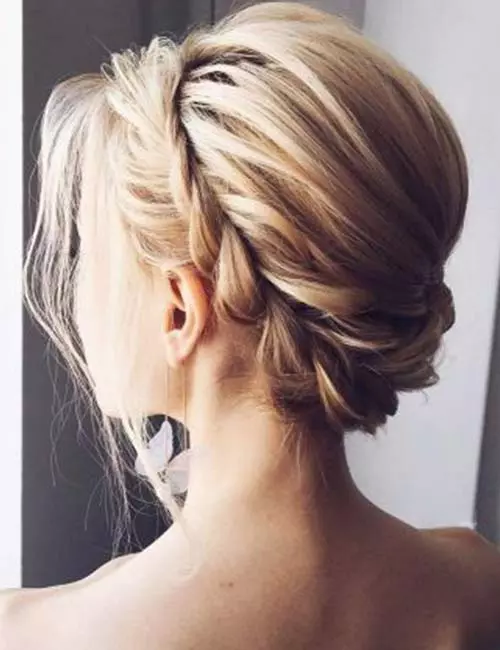
10. The Twisted Halo
What You Need
- Hairspray
- Hair pins
- Elastic bands
- Comb
Procedure
- Depending on how short your hair is, you can either twist or braid your hair.
- Spritz a good amount of working hairspray onto your hair. This will give it some hold.
- Part your hair on one side at the front and start twisting or braiding it. Keep adding hair from the side as you twist it. Make sure the twist or braid is big and neat. Make sure you are continuing to work just along the hairline.
- Keep weaving the braid or twist until you reach the other side and you’ve used up all your hair. This should create an updo.
- Pin up the twist on the opposite side.
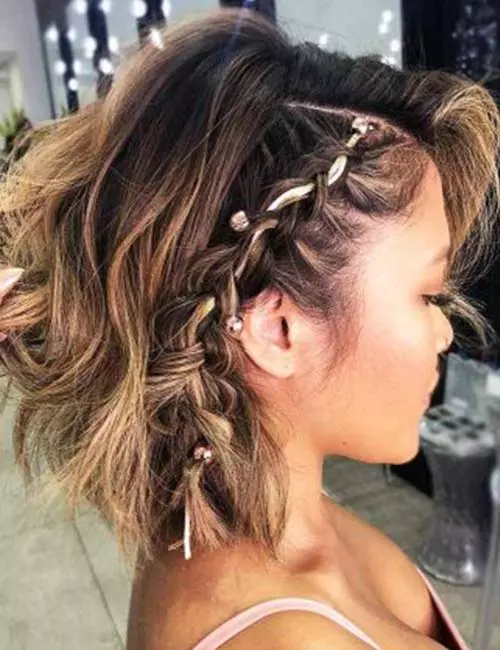
11. The Dutch Side Braid
What You Need
- Hair pins
- Elastic bands
- Comb
- Beads
Procedure
- Part your hair on one side.
- Pick up some hair from the side that has lesser hair.
- Weave a Dutch braid with this section right till the nape of your neck. If you wish to accessorize with colored hair extensions, add them in before you start braiding.
- Secure it with an elastic band.
- You can also accessorize with beads to add oomph to the hairdo.
12. The Half Pony With A Puff
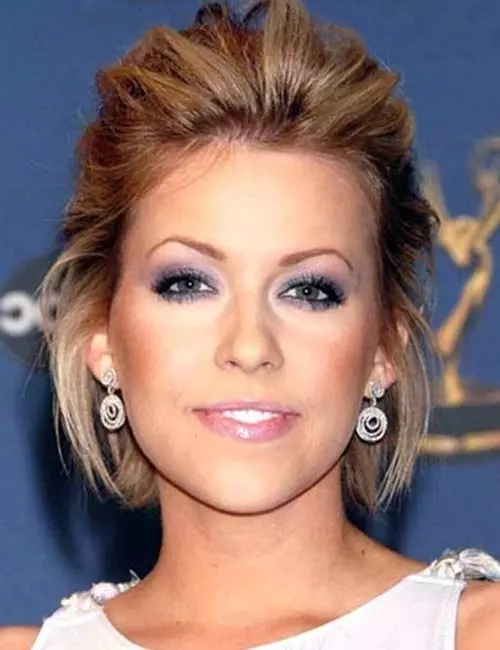
What You Need
- Hair pins
- Elastic bands
- Comb
- Fixing Hairspray
- Gel
Procedure
- Blowdry your hair back with gel using a round brush for volume, direction, and shape.
- Lightly backcomb the roots for added lift and longevity to the style. Add a few half pins at the back if you feel that your hair needs it.
- Spray with hairspray to secure in place.
13. The Twisted Up Prom-Do
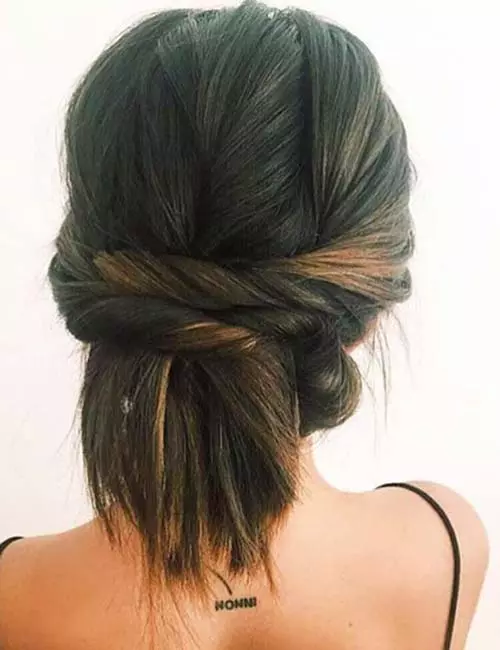
What You Need
- Hair pins
- Elastic bands
- Comb
- Straightener
Procedure
- Comb your hair thoroughly and straighten it.
- Divide hair into 4 vertical sections and place the side sections out of the way.
- Take the center two sections from the back and twist them pinning them at the back stopping at the occipital bone, leaving the ends out.
- Take one of the side sections and twist continually until you run out of hair. Pin across the back sections at the occipital.
- Repeat the same on the other side.
- If your twisted ends are extra long, simply pin them up underneath the rest of your hair leaving the ends.
14. Wavy Locks

What You Need
- Comb
- Curling iron
- Heat protectant
Procedure
- Comb your hair and spritz on some heat protectant.
- Create waves in your hair by curling the hair with vertical 1 inch sections. Curl away from the face.
- Allow your hair to cool down completely.
- Flip your hair and shake it up. Run your fingers through and part your hair to one side to complete the look.
 Quick Tip
15. The Curly Mohawk
What You Need
- Comb
- Curling iron
- Hairspray
Procedure
- Get the hair at the sides of your head trimmed, leaving hair only in the front and at the top and back for a faux mohawk. If trimming is too much of a commitment you can simply section the sides and braid them back to the nape.If the braids are long, twist them into a bun.
- Keep sections of your hair in the curling iron for about 8-12 seconds.
- Curl the mohawk section of the hair, alternating the direction of the curls and accentuating the edgy look. Allow the curls to cool down then tousle with your hands to separate the curl.
- Spritz on some hairspray to keep the curls intact.
16. A Classy Half Ponytail
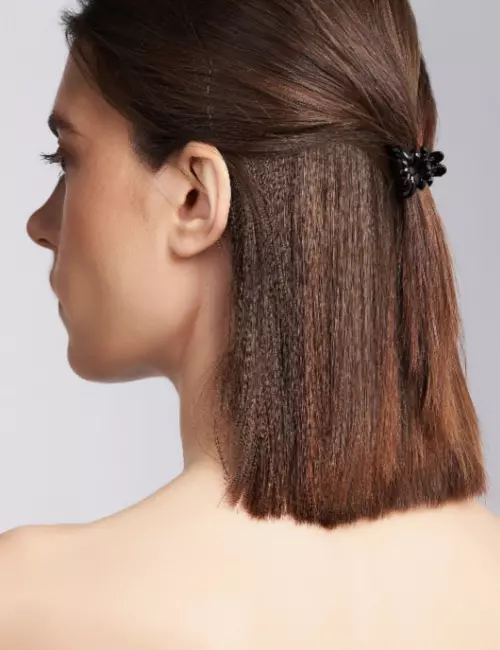
What You Need
- Hair pins
- Elastic bands
- Comb
- Curling iron
- Hairspray
Procedure
- Comb your hair to detangle and then straighten it.
- Take some hair from the sides and the crown and tie it at the back with an elastic band or clip.
- Spray with a light hairspray to finish the look.
 Quick Tip
17. One-Sided Four Weave Dutch Braid
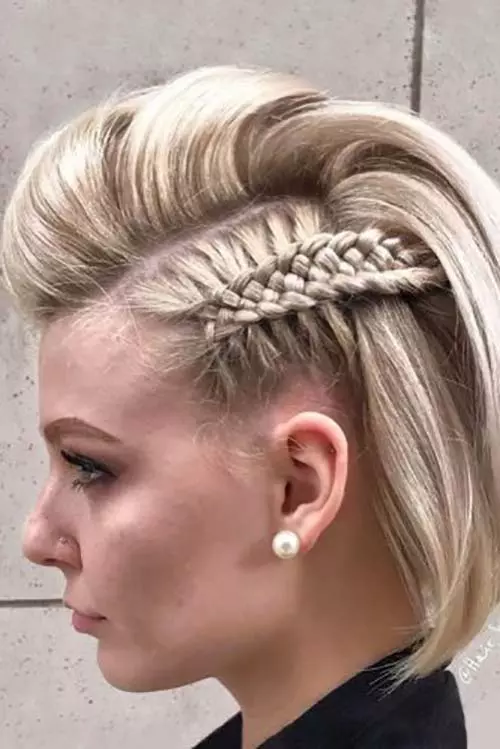
What You Need
- Hair pins
- Sectioning clips
- Rat-tail comb
Procedure
- Comb your hair to detangle it.
- Using a rat-tail comb, section off some hair from one side. Clip up the rest of the hair so that it doesn’t get in the way.
- Weave this section of hair into a four part Dutch braid. Divide your hair into four sections. Take one of the corner sections, pass it under the section closest to it and over the next section. Switch it with the other corner section to make it the corner section on the other side.
- Take the section that you crossed the first corner section under and pass it over the section closest to it and then under the other corner section. This will make it a corner section on the opposite side.
- While you continue to do this, keep adding hair as you would in a Dutch braid.
- Weave this braid till the end and secure it with an elastic band.
- Unclip the rest of your hair and spray on some hairspray all over it.
- Pin the braid in such a way that its ends are hidden under your hair.
18. The Beachy Goddess
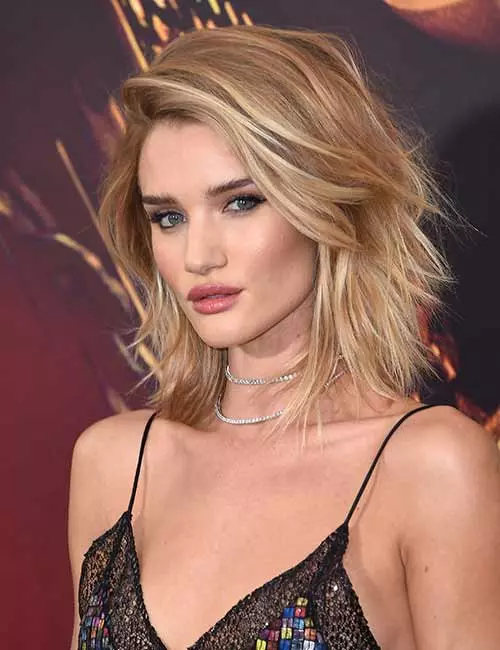
What You Need
- Comb
- Flat iron
Procedure
- Begin with straightening your hair. While using a flat iron, midway down the hair shafts, twist your wrist to give your hair a beachy vibe.
- Spritz on dry texturizing spray to add texture to the beachy look .
- Flip your hair and shake it to add volume to it.
19. The Retro Do
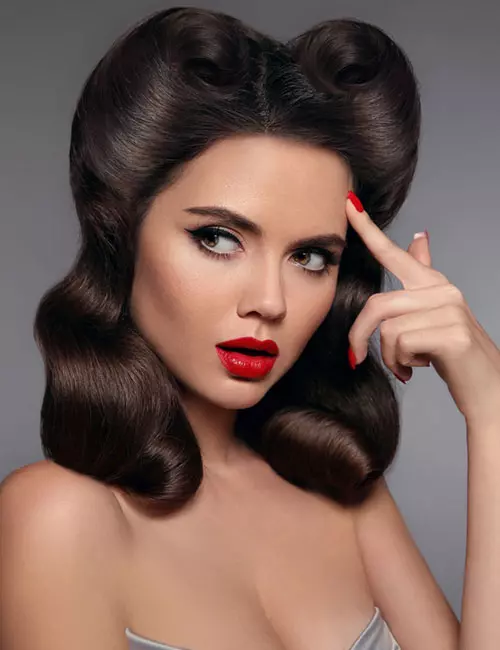
What You Need
- Hair pins
- Thermal setting spray
- Comb out brush
- Finishing spray
- 1-1.5 inch curling iron
Procedure
- Curl your hair using a curling iron. If you want big, rounder curls, use the larger iron. Apply a thermal setting hairspray on each section before using the curling iron.
- Keep the ends of your hair into the curling iron and roll up to the roots in one big roll.
- Allow your hair to cool, then gently brush out with a comb out brush before you part it to one side.
- Pin neatly in place.
- Spritz on some hairspray to lock in the hairstyle.
20. Simple Twists
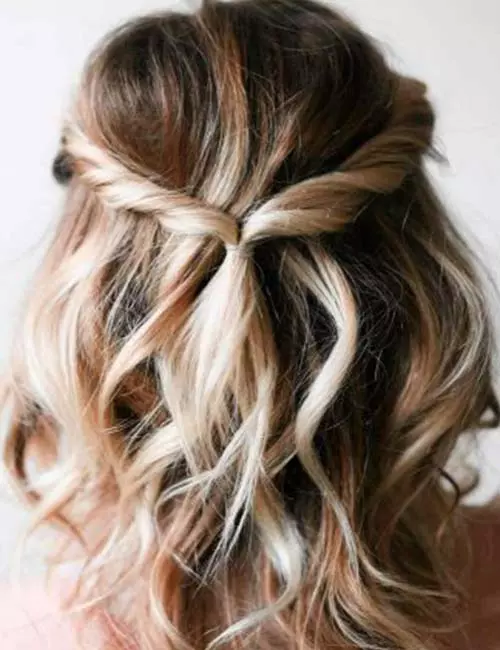
What You Need
- Hair pins
- Elastic bands
- Comb
Procedure
- Comb your hair thoroughly.
- Pick up two sections of hair from each side and tie them at the back of your head with an elastic band into a half ponytail. Comb the rest of your hair neatly.
- Flip the half ponytail up and in through itself (above the elastic band) a few times.
- By doing this, you create tight twists above the elastic band.
21. Color It
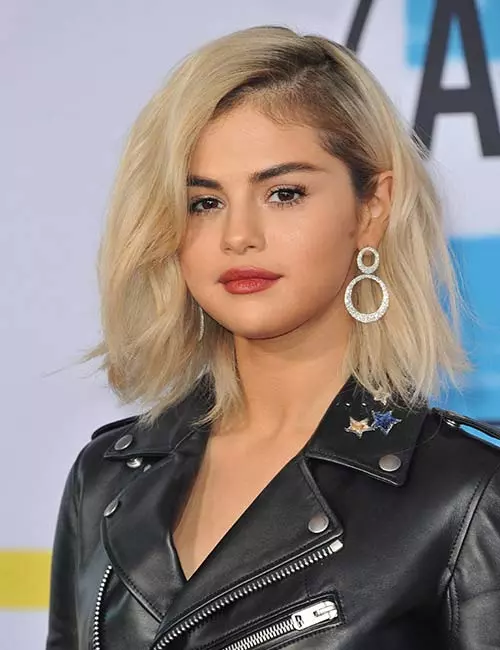
What You Need
- Hair color
- Comb
Procedure
- Go for a change and color your hair. If you have light hair, pick a dark color, and vice versa. Pick shades that are in the same tone as your hair and skin. Not all warm tones suit cool toned skin.
- Allow your roots to show if you have dark roots. Dark roots near the scalp help give the face an elongated look while also flaunting the colored shade.
- Go for simple haircuts like a messy lob, and elegant and chic long layers, since the point is to focus on the new color of the hair.
- Part your hair on one side to finish off the look.
22. Twisted Updo
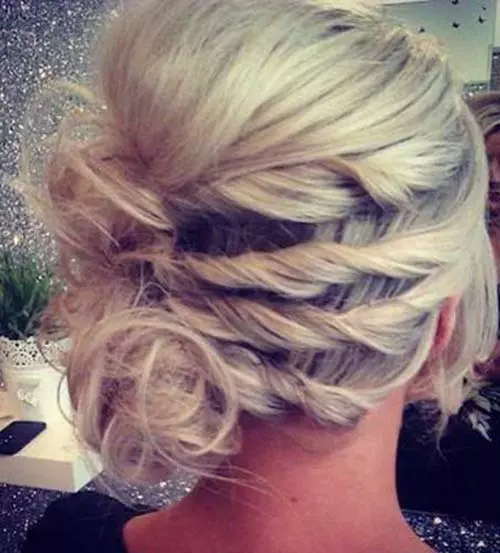
What You Need
- Hair pins
- Elastic bands
- Comb
- Curling iron
Procedure
- Detangle your hair with a comb.
- Curl your hair into soft waves.
- Tease the top section from the roots up to the middle of the hair shaft. This will give the bouffant look. Then comb and pin this hair just past the crown.
- Take a section of hair from one side and twist it. Pin the twist at the back into a mini bun leaving the ends out.
- Twist and pin back two more sections of hair on the same side with the same method.
- Gently tease the ends from your three mini buns, pinning sections down with U-pins if needed.
- Allow your bangs to fall freely and frame your face.
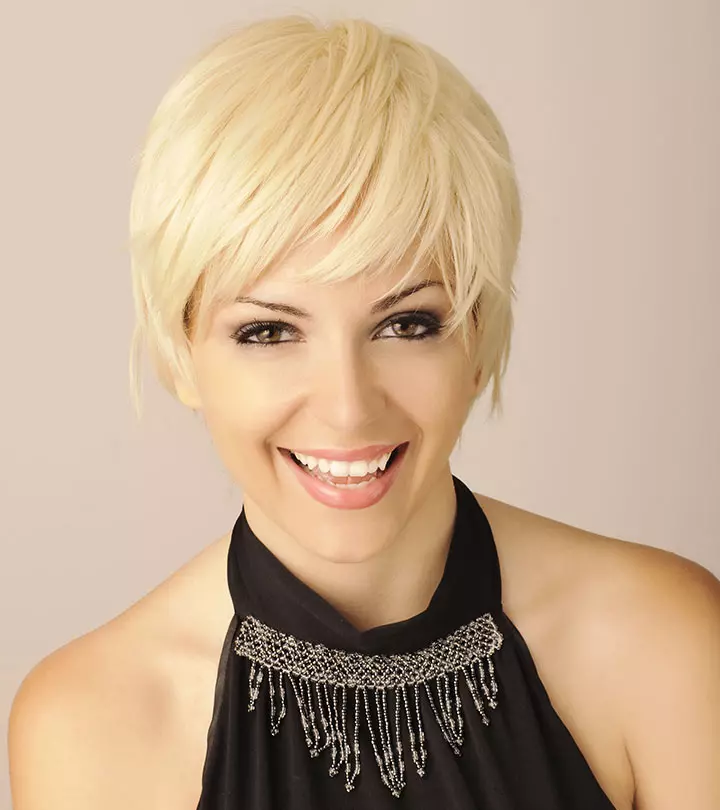
23. Pixie Cut With Bangs
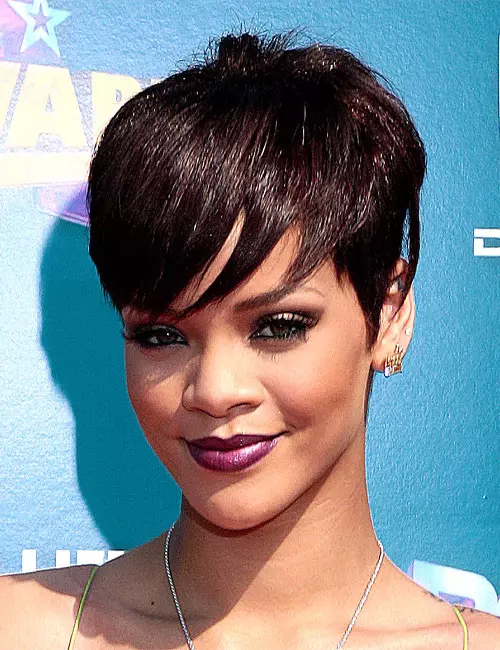
What You Need
- Wide-tooth Comb
- Hair gel or mousse
- Straightener
- Heat Protectant
Procedure
- If you have short hair, this one is a bold style.
- Use a small round brush to style your bangs on the forehead and add volume. Shape your fringes for a chic look.
- Spritz some heat protectant through your hair.
- For a sleeker look, use a flat iron to straighten the hair.
- Apply a small amount of styling wax or pomade, focusing on the ends and bangs.
- For extra hold, finish with a light mist of hairspray, ensuring your bold pixie cut stays stylish throughout the day.
While the hairstyle itself is definitely a big deal, you can change your entire look with the help of some hair accessories. Here are some hair accessories that will wow you!
Key Takeaways
- Those with short hair can choose from a variety of hairstyles for prom, such as sleek bobs and elegant updos.
- You can accessorize your prom hairstyle with clip rings, headbands, decorative hair clips, scarves, and flowers to elevate it.
- You can use hairspray and bobby pins to secure your prom hairstyle. Carry a touch-up kit for any necessary adjustments.
Accessories
- Clip Rings
Clip rings are all the rage right now. They can make a simple braid or ponytail look badass.
- Head Bands
Never underestimate the power of the headband! A headband could be all you need to glam your hair up.
- Decorative Hair Clips
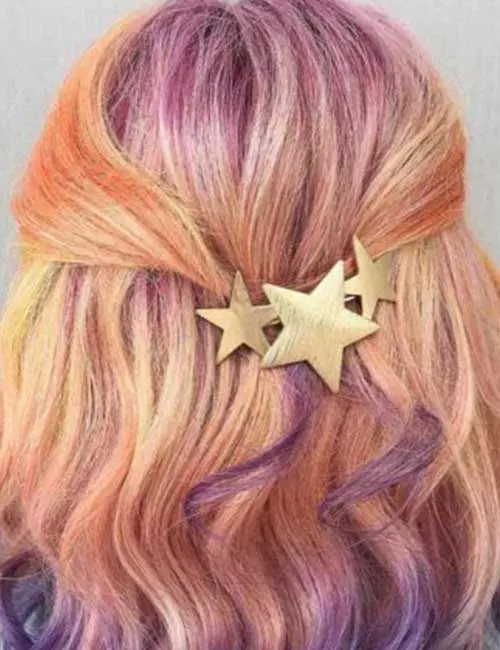
These days, you can find all sorts of designs in hairclips. Instead of using a plain old hair clip, consider using a fancy one that can transform your hairdo from a 5 to a whopping 10.
Andrea Claire suggests, “You can also use a vintage brooch in your hair. Secure it with bobby pins over the pin and clasp.”
- Scarf
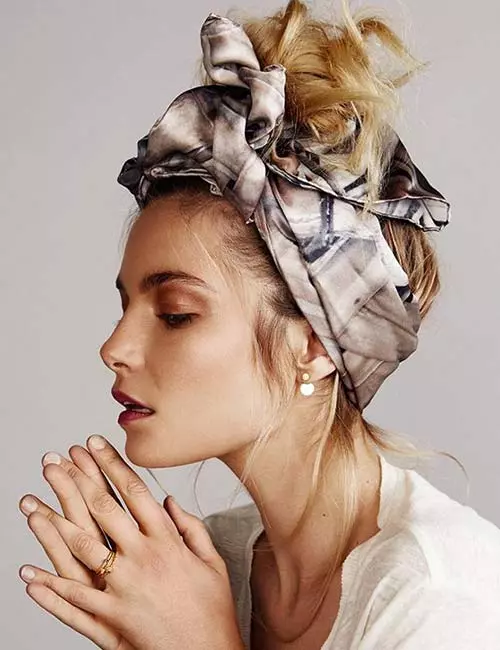
If your hair is untamable or you’re just having a bad hair day, consider this age-old way of covering it up. Use a snazzy scarf. Scarves are always in fashion and more people are choosing to wear them. Pick a scarf with the same material as your dress for a monochrome look or choose a vibrant pattern or color. There are many ways to tie your scarf too. Try a rosebud knot!
- Flowers
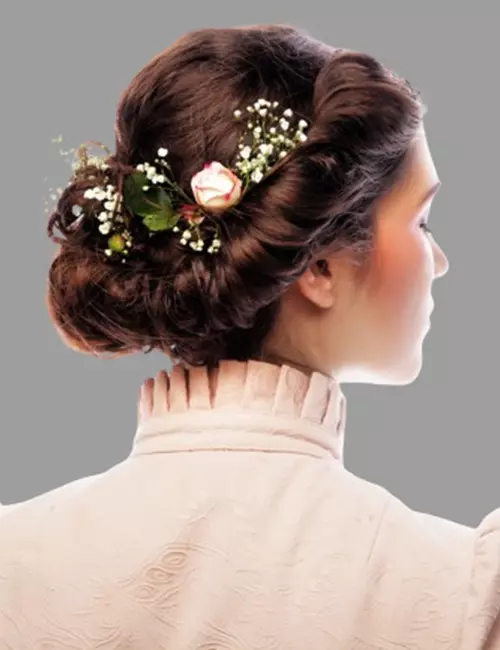
Flowers can instantly change your look. They not only make your hairstyle look elegant and delicate but also add a dash of color.
Lastly, you want your prom hairstyle to stay in place. Here are a few tips that will help keep your hairdo intact until the end of the night.
How To Keep Your Prom-do Intact
- Use a good amount of hairspray. Spray your finished hairstyle thoroughly with a fixing spray to have it last all night.
- Spray your hair clips, pins, and hairbrush with hairspray right before using them. This will help keep them from sliding out.
- If you want to have a touch up kit on hand, have some pins and a travel size hairspray in your clutch or handbag.
- Don’t be afraid to use hair pins generously. Use hair pins and elastic bands that are the same color as your hair. They are available at beauty and drug stores.
- Cover your styled hair with a high-quality silk scarf on your way to prom and even when you take breaks at the party.
Infographic: 4 DIY Prom Hairstyles For Short Hair
Do you have short hair and are struggling to find the perfect prom hairstyle? Worry no more! From chic pixie cuts to elegant updos, these 4 easy-to-do hairstyles are sure to make you feel beautiful for this iconic night. Take a look at the infographic below for simple tutorials to achieve the look of your dreams, all in the comfort of your home.
Some thing wrong with infographic shortcode. please verify shortcode syntax
So, that was the list of 20 amazing prom hairstyles for short hair that you can show off during your prom. Perhaps, these ideas can inspire you to put together the best look for yourself. Whether you go for a timeless classic design or something a little more creative and modern, your hairdo can be the perfect complement to a wonderful dress and gorgeous accessories. And perhaps you have understood that just because something appears to be complex doesn’t imply it has to take hours to complete. You can floor everyone at your prom with a stunning hairdo thanks to these chic short hairstyles. So here’s to a prom that makes everyone in the room turn their heads!
Frequently Asked Questions
Can I use extensions for my prom hairstyles?
Yes, you can install extensions on your hair to add length and volume. They help you create elegant hairstyles of your choice. Ensure to choose extensions that blend with your natural hair seamlessly. And get the extensions installed at least a week before so that you get time to feel used to them and have some practise styling them.
How early should I get my hair done before prom?
You should ideally finish doing your hair a few hours before prom. This gives you enough time to change or modify your hairstyle if needed.
Should I wash my hair before prom?
Yes, you should wash your hair one or two days before prom to allow your hair to hold up well.
Can you add extensions to short hair for prom?
Yes, you can add extensions to short hair as they are a great way to add length, volume, and color to your hair while looking natural. You can use clip-in or permanent hair extensions to create those voluminous hairstyles for prom.
Are you struggling to find the perfect prom hairstyle for your short hair? Look no further! This video showcases stunning and easy-to-do hairstyles that will make you the belle of the ball.
Personal Experience: Source
StyleCraze's articles are interwoven with authentic personal narratives that provide depth and resonance to our content. Below are the sources of the personal accounts referenced in this article.
i. Pixie Cutshttps://dartmouthfashioncouncildotcom.wordpress.com/2012/09/29/pixie-cuts/
Read full bio of Andrea Claire
Read full bio of Anjali Sayee
Read full bio of Shatabdi Bhattacharya
Read full bio of Joyce Joyson








Community Experiences
Join the conversation and become a part of our empowering community! Share your stories, experiences, and insights to connect with other beauty, lifestyle, and health enthusiasts.