62 Most Trending Nail Art Designs For Short Nails – 2025
Such colorful and adorable designs to choose from with stepwise tutorial images.
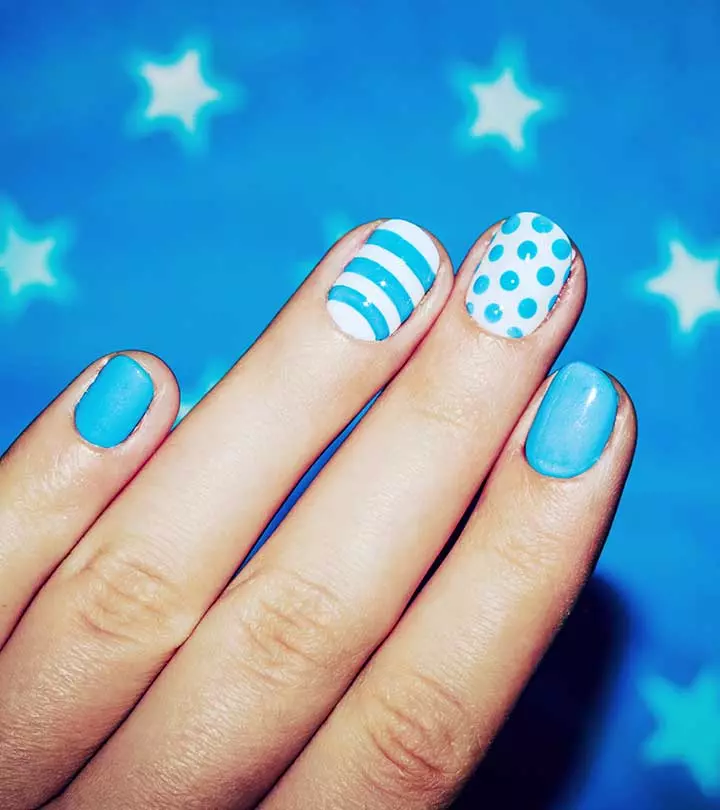
Image: shutterstock
It is a misconception that nail art suits only long nails. The size of your nails does not matter to show the art extravagantly. We have listed some interesting short nail designs to present a case in point. So, don’t be disheartened if you have short nails or don’t have the patience to tend to long nails.
Short nails are easier to maintain, and the right style makes them look even chic. If you love to keep your nails short but don’t know how to style them perfectly, this article is for you. Each nail art is practical and uniquely beautiful in colors ranging from turquoise to crimson. Keep reading to learn more about DIY nail art for your short nails!
 Keep In Mind
- Brush Type: Painting on short nails is not easy, so use a very fine-bristled brush to make the process easier.
- Nail Shape: Cut the nails in a squoval or square shape if you have short nails to give the nail art a more well-defined appearance.
- Cuticle Care: Nourish the cuticles and push them back using a cuticle pusher to create more space for nail art.
In This Article
Easy Nail Art Designs For Short Nails
Have a look at the following 60 most trending simple nail art designs for short nails.
- Turquoise And Gold Nails
- Graffiti Nail Art
- Pinstripe Nails
- Heart Inception Nail Art
- Ruffian Manicure Tutorial
- Paint Splatter Nail Art
- Monochrome Peek-a-Boo Nail Art
- Ombre Nail Art
- Geometric & Roses Nail Art Tutorial
- Pink Autumnal Nails
- Pink And Silver Stripes Nail Art
- Colorful Stripes
- Half Moon Glitter Manicure
- Triangle Nails
- Parisian Nails
- White And Green Geometric Nails
- Pink Yin And Yang
- Pink Lace Nail Art
- Chevron Nails
- Rainbow Tips Nail Art
- Glitter Gradient Nails
- Glitter French Tips
- Gold And Pink Triangle Nail Design
- Polka Dot Nails
- Color Block Nail Art Manicure
- Glitter Fade Nails
- Fired Up Triangle Tip
- Fizzy Fun
- Spring Manicure
- Geode Stone Nails
- Cross Stitch Manicure
- Mix And Match Polka Dots
- Faded Floral
- Gingham Accent Nail
- Robin’s Egg
- Blue Gradient
- Black Out
- Dreamcatcher
- Once In A Blue Moon
- All That Glitters Is Gold
- Aesthetically Mismatched
- Pink Gl’Amore
- Speckled Out
- Whoopsy Daisy
- Third Time’s A Charm
- Blackheart
- Japanese Cherry Blossoms
- Ombre And Glitter
- Black And Red Gradient
- Vintage Roses
- Watermelon Nail Art
- Frozen Treat
- Wild Flowers
- Dark Fantasy
- Classic French Manicure
- Retro White Pink And Gold
- French Toast
- Graveyard
- Crimson Love Nail Art
- World Beyond
- Peacock Nail Designs
- Miami Nail Designs
1. Turquoise And Gold Nails
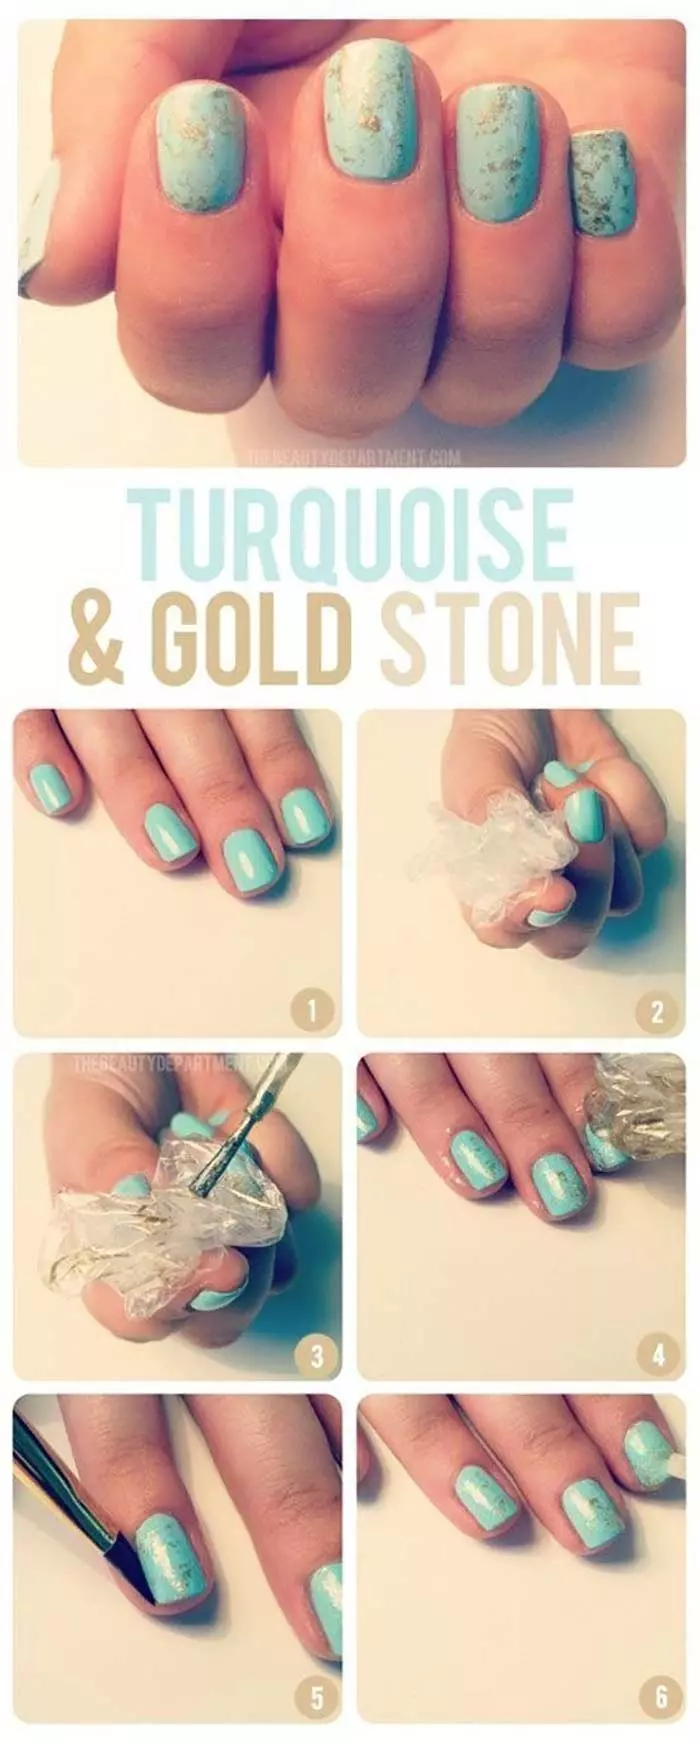
Get the appearance of beautiful turquoise and gold stones on your nails with this manicure. All that you need is a turquoise polish, a gold polish, and plastic wrap. After applying the turquoise, apply some of the gold onto a crushed plastic wrap (or cling wrap or silver foil) and dab slightly onto your nails to create the desired effect.
2. Graffiti Nail Art
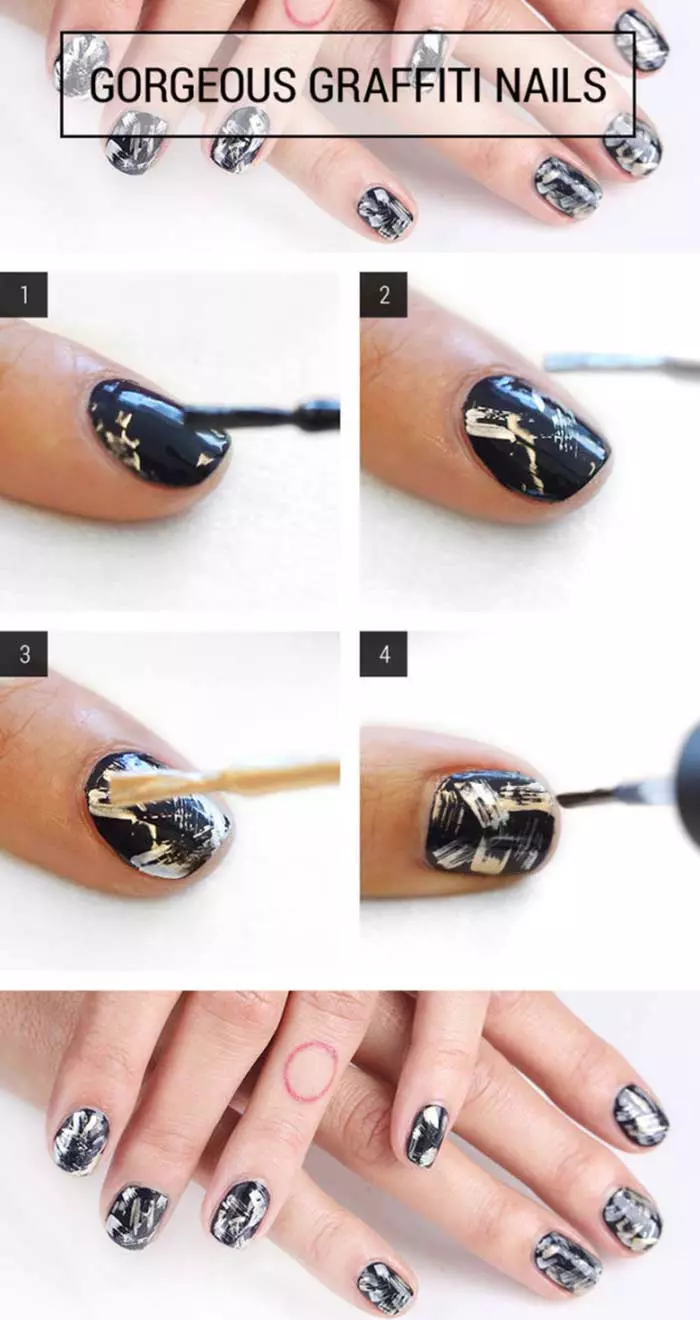
Simplicity is style. This gold and black dual-tone manicure is quite easy to achieve and doesn’t require any special tools. To create this graffiti nail art look, wipe off excess nail polish from the brush and swipe random stripes onto your black painted nails. Voila – you are done!
3. Pinstripe Nails
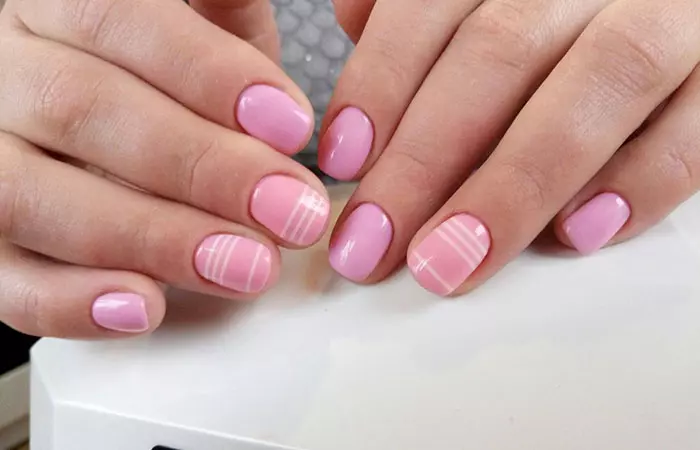
Pinstripes, once upon a time, were synonymous with workplaces. But now, they are being incorporated into everyday outfits with utmost ease. So, why not use them as an inspiration for nail art? This super easy and minimalist pinstripe nail art design manicure only requires a nail striper in addition to your nail polishes. After painting on the white, with the color of your choice, create thin stripes as shown. If you want to take it up another notch, you can use different colors for different nails, but try and make sure you’re using pastel colors to keep it looking aesthetically pleasing.
4. Heart Inception Nail Art
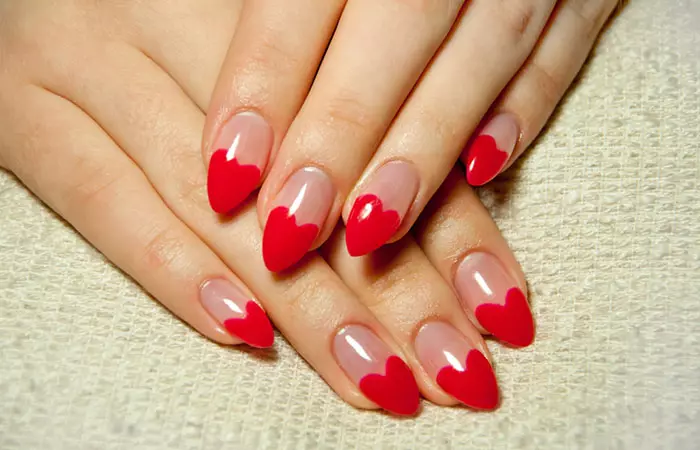
Spread some love with hearts on your nails. This manicure can be done simply by drawing one heart within another, using different shades of pink. If you ever watched The Powerpuff Girls and remember the credits of the cartoon, you would know what I am talking about!
5. Ruffian Manicure Tutorial
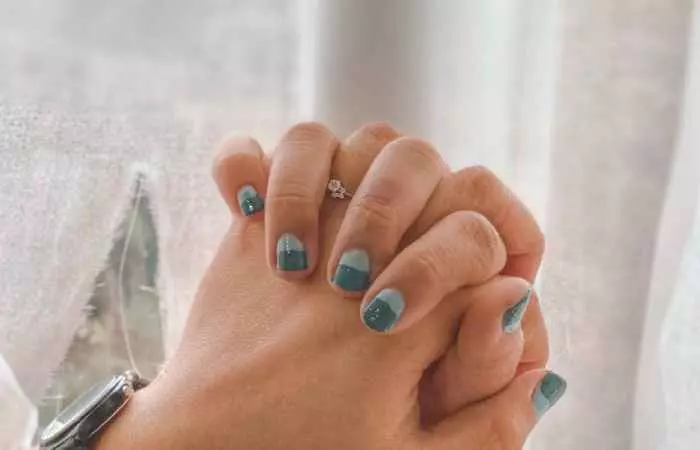
Doesn’t this look both chic and quirky? You can create this look quite quickly! All you need is two gel nail polish colors of your choice. Use one color to paint your entire nail. With the second color, paint 90% of the nails, leaving some space near the cuticle. Finish it off with a top coat, and that’s it! You are good to go!
6. Paint Splatter Nail Art
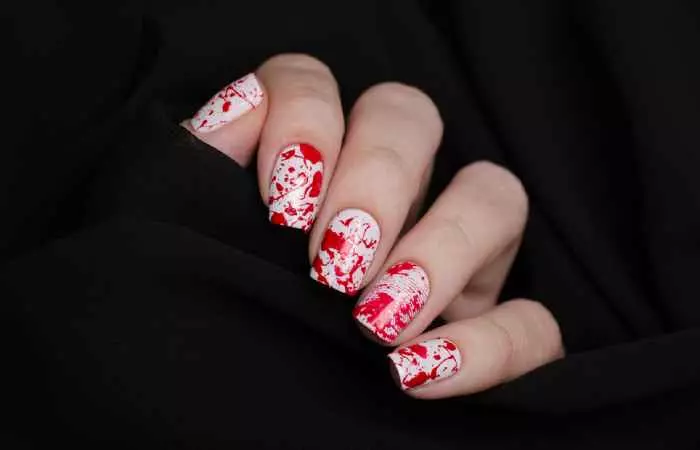
Bring out the inner artist in you! To create this nail splatter look, you will need a paintbrush in addition to the nail colors of your choice. Firstly, you will need to paint your nails white. Then, take a nail color onto a brush and dip it in a cup of water. Use your fingers to spray the color on the brush onto your nails. Repeat this for multiple colors so that you achieve the look as seen in the image.
Danielle, a beauty and skincare blogger, experimented with the paint splatter nail art technique and shared her insights on it. She suggested taking enough paint to continue to process smoothly and then went on to add, “Very simple, very easy. Anyone can do this and it’s really cute. My mom even thought I used a stamp for it! (i)”
7. Monochrome Peek-a-Boo Nail Art
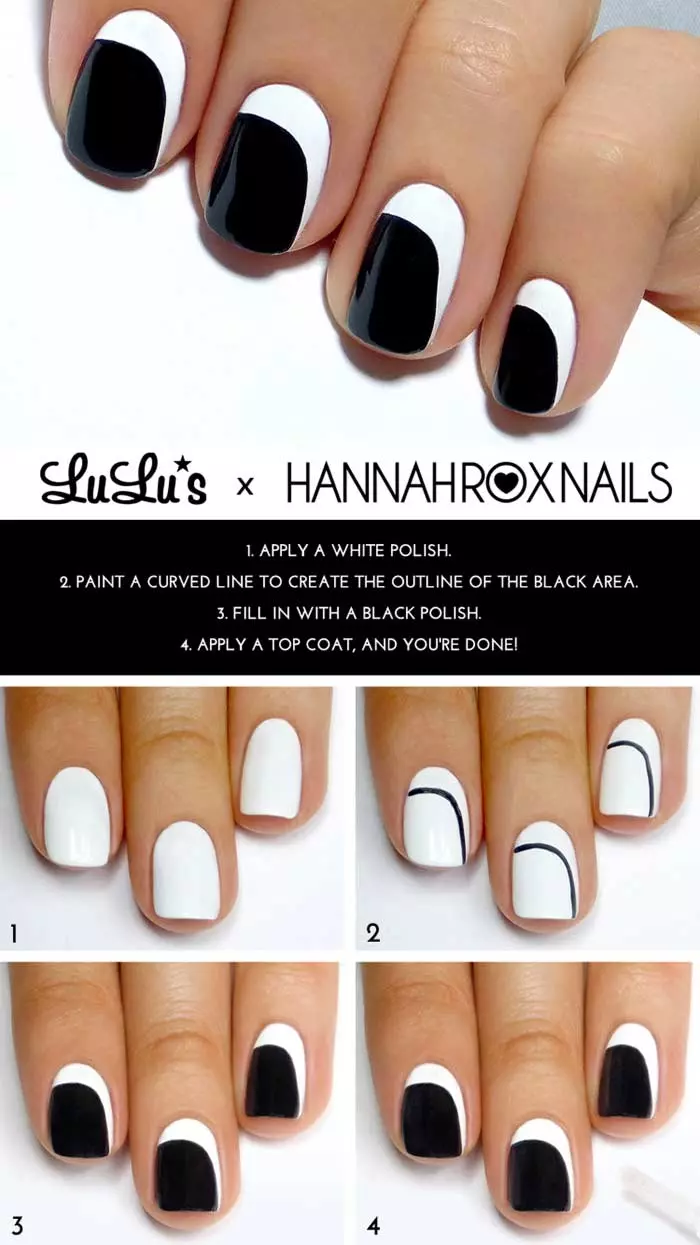
Ah, the monochrome! To say that I love anything in monochrome is a massive understatement. These are colors that work for any season and with any trend. You can’t go wrong with black and white. All you need to do for this manicure is paint your nails white and outline a curved crescent, as shown in the image. Now, fill it in with black polish and finish with a top coat.
8. Ombre Nail Art
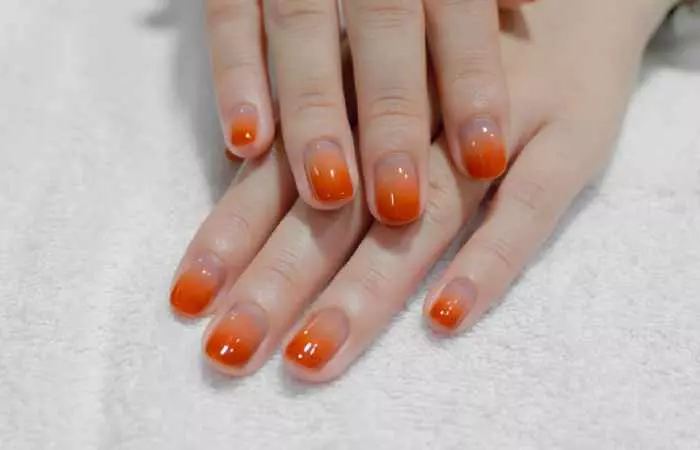
Ombres are the way to go right now! Hair, apparel, nails – you name it. It’s everywhere. So this list would be incomplete without an ombre tutorial, wouldn’t it? For this look, you will need to first paint your nails a pale pink. Then, on a makeup sponge, apply colors pale pink, white, and pale blue in gradation. They should slightly overlap each other so that when you dab the sponge onto your nails, it will create an ombre effect.
 Quick Tip
Read the most trending post – Ombre Nail Art Tutorials, to get more ideas on how to do ombre nails.
9. Geometric & Roses Nail Art Tutorial
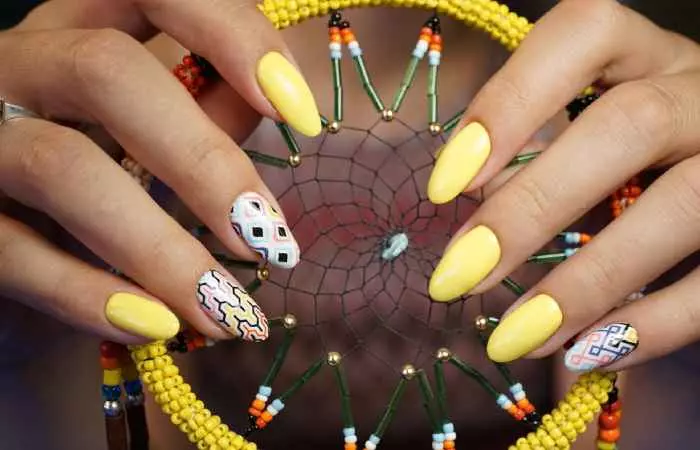
Perfect for the spring and summer, this nail art requires a little patience and precision. Using white as a base for all the nails, take some light pink and wipe away the excess with a thin brush. Create small circles gently so that it appears soft against the white base. With the help of striping tape, create random lines so that when painted over olive nail polish, it results in geometric patterns. Use the same olive polish to create soft leaves for the flowers, and you are done!
10. Pink Autumnal Nails
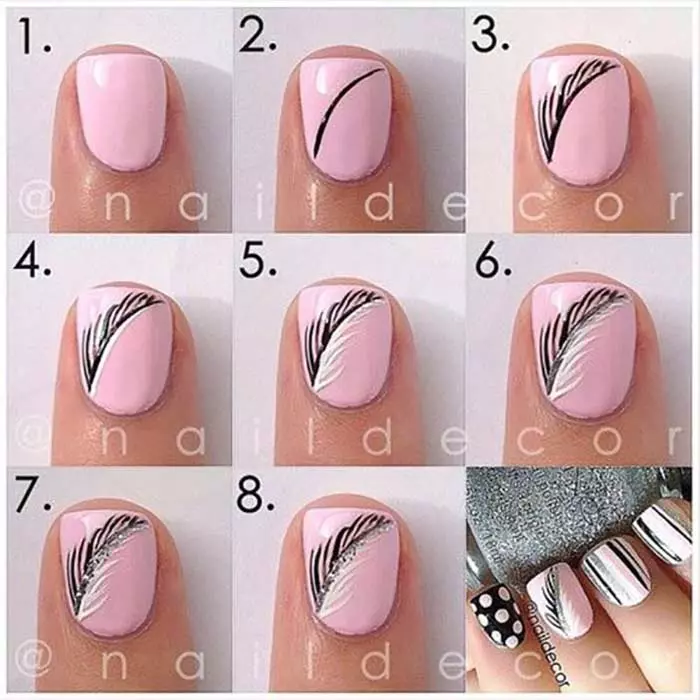
Simple and cute, all this manicure requires is a few steps. Starting off with a pastel pink base, with black polish on a nail striper, create one side of a leaf on your ring finger. Then using white polish, do the same for the other side of the leaf. To add a little something, swipe on some silver glitter where the black and white meet, as shown in the image. For the rest of the nails, create stripes and polka dots using the same colors.
11. Pink And Silver Stripes Nail Art
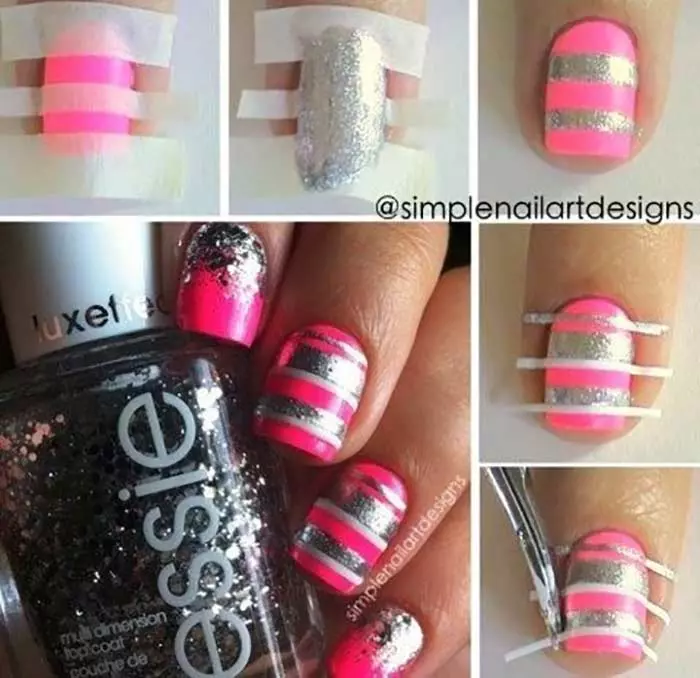
For this look, you need to start off by painting your nails in hot pink. Create stripes with the help of tape and paint over it with silver once the hot pink is dry. Use white and silver nail strips and place them onto the nail, as shown in the image. You can either do this for all nails or paint a pink and silver glitter gradient.
12. Colorful Stripes For Short Nails
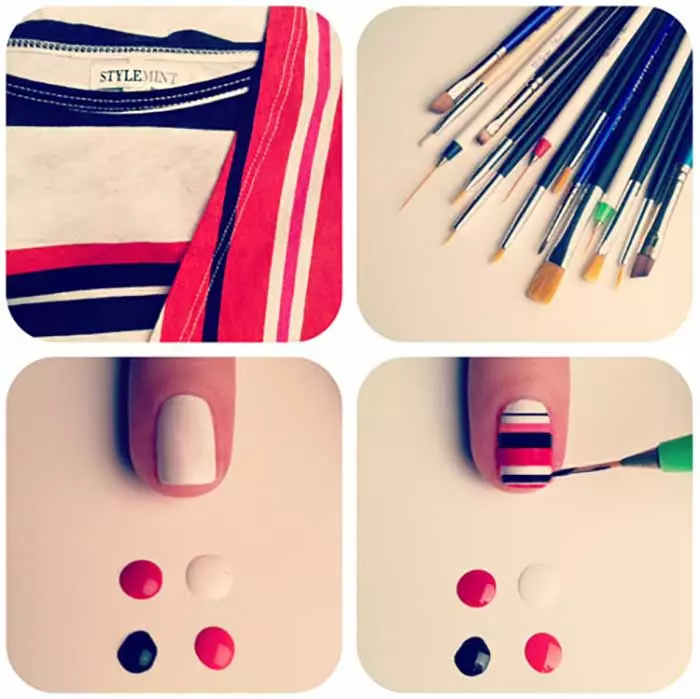
If color is what you fancy, you can try a whole range of simple nail art designs that are no short of stunning! Start off with a white base and use different-sized brushes to create the stripes. If you are not so confident painting free-hand, you can use tape to keep the lines nice and straight.
13. Half Moon Glitter Manicure For Short Nails
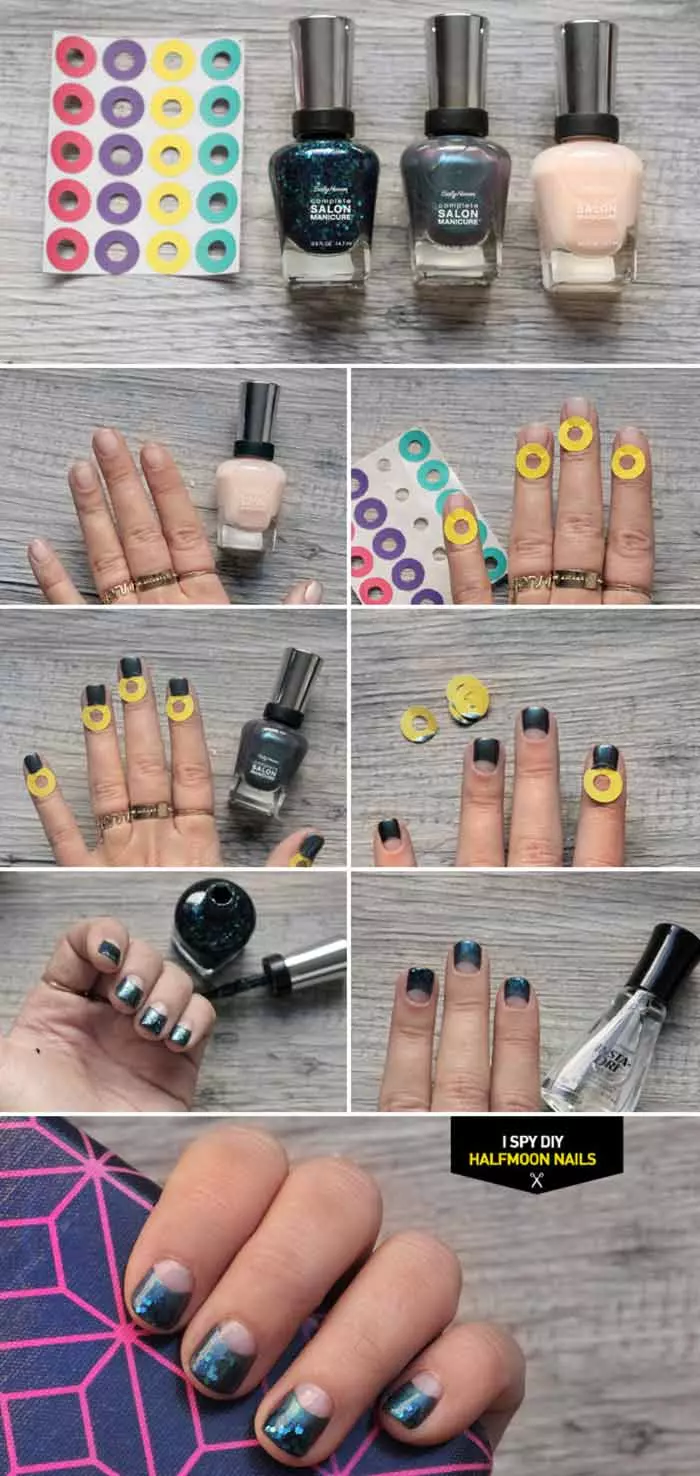
To create this half-moon manicure, paint your nails with a nude for the base. After applying the reinforcement stickers near your cuticles, paint your nails metallic black. For a glitter effect, use black glitter just on the tips and finish with a top coat.
14. Triangle Nails
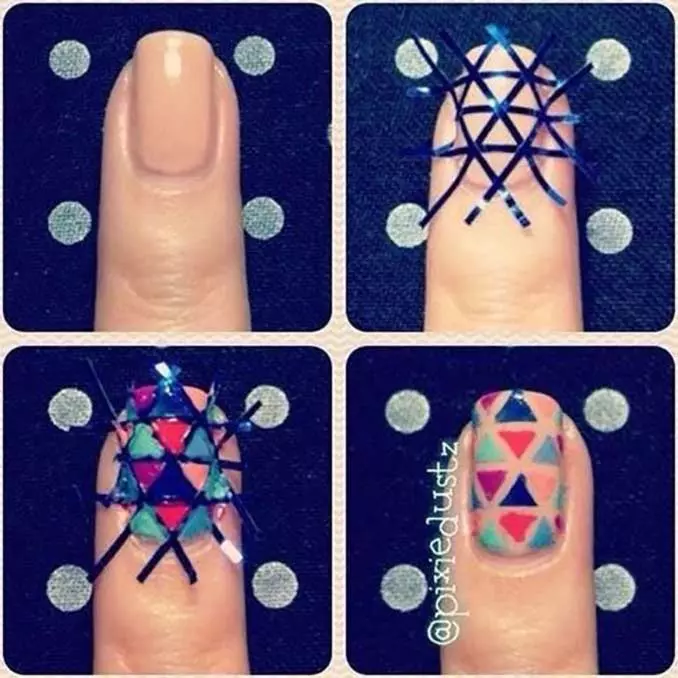
Start off this triangle manicure with a nude base. Once it dries, create triangles with nail stripe stickers, as shown in the image. Now, using a small brush, paint each triangle with different colors. Remove the stickers carefully and seal with a top coat. There you have it, a triangle nail art!
15. Parisian Nails
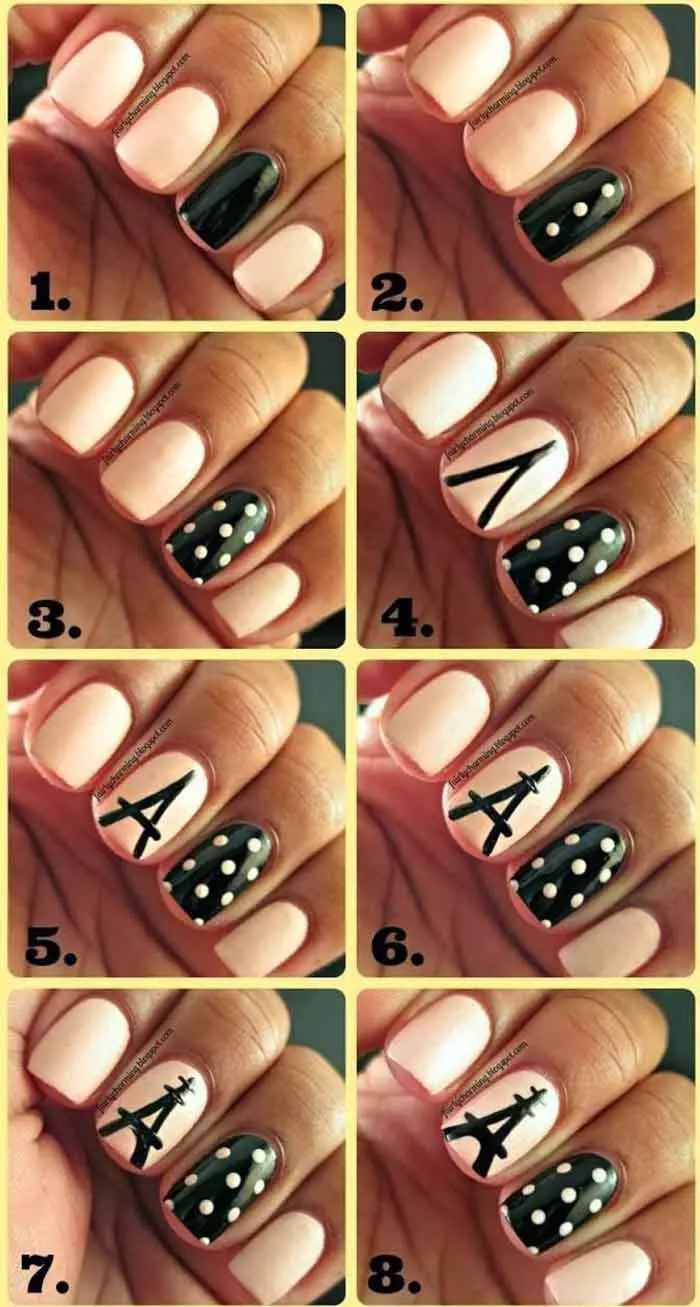
For this Parisian nail manicure, you will need two polishes, one black and the other a very pastel peach. Paint all the nails pastel peach, except the accent nail. That will need to be painted black. Create polka dots on the accent nail with the peach color. Then, with some black polish on a nail striper, create the Eiffel Tower, as shown in the image.
16. White And Green Geometric Nails
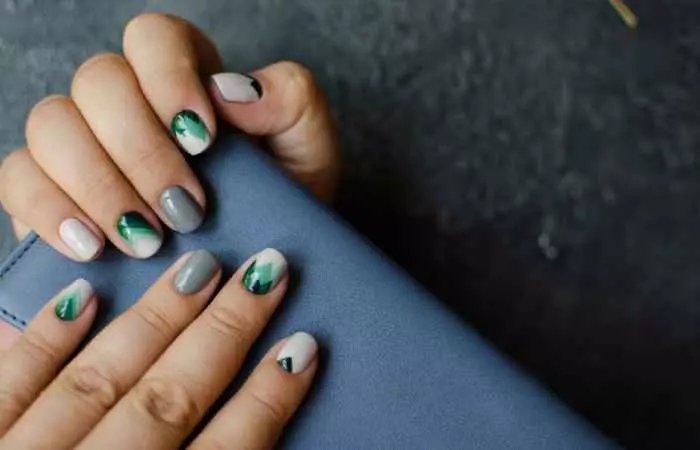
You can recreate these geometric patterns with the help of tape. Paint your nails in white for the base. Then, cut up strips of tape and stick them however you like so that they look like geometrical shapes. Paint over it with the green polish, remove the tape and finish off with a top coat. You may also use multiple shades to add a pop of color!
17. Pink Yin And Yang
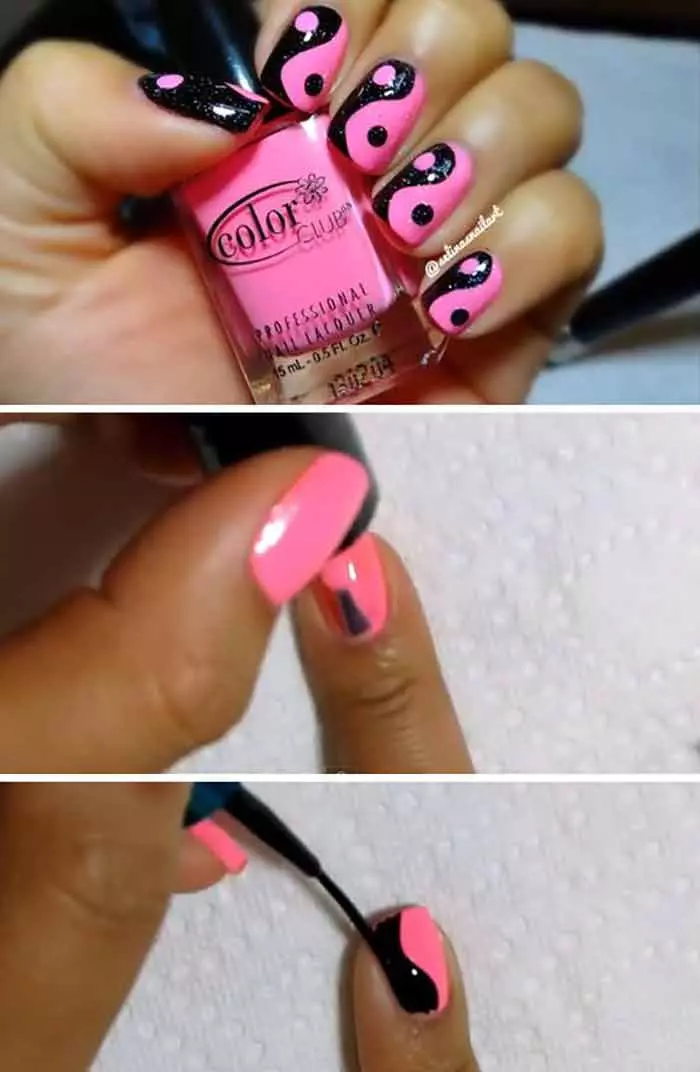
You’ve heard of the monochrome Yin and Yang, but have you seen one in pink and black? Well, if not, it’s time you try it out! Start off with a hot pink base. Use black polish to create a wave, as shown in the image. Dot the black side with pink and the pink side with black. To add a bit of glam, you can apply a glitter top coat.
18. Pink Lace Nail Art For Short Nails
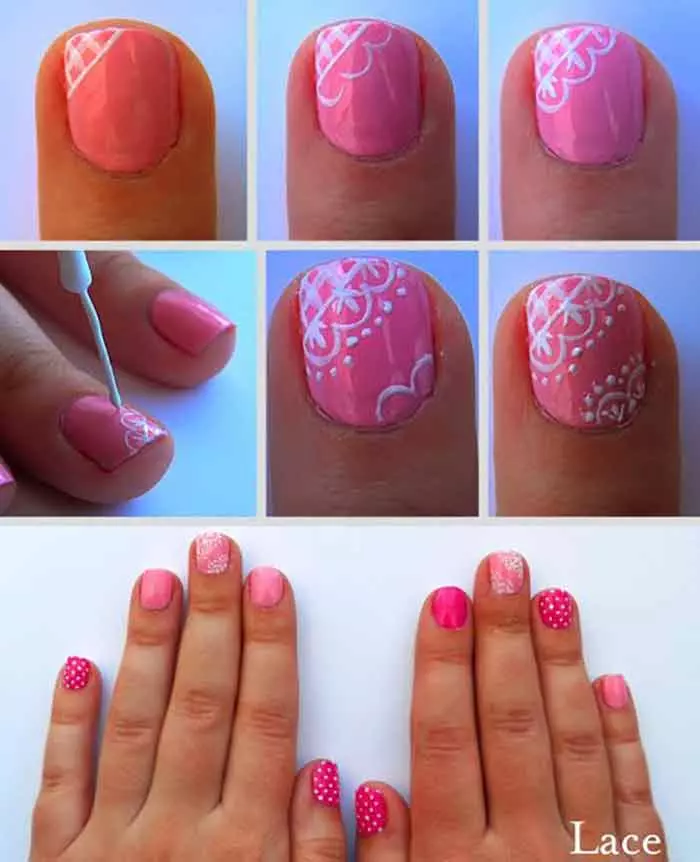
For this look, begin by painting your nails with two variations of pink. On the lighter pink shade, use a nail striper dipped in white polish to create a checkered pattern. Do this on the outer corner of the nail. Continue to follow the design as shown in the image, and you will have pretty lace nail art! You can paint the other pink nails with polka dots.
19. Chevron Nails
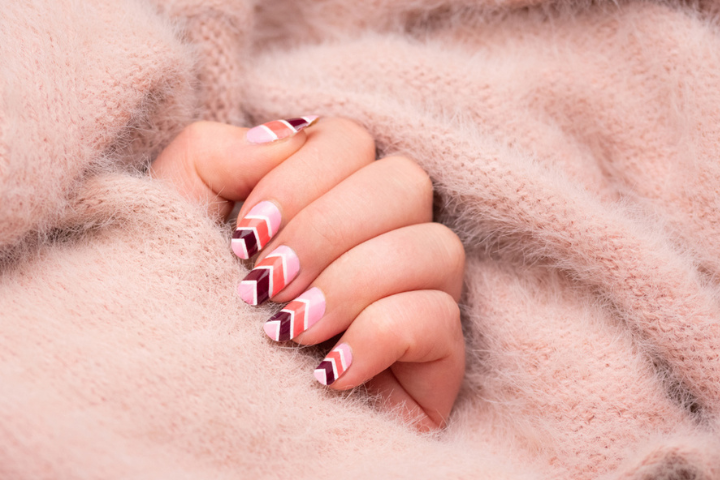
To recreate this autumn-themed chevron nail art, prepare the base with a pale pink nail polish. Once it is completely dry, place crisscrossed pieces of tape to create an exposed “V” shape and paint over it with orange nail polish. Let the paint dry and peel off. Do the same with as many chevron layers and colors as you want. Once your pattern is ready, seal the nails with a top coat. It’s as easy as that!
20. Rainbow Tips Nail Art
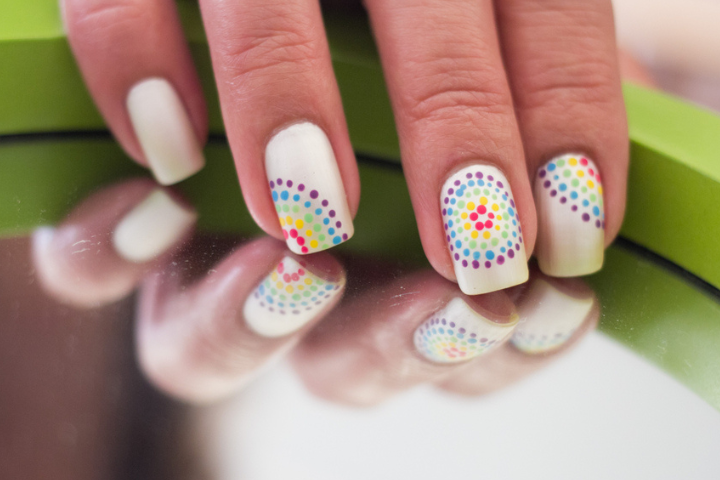
This one is super easy! It’ll take hardly any time. Paint your nails white for the base. Use a hairpin, a pointed Q-tip, or a toothpick to create small dotted concentric circles in different colors. You can use the same or different colors for the nails or even experiment with placement of the circular patterns.
21. Glitter Gradient Nails
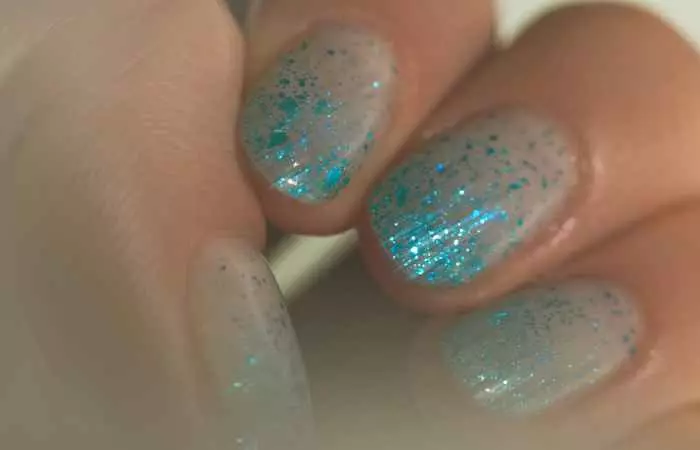
For this look, you will need to first paint your nails a light blue. Then, while the polish is still wet, dust some blue glitter in an ombre fashion. Make sure to seal it with a top coat. That’s all! Read more tutorials on Glitter Nail Art Designs.
22. Glitter French Tips For Short Nails
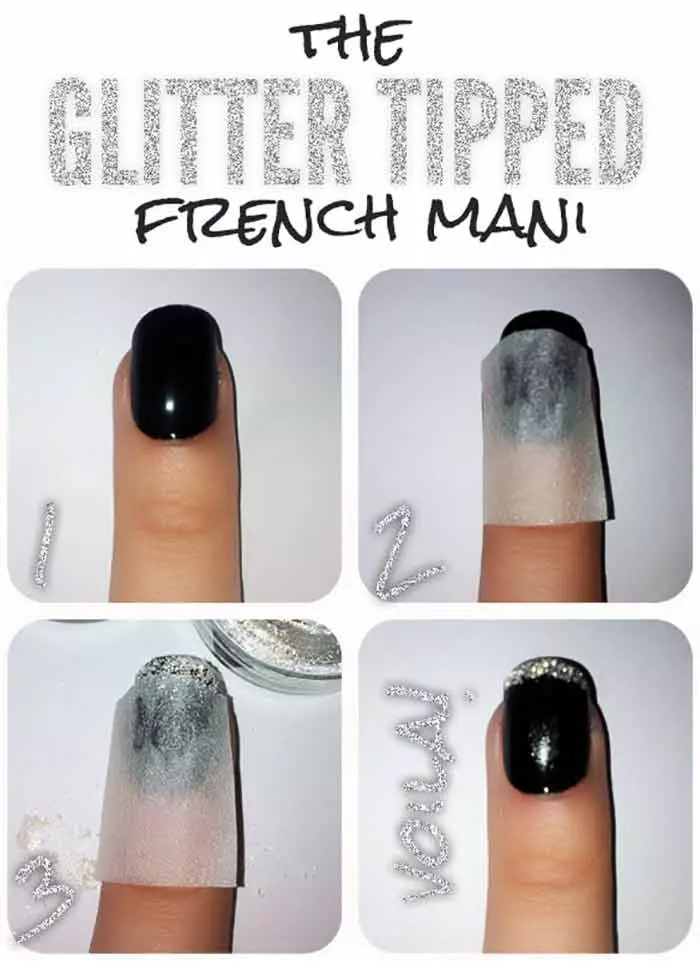
I’m pretty sure you’ve tried doing a French manicure with white tips but have you tried it with glitter tips? If not, what are you waiting for? To achieve this manicure, use black as a base. Once it dries, put some tape on the nails and apply a silver polish at the tip. Remove and seal with a top coat.
23. Gold And Pink Triangle Nail Design
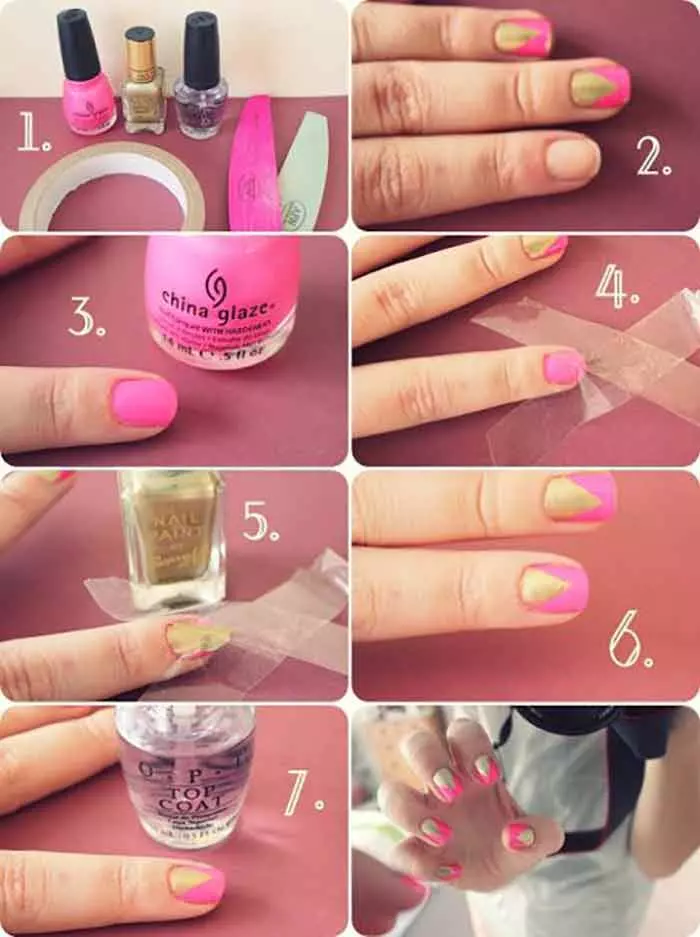
To create this gold and pink look, start off by painting your nails a hot pink. Create triangles with tape near the cuticles. Paint over it with gold. Carefully remove the tape, and you will see the desired effect. Make sure to seal it with a top coat!
24. Polka Dot Nails
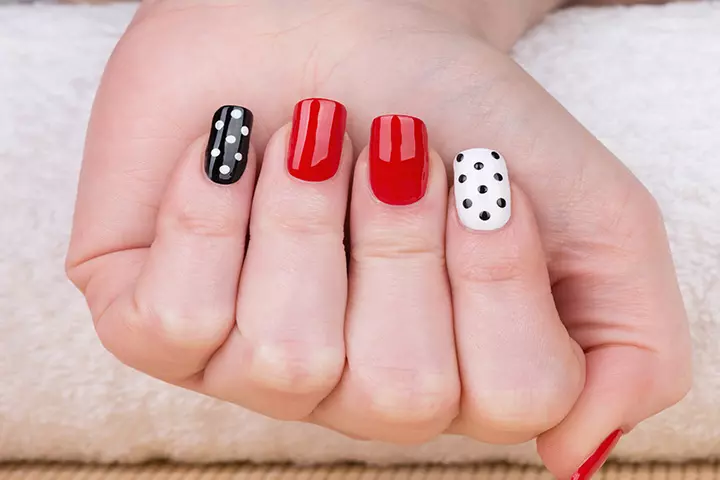
Polka dots are fun and, most importantly, easy to create! Paint your nails with a base color of your choice. Use a dotting tool, or a hair pin or toothpick to make your polka dots. Voila!
25. Color Block Nail Art Manicure
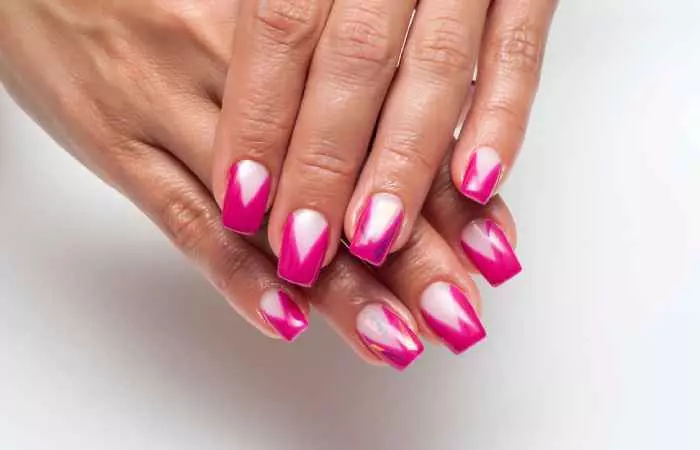
This is another one that requires just tape, in addition to the nail polish. Firstly, apply nude as the base color. Stick the tape diagonally, as shown in the image. Now, paint over it with hot pink. Remove the tape and apply the top coat of your choice.
26. Glitter Fade Nails
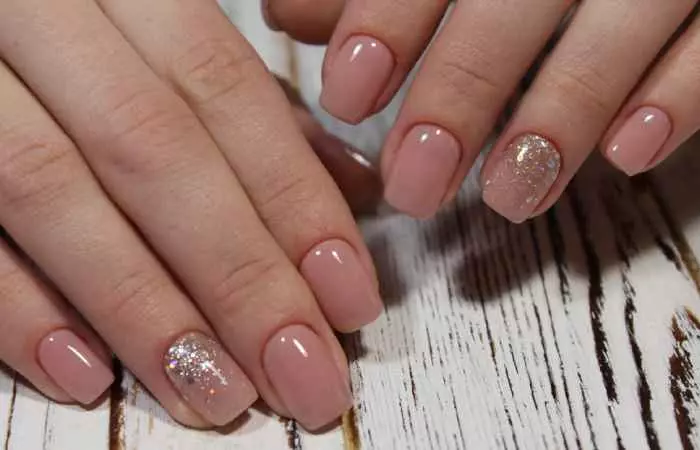
This is one of my favorites. Glitter fade nail art is simple, pretty, and elegant! You will need a peachy shade and a gold glitter polish for this manicure. Use the peach as the base. Then, apply the gold polish on the ends of the nails, as shown. With slightly less glitter on the brush, lightly swipe towards the center of the nail. You can use a nail striper for more precision. Make sure you apply a top coat to make the manicure last longer.
27. Fired Up Triangle Tip
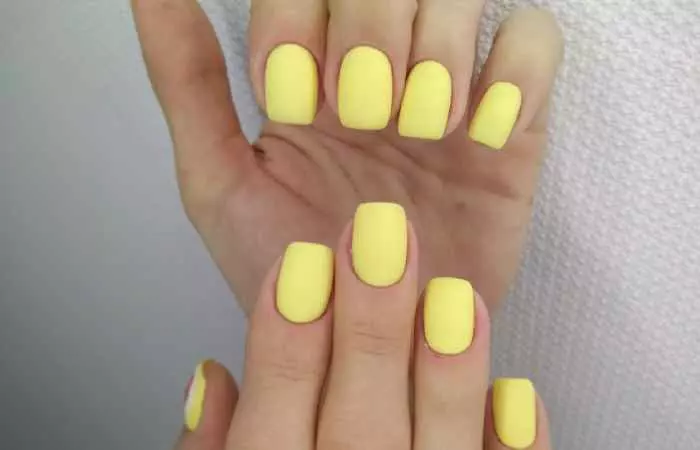
Fire at your fingertips! Now you can have flames on your fingers with this manicure. Start off this flame nail art with a yellow base. Then, paint on orange triangles on the yellow base. You can either do this with some tape or freehand if you think you can do it. Do the same with the red polish, but create the triangles smaller than the orange triangle.
28. Fizzy Fun
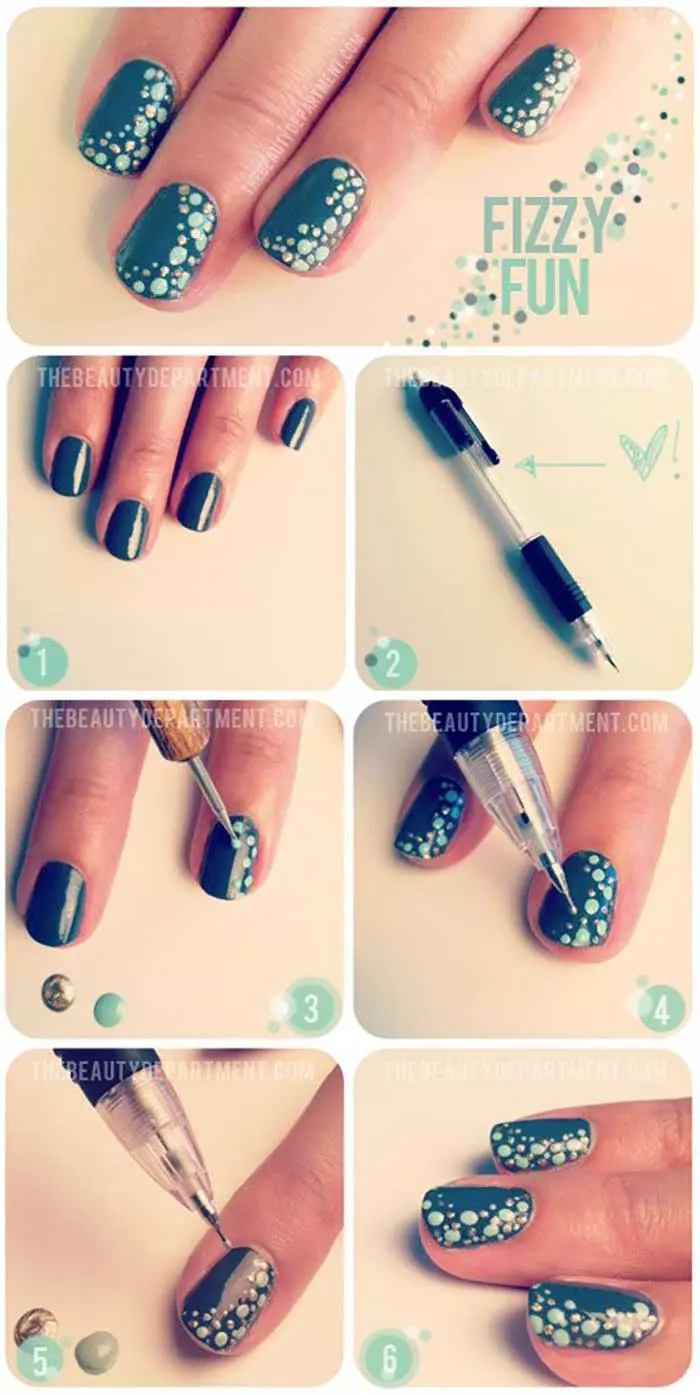
Doesn’t this remind you of pebbles in a pond? For this manicure, you need two different-sized dotting tools, but you can also work with pencils and pens. On a dark green-blue base, create multiple dots of turquoise and gold with the tools of your choice. That’s it!
29. Spring Manicure
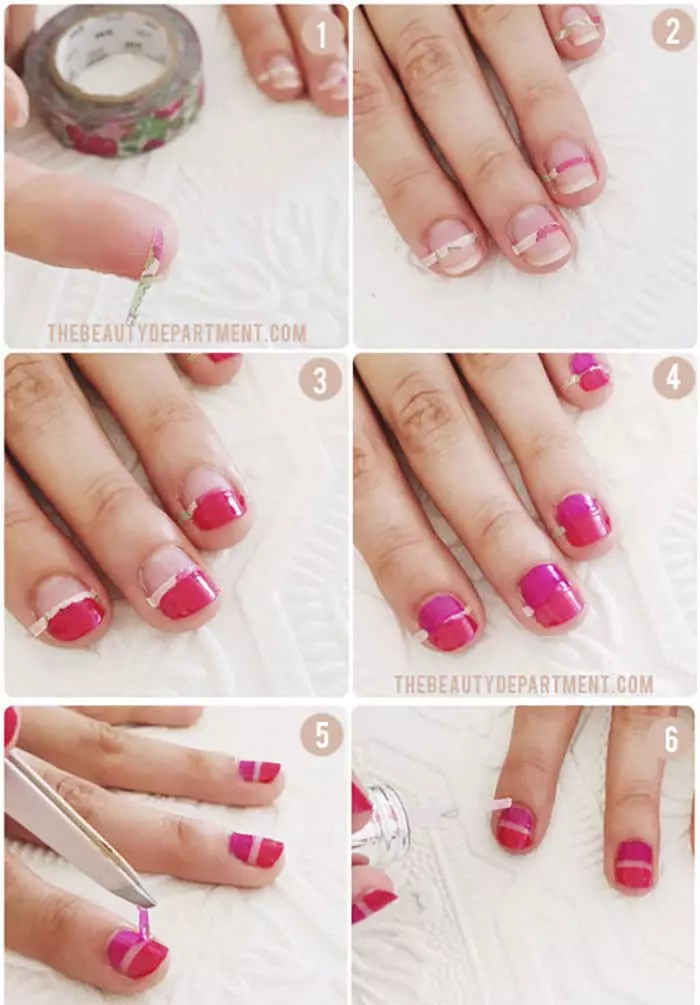
Two colors are better than one in some situations. And, this is definitely one such situation! Place a nail strip in the middle of the nail, as seen in the image. Then, using two shades of the similar prime color, paint on each side. Remove the sticker and seal with a top coat.
30. Geode Stone Nails
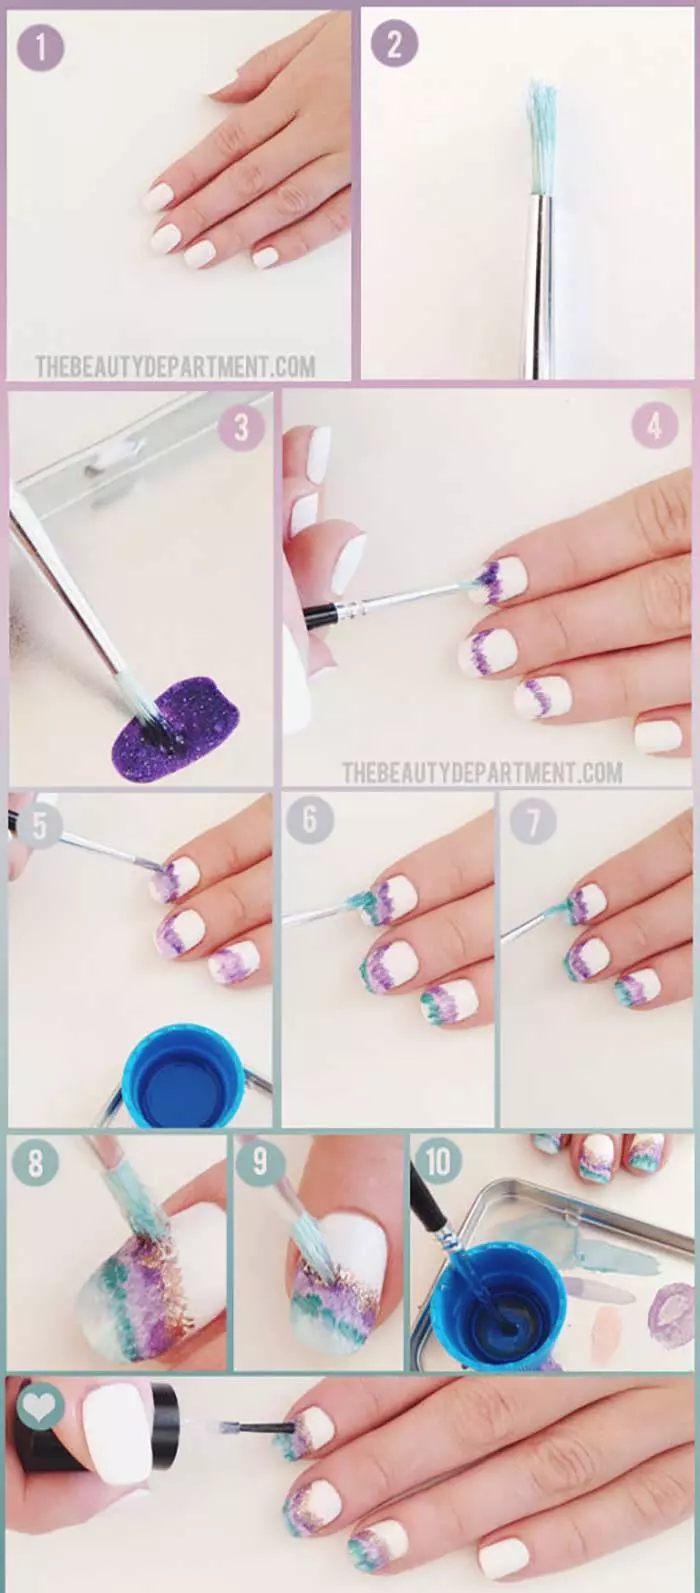
This one looks like you have tiny stones for nails! Using white as a base, dilute each shade in water while applying each shade in gradation to create the geode stone effect. That’s all!
31. Cross Stitch Manicure
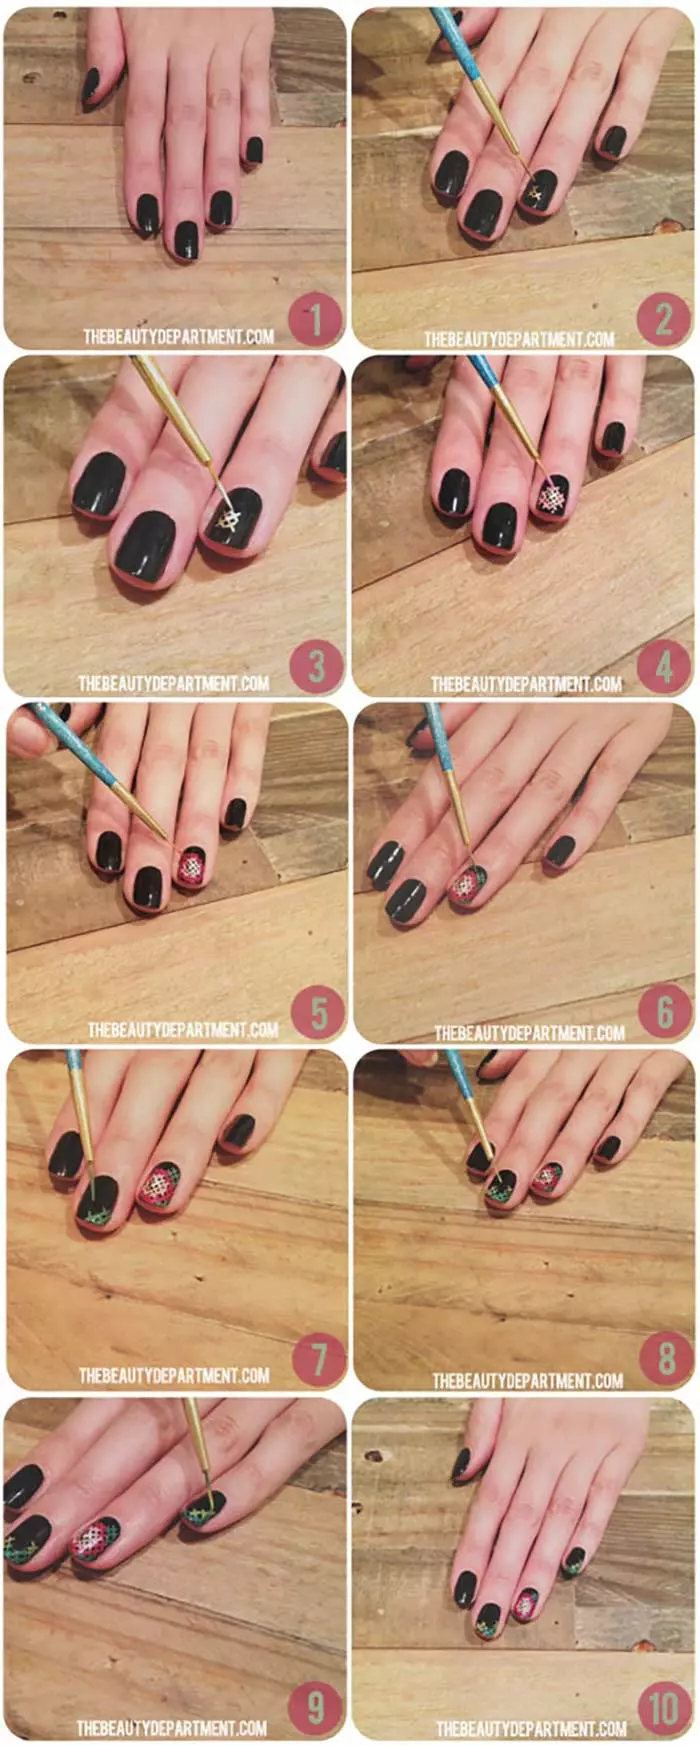
This innovative cross stitch pattern looks quite interesting on nails as a manicure. To create this manicure, create tiny crosses with different colors to make it look like a cross stitch. Keep doing this till you get your desired design.
32. Mix And Match Polka Dots
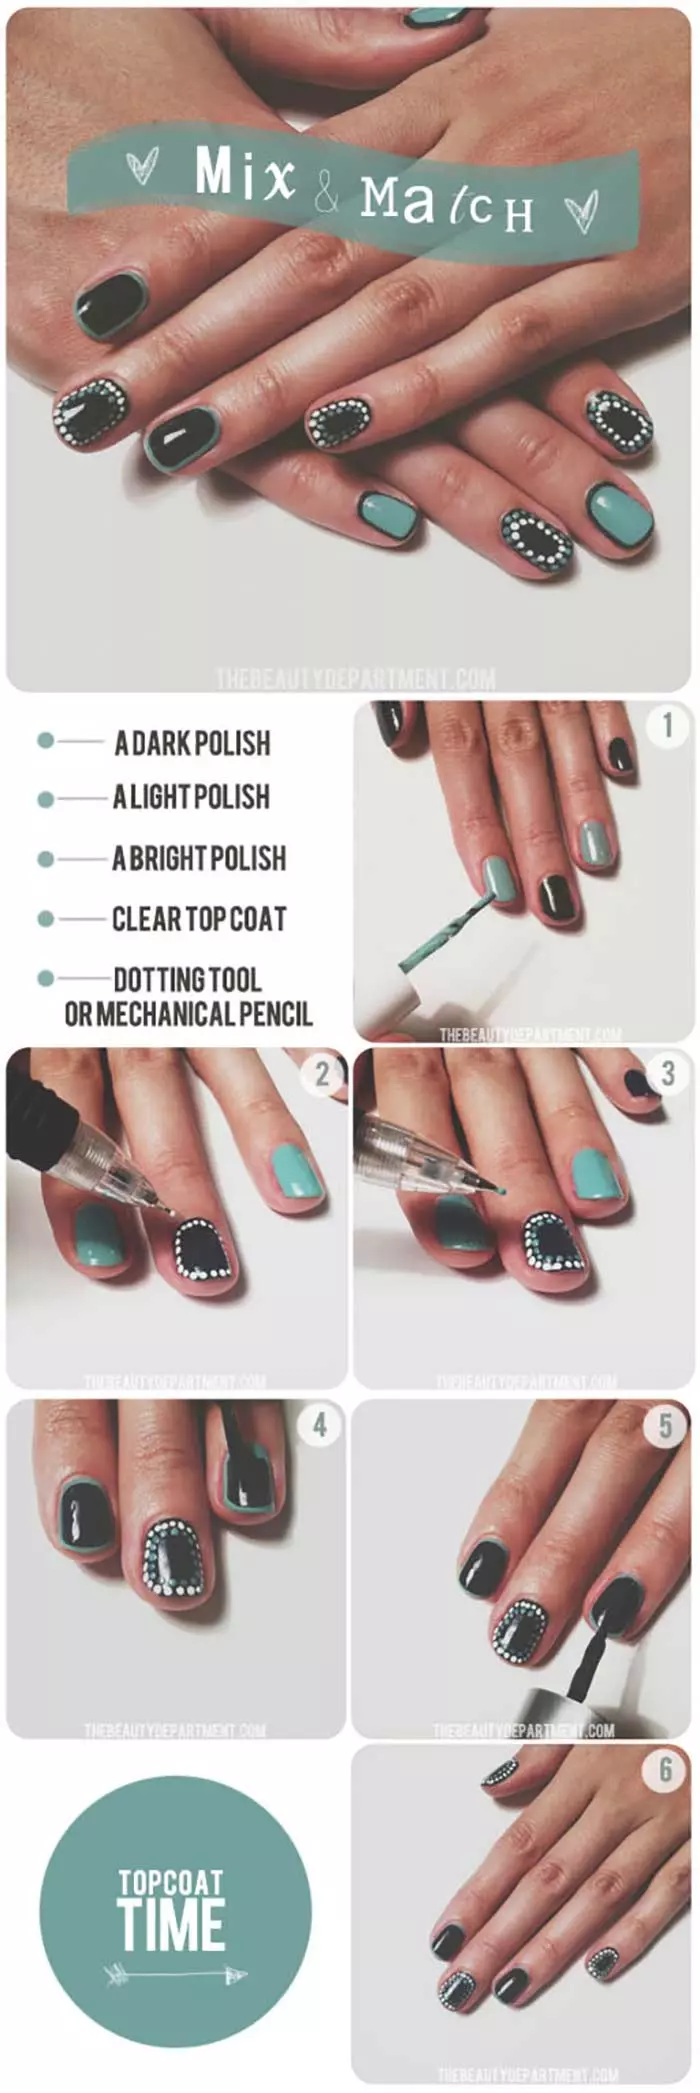
For this look, you will need three colors. Black, white, and any bright color. In the picture, they used a turquoise shade. Paint your nails in alternate with these two shades. On the black nails, create two layers of polka dots, as shown, with a pen or a dotting tool. On the turquoise nail, leave for a millimeter or two, and cover the entire nail with black. In the end, only a hint of the turquoise must peek out.
33. Faded Floral
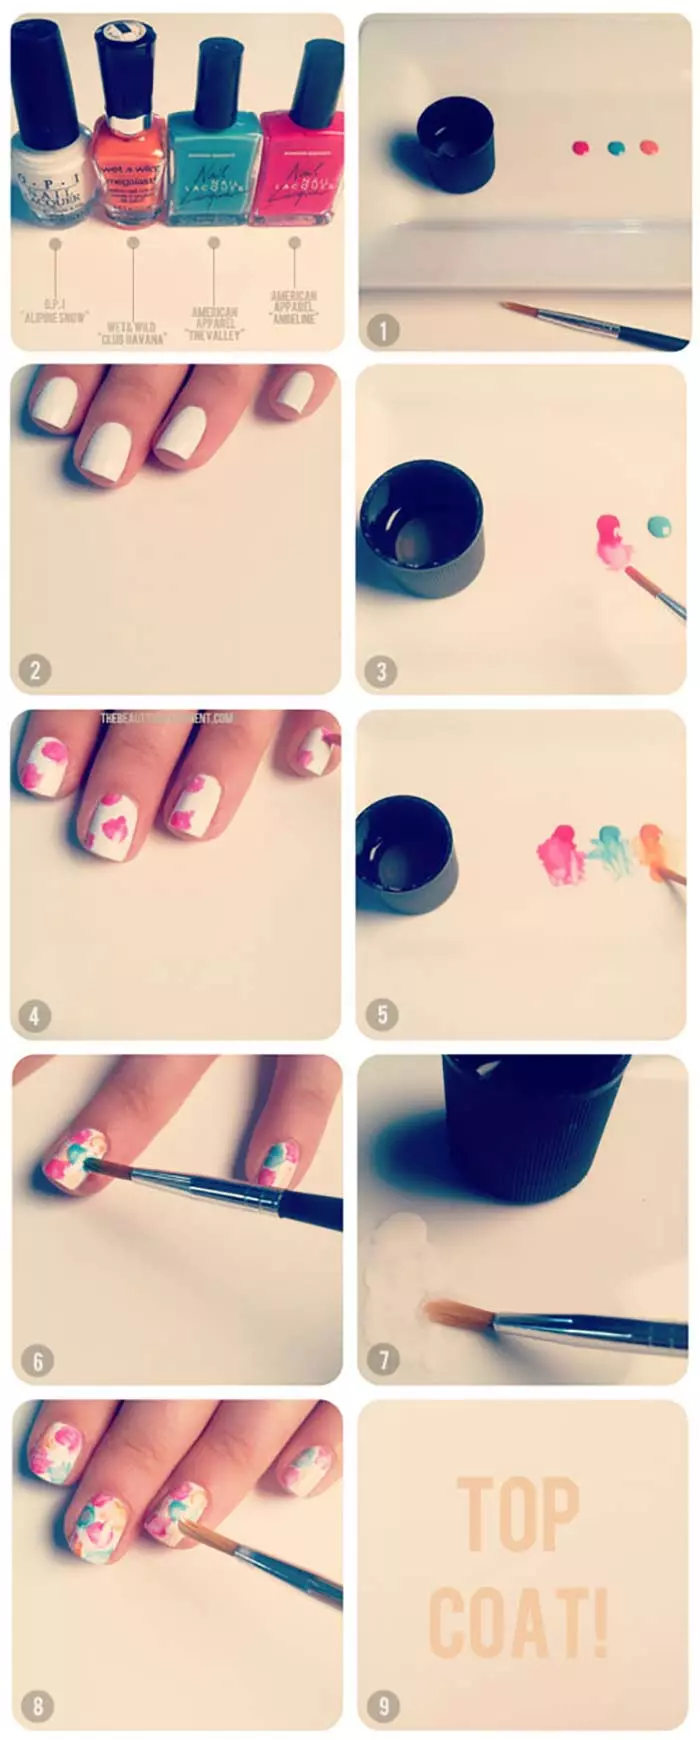
If you like art and craft, this might be perfect for you! Dilute two or three colors with water to create the water color look. Then, on a white base, make rough blobs with the different colors on a white base. Finish with a top coat. It’s as easy as that!
34. Gingham Accent Nail
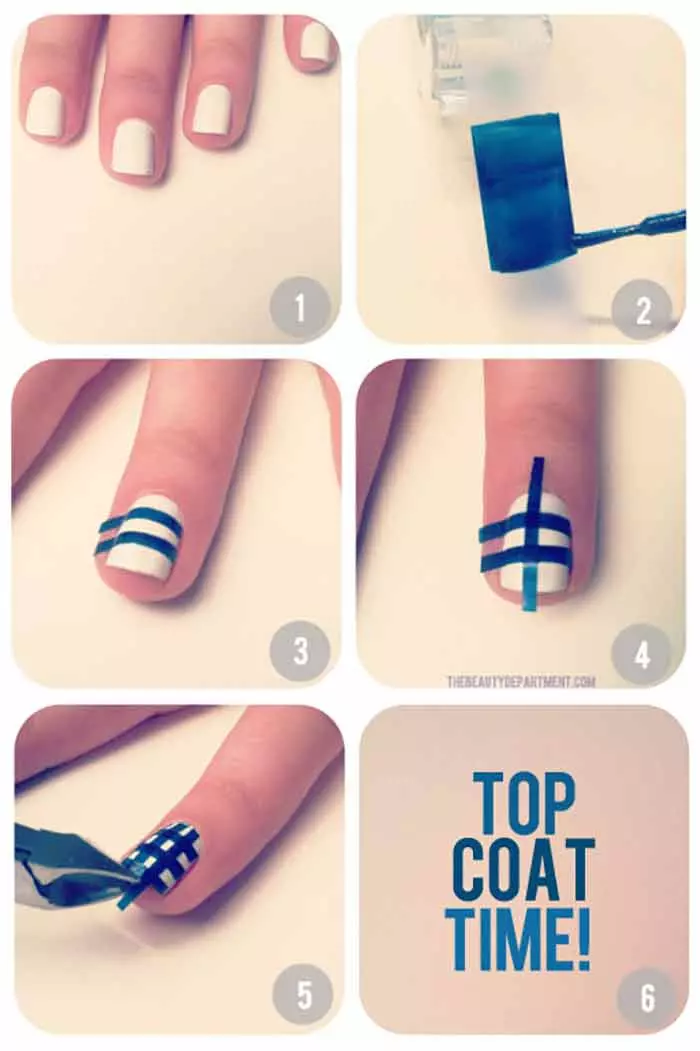
Make use of that tape! Paint a strip of tape blue using nail polish. Then, create thin strips and place them in a checkered fashion, as shown. Finish it off with a top coat.
35. Robin’s Egg
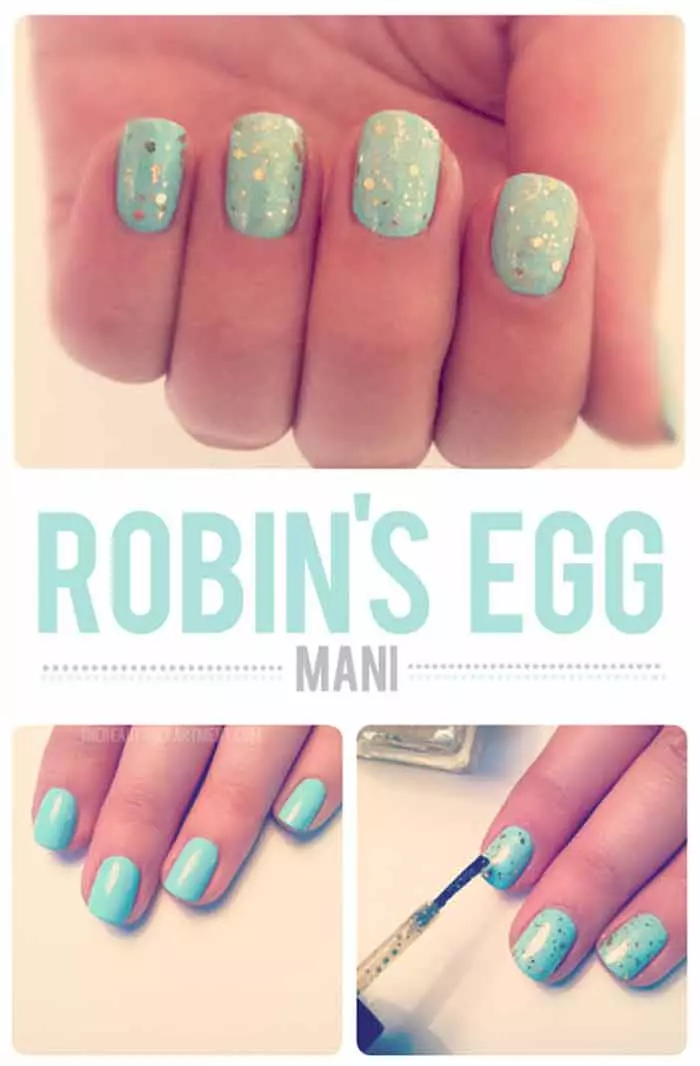
This is one of the most basic manicures, but it looks very elegant and pretty. Firstly, paint your nails with a turquoise shade. Paint over it with a top coat with big golden specks. Once that is done, it will look like a robin’s egg.
36. Blue Gradient

Paint your nails white. On a surface that won’t absorb liquid (you can use plastic or metal), add a drop or two of water. To it, add a drop of blue polish. Mix it with a brush and apply it over most of the nail, leaving a few centimeters near the cuticle. Now to a drop of water, add two drops of polish and apply in gradation. Do this again with three or four drops of polish. Finally, apply the polish directly to the tips, and you have yourself a blue gradient nail art!
37. Black Out
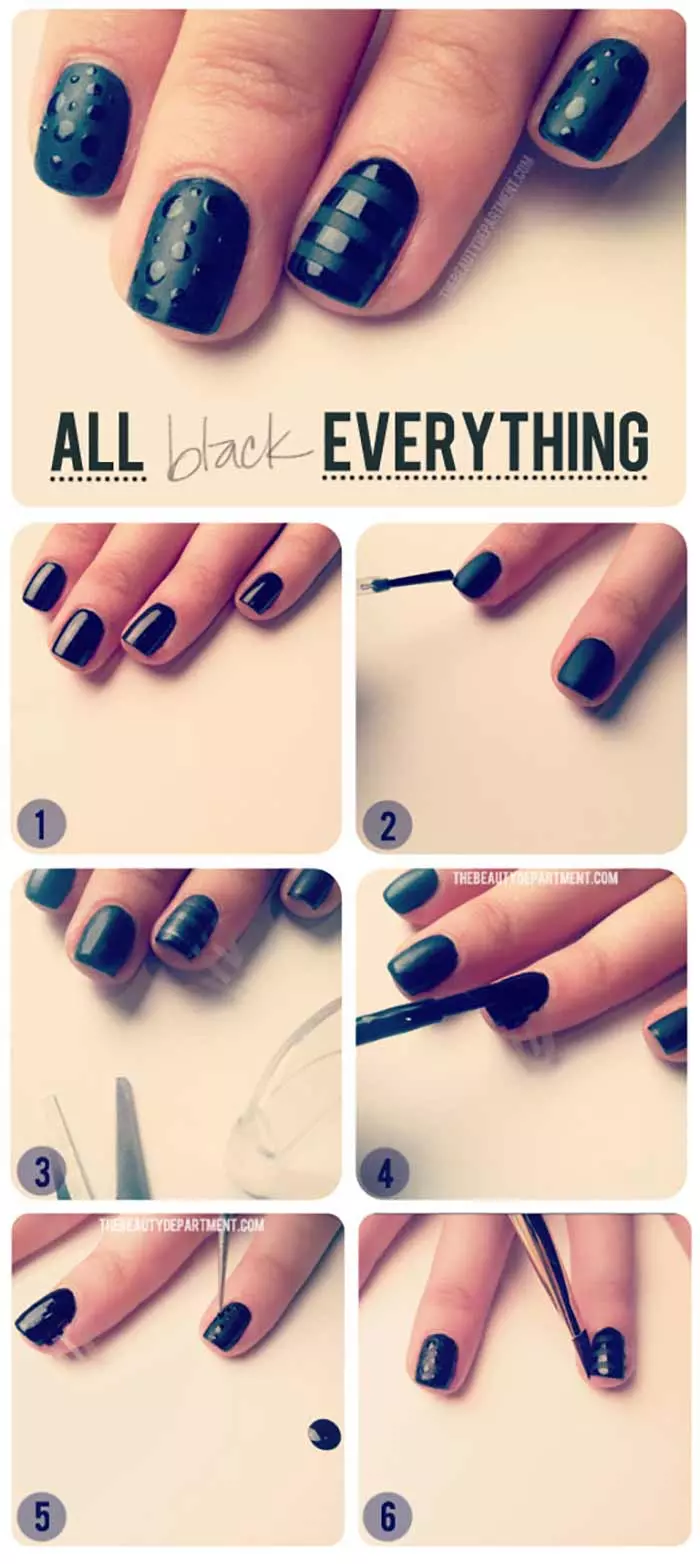
An absolute favorite of mine, this all-black nail art makes use of matte and gloss. Anything with all black is a total winner for me. There’s something about black that exudes power and confidence. So play around with glossy black polish and a matte top coat!
38. Dreamcatcher
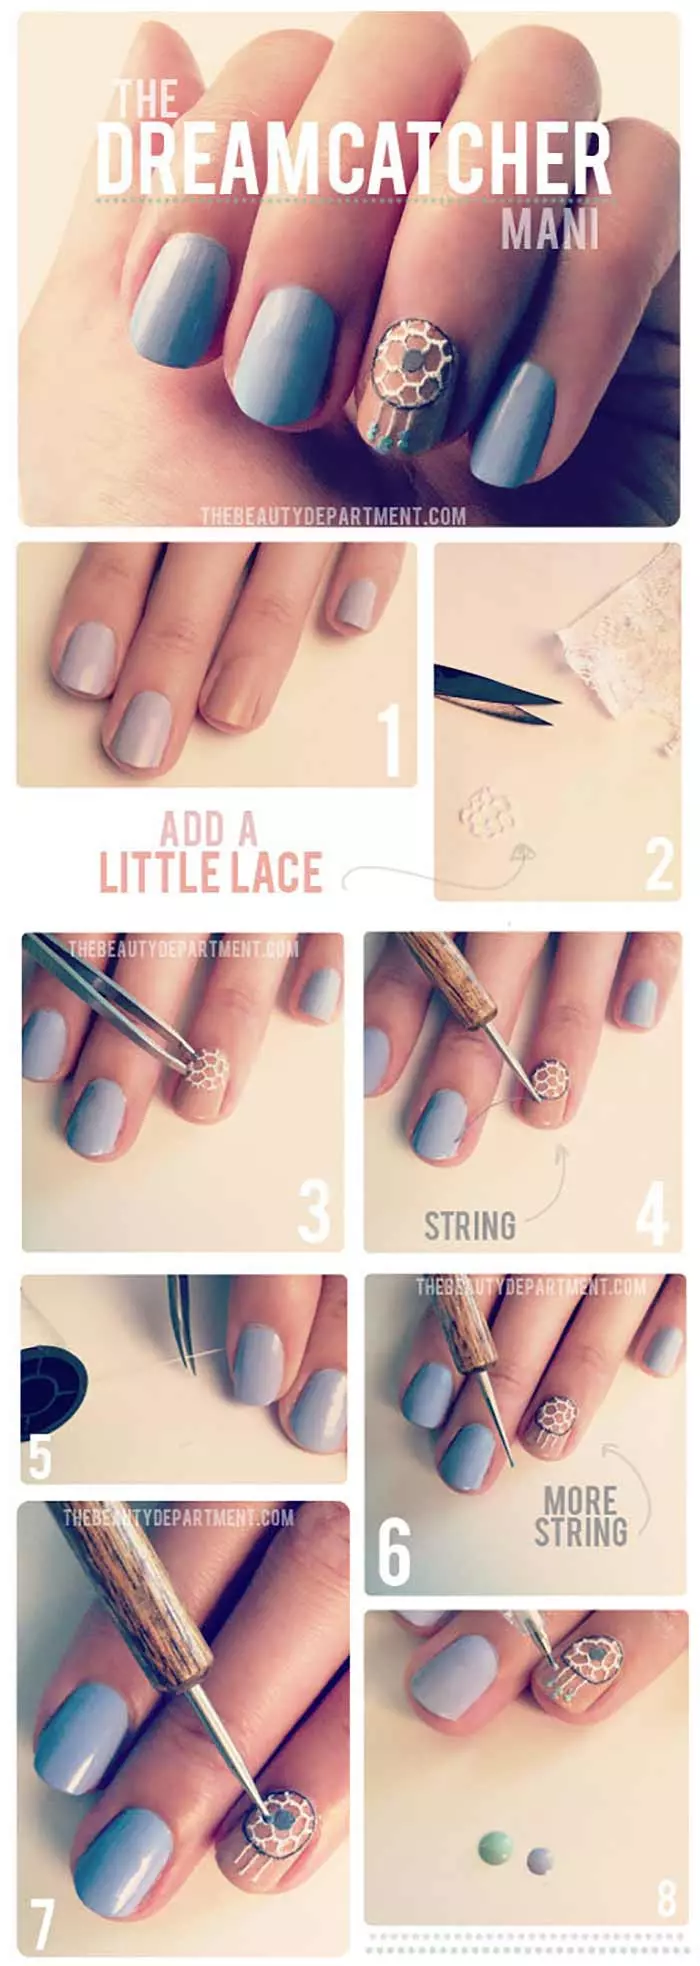
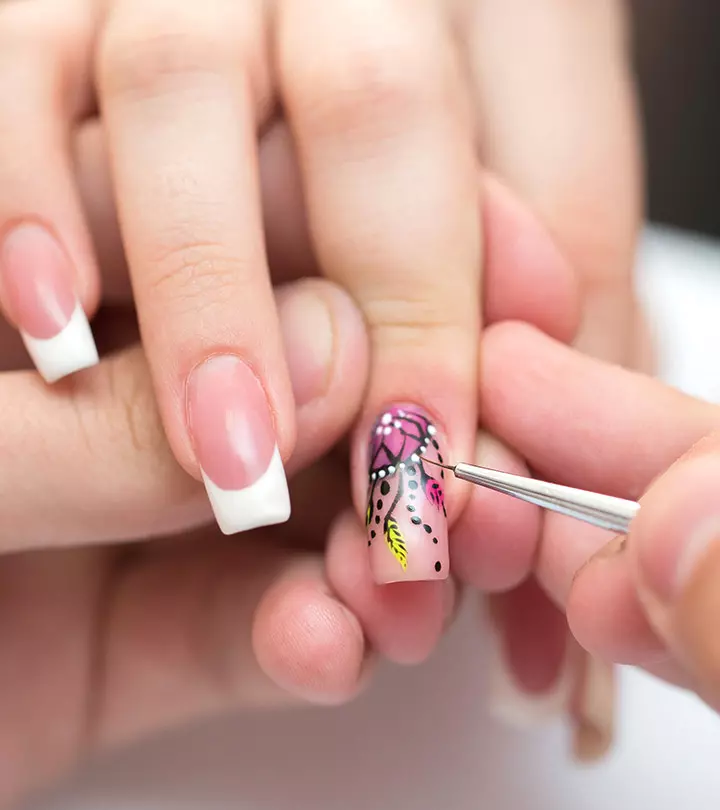
This one requires you to get a little crafty. Paint all your nails, except the accent nail, a periwinkle shade. Paint the accent nail a light brown. Stick embellishments like a little lace onto the accent nail as shown and go around it with some black string. Attach more string at the bottom and use pastel nail colors for decorating the dreamcatcher. Happy dreaming!
39. Once In A Blue Moon Short Nail Design For Beginners
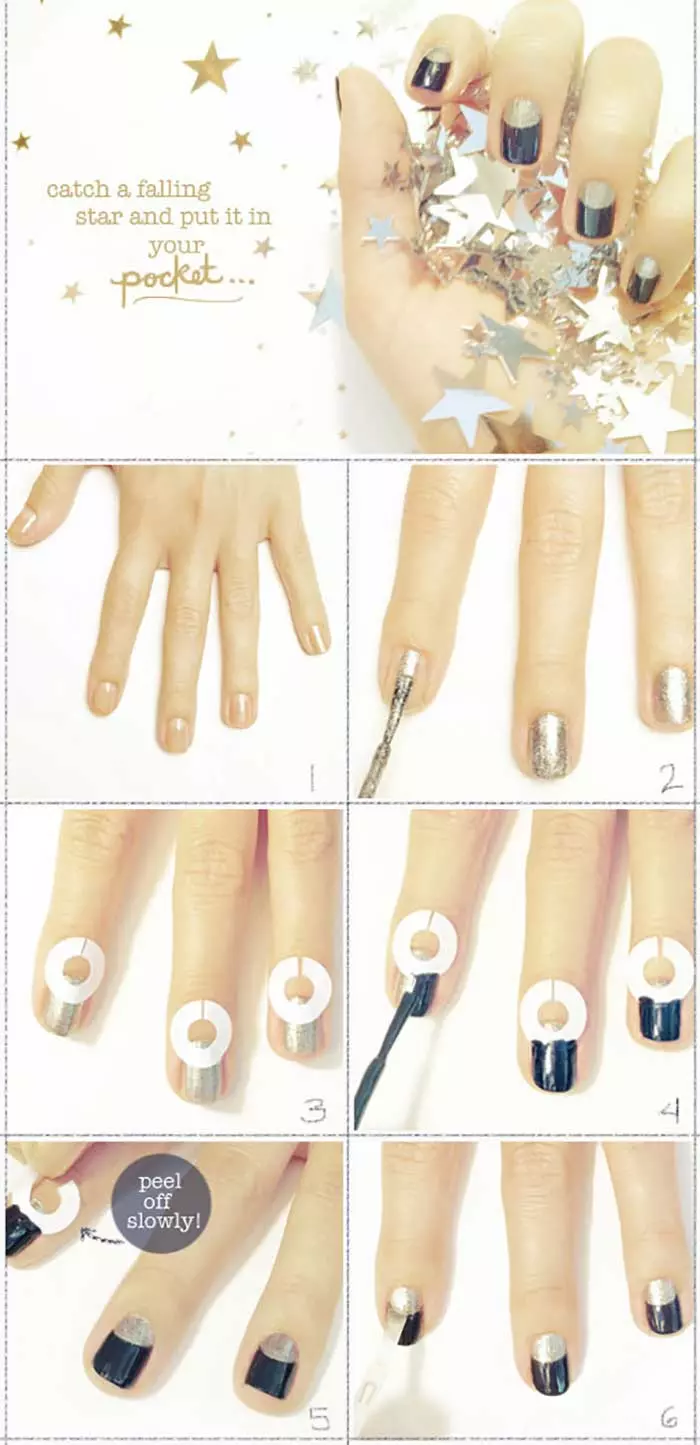
Using navy blue and silver polishes, create this blue moon manicure with the help of paper reinforcement stickers. This is easy and doesn’t require many tools. A good place to start for beginners who want to experiment with nail art.
40. All That Glitters Is Gold
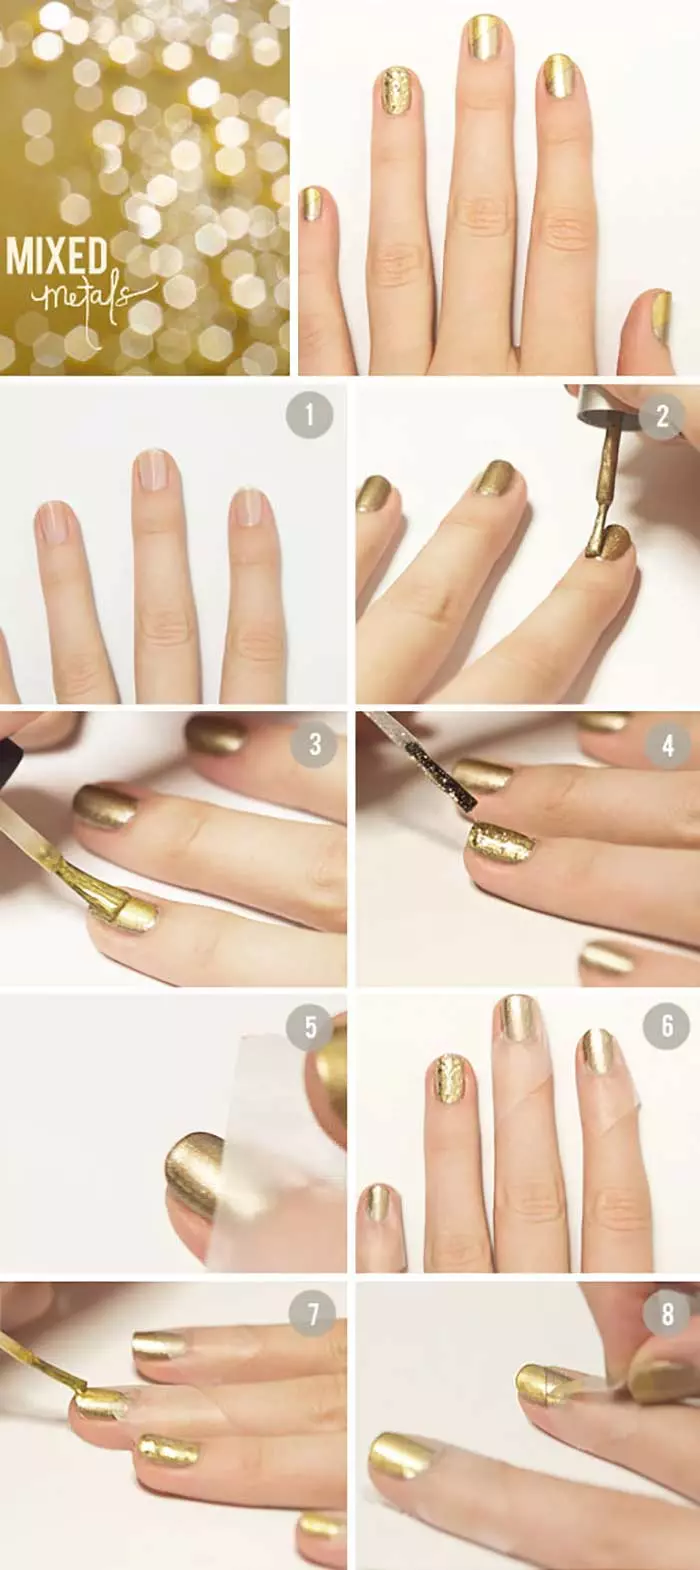
I know gold can be seen as tacky sometimes, but this tutorial will make your gold nails look anything but tacky! Start off by painting all your nails in a dull gold shade. Then, use a gold glitter polish to paint the accent nail. With a brighter gold, paint the rest of the nails diagonal with the help of tape. It is as simple as that!
Here are some more cute nail designs for short nails that will inspire you!
41. Aesthetically Mismatched
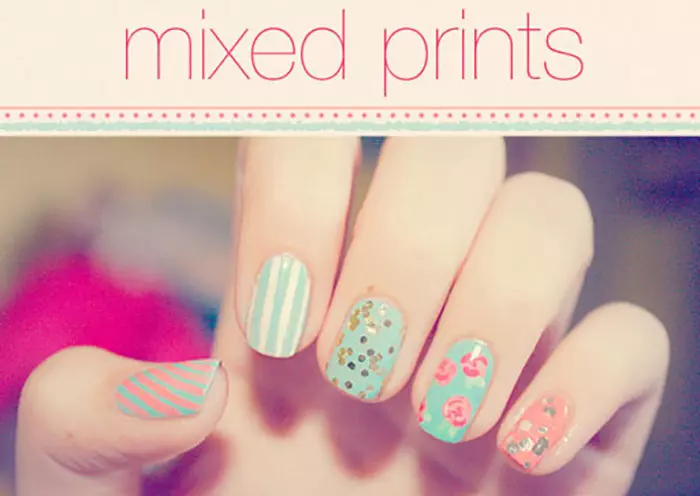
This cute and aesthetically pleasing manicure is created by using mostly pastel colors. It’s all about the pastels these days, and nail art isn’t an exception. This manicure requires nail stripers and dotting tools. With the help of these, you can create stripes and the floral pattern on the accent finger, as shown. Finish off the other two with a glitter top coat. It looks complicated, but it is, in fact, quite easy!
42. Pink Gl’Amore
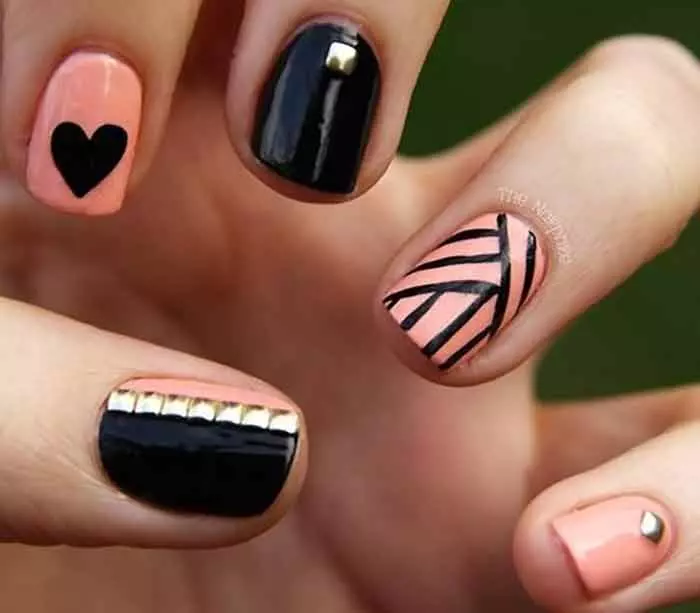
These glam pink and black nails may look difficult to achieve but are quite easy. The use of dual colors and metallic studs makes it look fancy. All you need to do is paint your nails peach and black, as shown in the image. Decorate them with the help of a nail striper and gold studded stickers.
43. Speckled Out
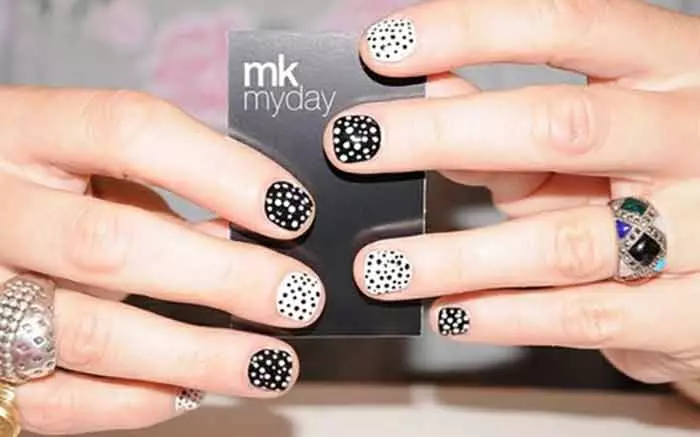
This black and white polka dots is so aesthetically pleasing and fun! This may not be the best option for a professional environment, but if your workplace is creative, go for it! Paint your nails with black and white (on alternative nails). Use the opposite colors to create small specks, and there you go!
 Quick Tip
44. Whoopsy Daisy
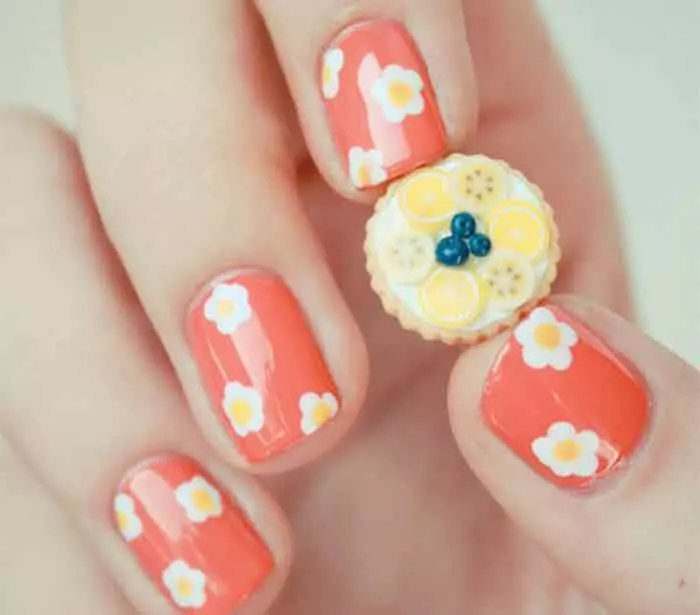
This nail art is perfect for spring and summer! You will need something to create small dots with. You can use a pen or a dotting tool to get this result. Create five dots so that they connect. Then, top it off with a yellow dot at the center.
45. Third Time’s A Charm
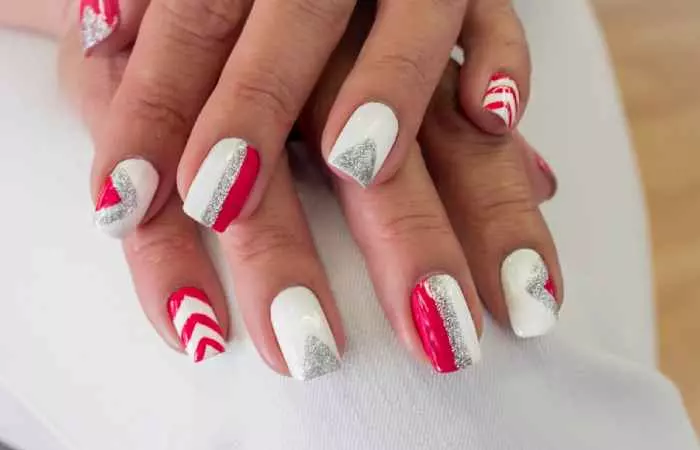
You’ve probably tried two nail colors, but have you tried three? Go ahead and give it a shot! All that you need to do for this look is create stripes with each color in a different order. It’s as simple as that! Try to pick colors from a painting color palette. They are the colors that complement each other well.
46. Blackheart
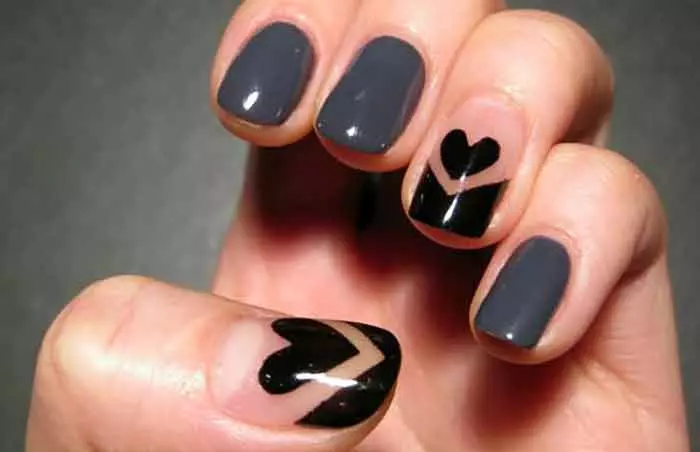
This is probably an eye catcher for someone who loves dark colors. I smile as I write this because I am a sucker for anything monochrome or dark. Paint a few nails gray, and then for the remaining nails, do a chevron tip and draw a heart. You can use a nail pen or a nail striper for this. You can change up the combination if you like. Going all gray and a heart accent nail would look just as pretty!
47. Japanese Cherry Blossoms
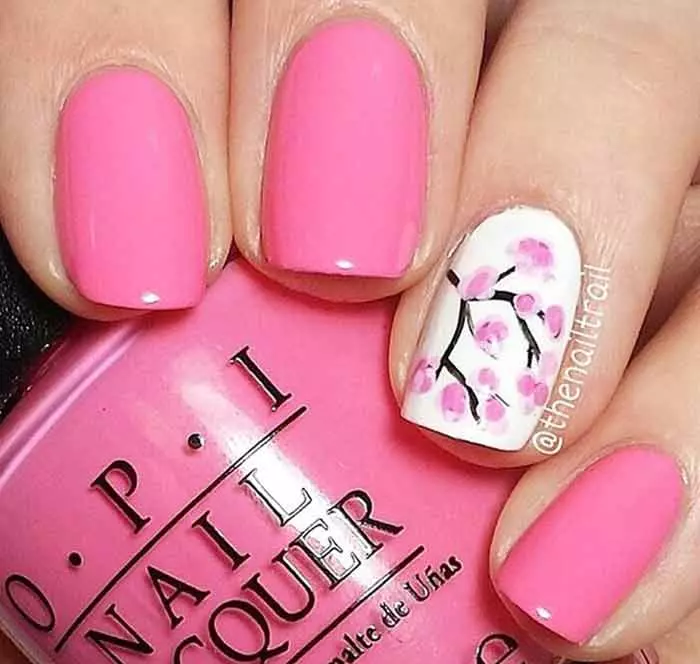
Japanese cherry blossoms are a beautiful sight. Everything about them says ‘beauty’ and ‘elegance.’ It just so happens that these beauties are not that hard to paint on your nails! Except for the accent nail, paint your nails a carnation pink. With white as a base for the accent nail, use a nail striper and dotting tool to create the look as shown in the image.
48. Ombre And Glitter
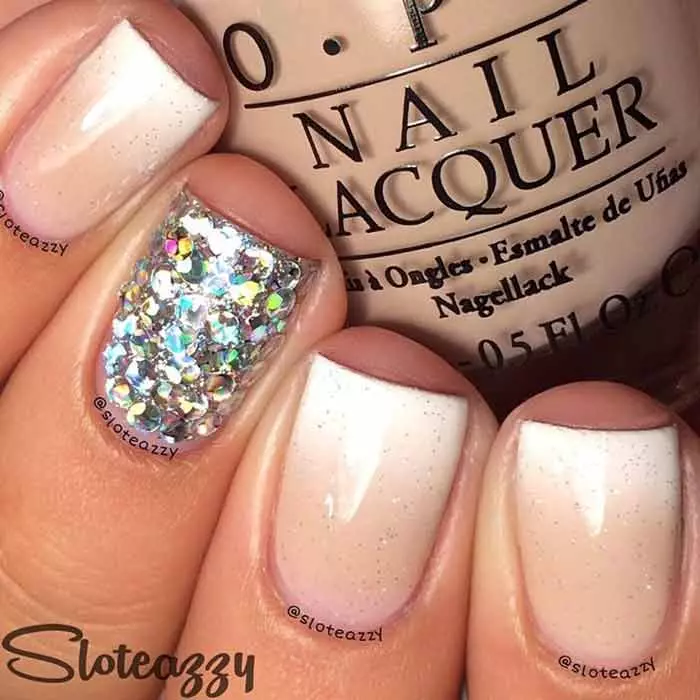
Why pick Ombre or Glitter when you can have the best of both worlds? That’s right, Ombre and Glitter in one manicure. Firstly create the ombre effect by dabbing the colors on the nail with a makeup sponge, except for the accent nail. Paint the accent nail in a thick silver glitter polish and seal the other nails with a slight glitter top.
49. Black And Red Gradient
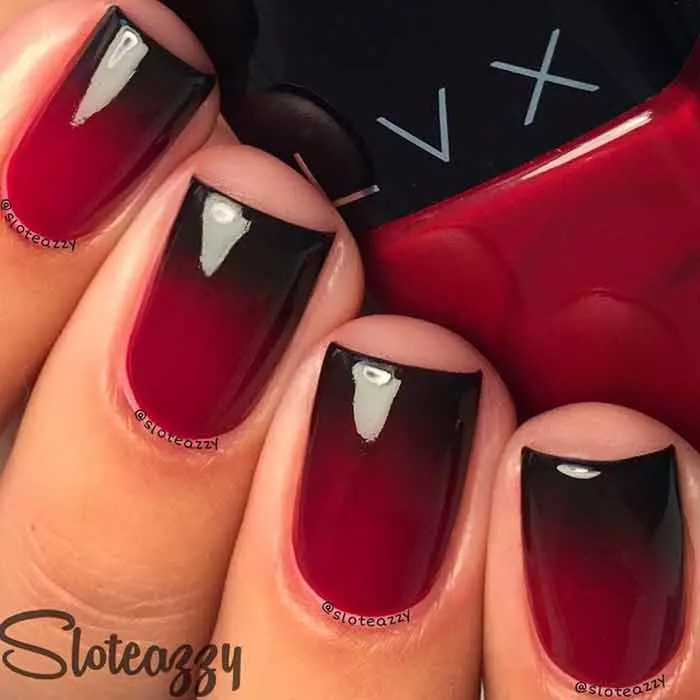
Dark and seductive, this manicure is perfect for Halloween (or every day, if that’s what you like!) Create an ombre effect with these two colors on your nails. To make it last longer, seal it off with a top coat.
50. Vintage Roses
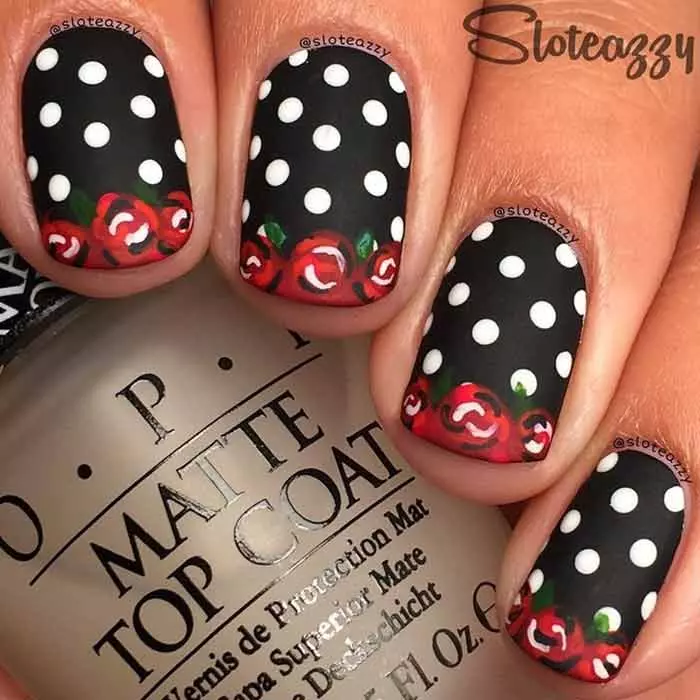
Let’s go back to the vintage days, shall we? Well, more like the vintage retro days, since we have polka dots in this manicure. This nail art looks so beautiful, and all the colors work together so well! Create monochrome polka dots over the entire nail and add a red rose tip. For an additional ‘oomph’ factor, finish with a matte top coat.
51. Watermelon Nail Art For Short Nails
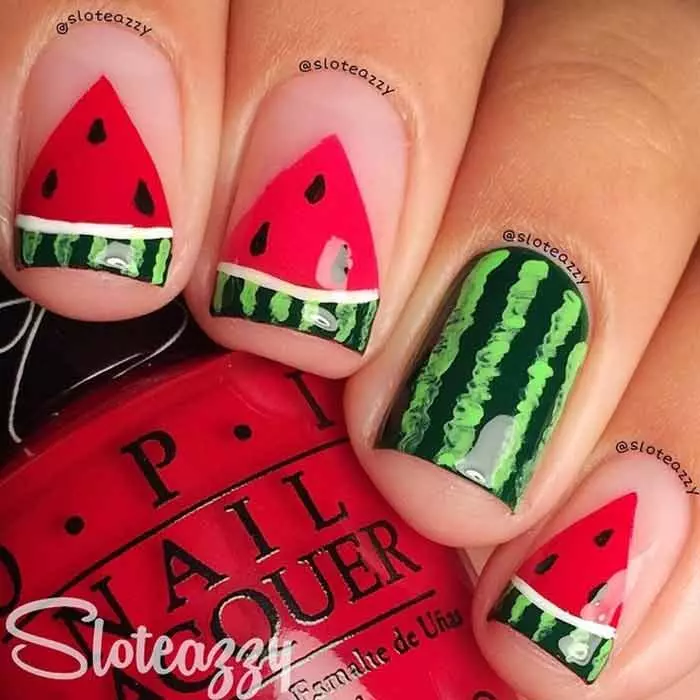
Yum! Doesn’t this manicure make you want to splash into a pool and grab some cold watermelon? You can also use tape or a nail striper for the triangle watermelon pieces. For the accent nail, use a deep green for the base and a lighter green to create the lines of the watermelon.
52. Frozen Treat
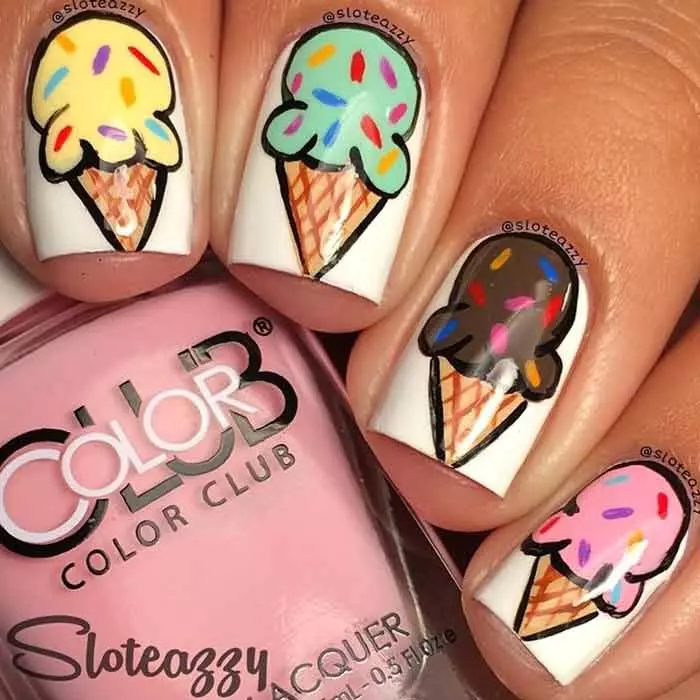
I know these look appetizing, but don’t bite your nails! You’ll need a nail striper and a steady hand to create this look. It requires some patience, but the final look is worth it! Choose colors that reflect ice cream flavors. Follow the design shown in the picture, and I am sure you will have yourself some delicious-looking nails!
53. Wild Flowers
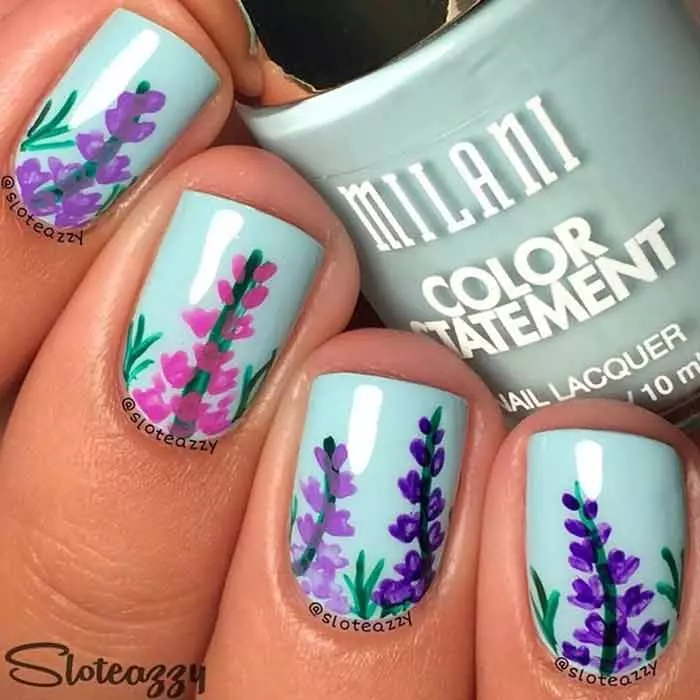
I love this manicure because it looks like you have spent some time on it, but is in fact quite easy! After painting your nails a pastel blue shade, create stems with a green polish, and tiny strokes along the green lines to create flowers in various shades of pink and purple.
54. Dark Fantasy
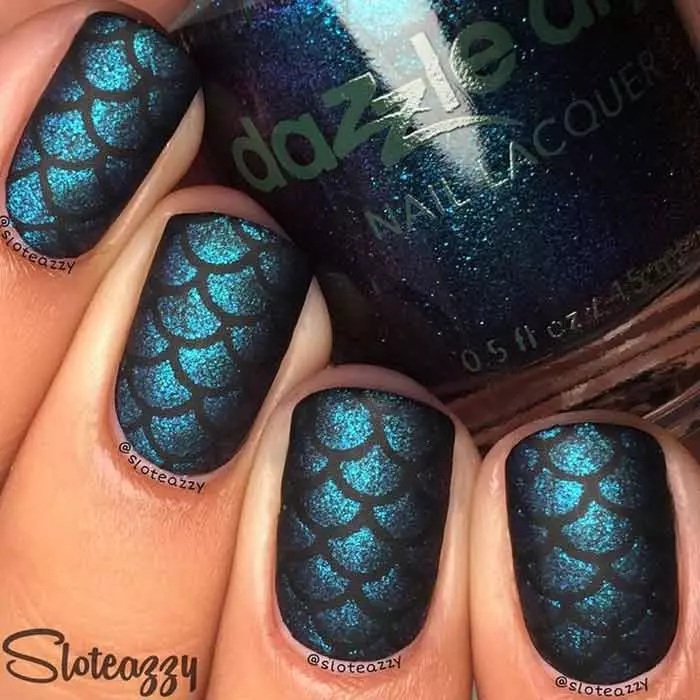
Mermaid or Dragon Scales? You decide. Let your imagination run wild. If, like me, you enjoy anything high fantasy, whether it be reading or watching, I know this will intrigue you. You will need to find a stencil that will help you achieve the design that you see in the image.
55. Classic French Manicure
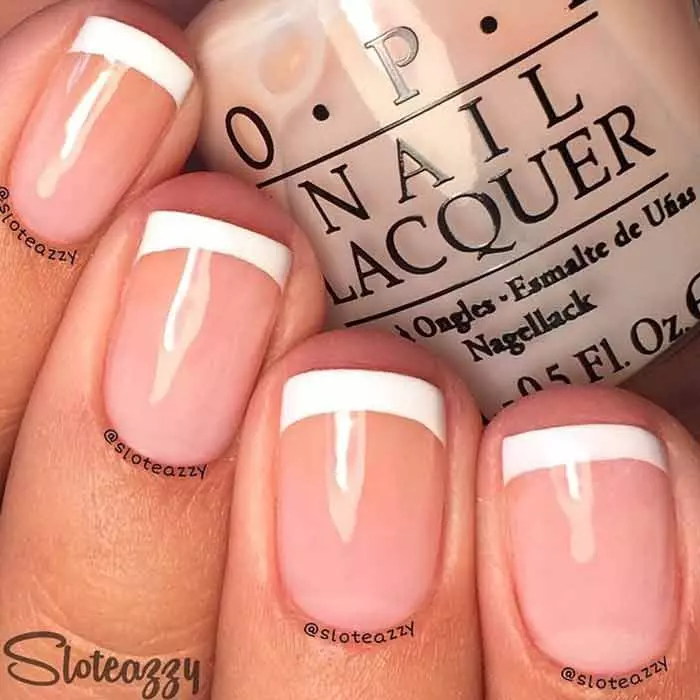
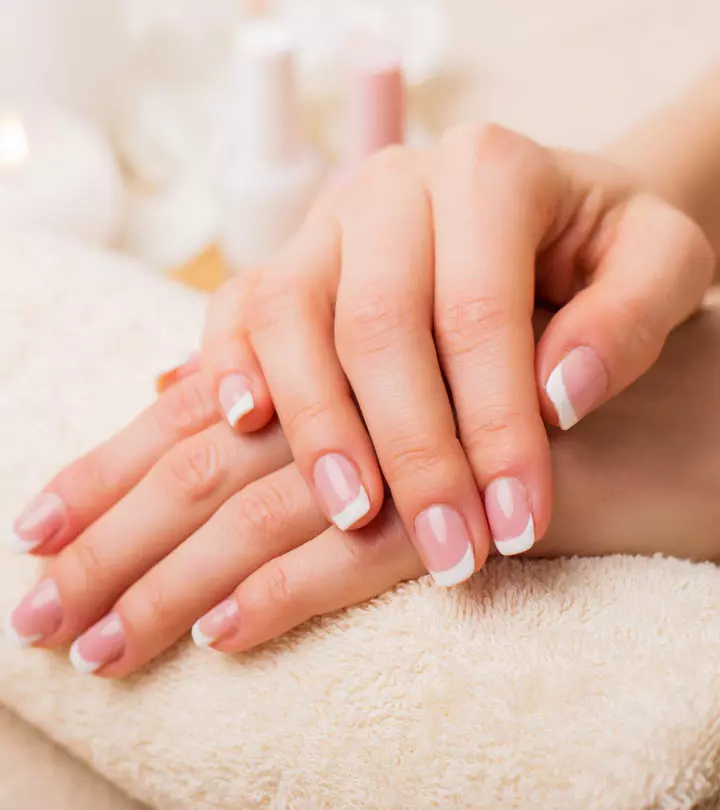
Need I say anything? This is the classic go-to when you can’t think of what to do. It’s suitable for all occasions and is neutral. Who says you can’t do a French manicure with short nails? Look how pretty it looks. If you needed any more convincing, there you go!
 Quick Tip
56. Retro White Pink And Gold
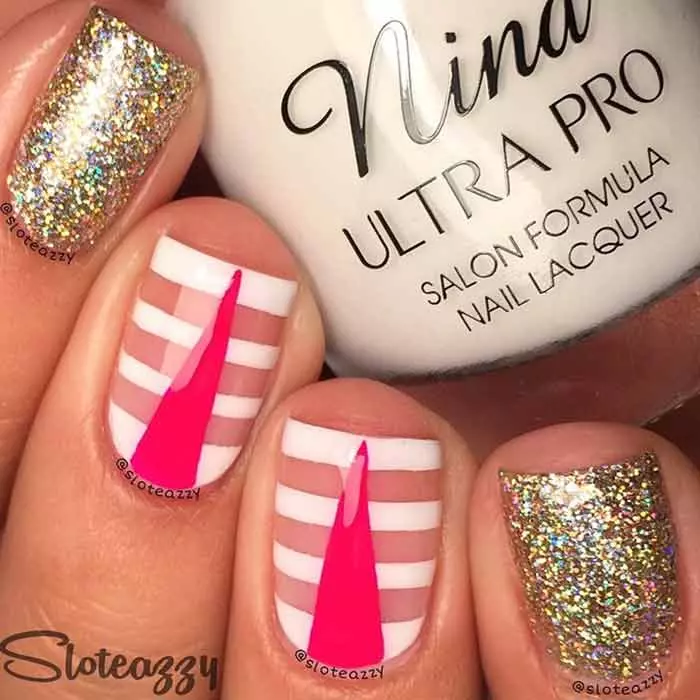
The color combination of this manicure is glamorous! To create this look, create stripes of white and a pink triangle over it on some of the nails. Paint the rest of the nails with a gold glitter polish, as shown. It is simple enough and doesn’t require any special tools.
57. French Toast
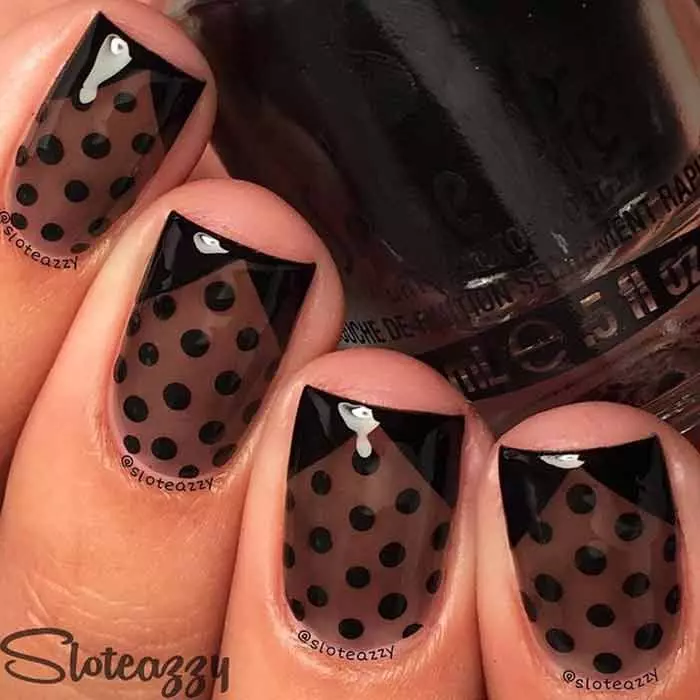
This one is a twist on a French manicure with polka dots. All you need is something to create the dots! On a coffin brown or brown base, create two small triangles with black polish, as seen in the image, and create the polka dots. It is as simple as that!
58. Graveyard
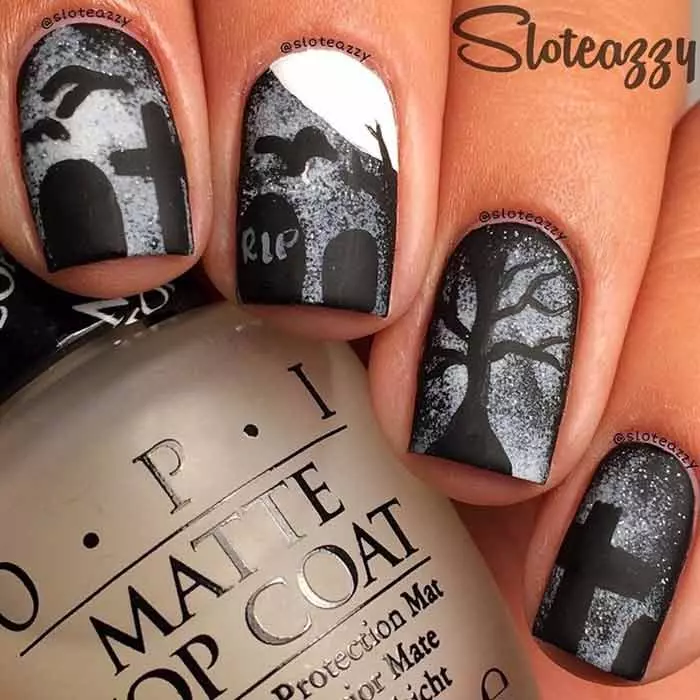
This one is a killer manicure for Halloween! You will need white and black polishes, both in matte. Start off with a black base, and dab on the white polish with a sponge to create a mist effect. Paint on the details as shown in the image with a nail striper, and you are ready to hit that Halloween party, or have your own personal party at home!
59. Crimson Love Nail Art For Short Nails
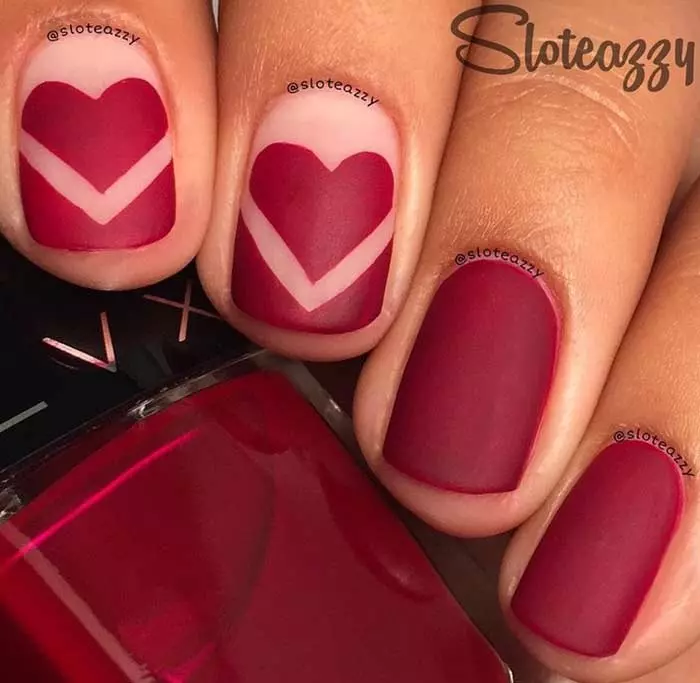
Jump into this deep red manicure by using a matte crimson shade on a nude base. Paint the ring, thumb, and pinky fingers entirely. Using a nail striper, draw two precise hearts like the ones in the image above. There you go!
60. World Beyond
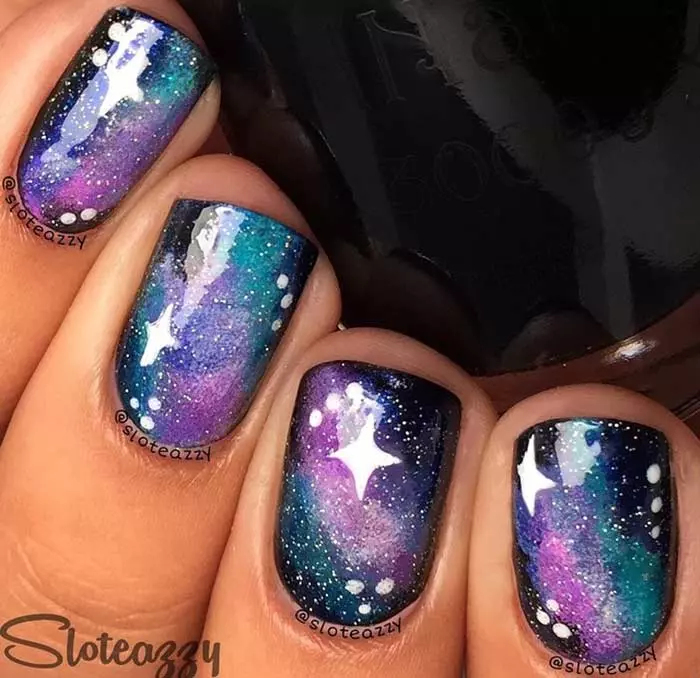
Isn’t this galaxy manicure just out of this world? It’s not as hard as it appears to be. You just need to dab on blue, pink, and purple polishes on a black base with a makeup sponge. Then, make the dots and tiny stars as shown in the image. Seal with a glitter top coat.
61. Peacock Nail Designs
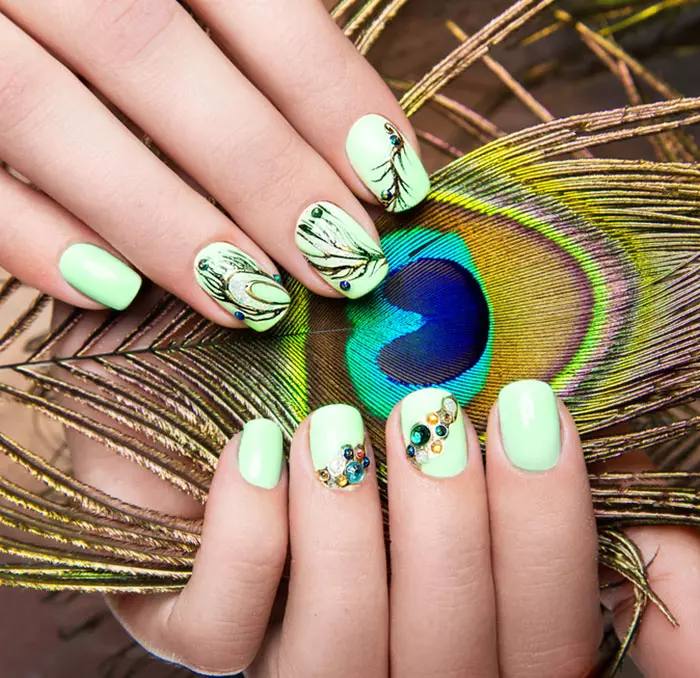
Peacock nail designs reflect the elegant appeal of peacock feathers with a captivating blend of vivid colors and detailed patterns. Rich hues of blues, greens, teals, and gold are frequently used in these patterns to mimic the breathtaking shine of the bird’s feathers. This nail art serves as a brilliant canvas for expressing creativity while reflecting the grace of one of the most beautiful birds in nature.
62. Miami Nail Designs
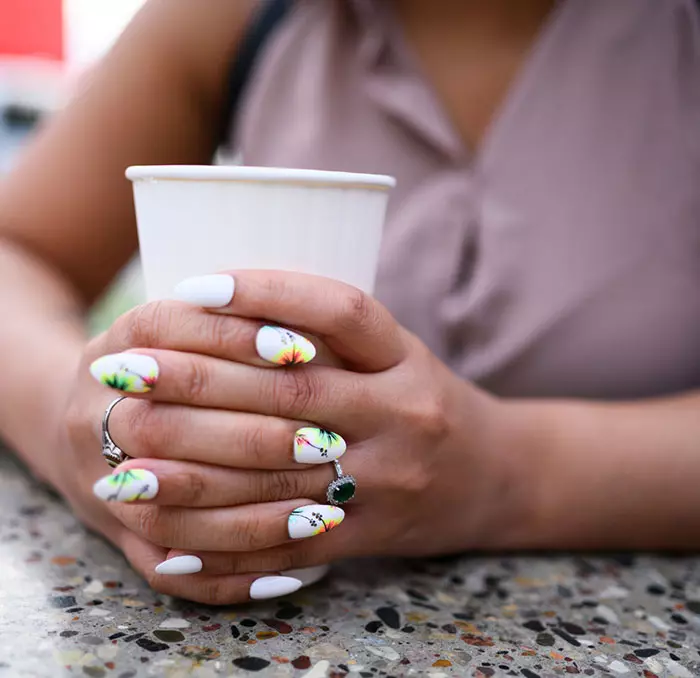
Miami nail designs radiate color and playfulness, mirroring the vibrant energy and rich cultural diversity of the city. These patterns often feature vivid and striking hues, reflecting Miami’s lively and tropical atmosphere, such as neon oranges, aqua blues, sunny yellows, and hot pinks.
The designs listed above are definitely worth a try. However, if you are a beginner and wondering how to do nail art, it’s better to start with simple designs and gradually move on to more fancy and intricate nail designs.
Key Takeaways
- Short nails are easier to maintain but they might prove challenging when getting edgy or trendy nail designs.
- Monochrome peek-a-boo and ombre nails are some understated yet elegant designs that go with a wide range of outfits.
- Those looking for timeless designs for short nails can opt for vintage roses, polka dot nails, or gingham accent nails.
Infographic: What You Need For Nail Art
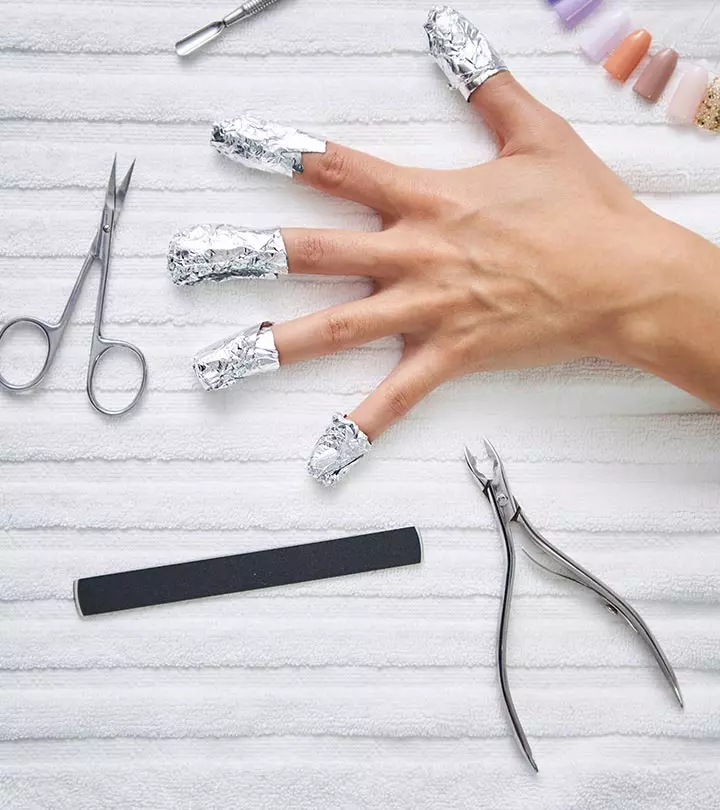
Every nail art fiend has to have their own custom nail art kit. If you’re a beginner, don’t worry! We are here to help! To get you started, we have added a list of nail art essentials that you should have. As you keep practicing, you will add more to your kit.
Check out the below infographic to learn what you need for nail art. Scroll down and get to beautifying those nails! Illustration: StyleCraze Design Team

If you have short nails and are apprehensive about trying nail art, don’t worry about it anymore. All the nail design ideas shared in the article are suitable for short nails and look super cute on them. The designs are simple, and you do not need to be a nail art pro to do them. You can choose from simple geometric patterns, gradient colors, color blocks, and polka dots. Some of the designs do not require anything other than two different nail polishes, while you may have to get nail art stencils for a few. So, go ahead, be creative, and try these super cute short nail designs. You may also try seasonal designs such as bright floral patterns for the Summer, earthy leaf motifs for Autumn, cute snowflakes for the Winter, and pastel nature-inspired designs for the Spring. Seasonal designs ensure your nail art remains stylish and trendy all year round.
Frequently Asked Questions
Are short nails trendy?
Yes. Short nails require low maintenance. They also make your hand accessories stand out better.
Why are short nails better?
Shorter nails allow more even application and do not harbor more bacteria that otherwise may cause infections.
What color makes short nails look longer?
Light and nude shades make short nails look longer.
Illustration: Most Trending Nail Art Designs For Short Nails

Image: Dall·E/StyleCraze Design Team
Unleash your creativity with these simple nail art designs perfect for short nails! Watch this fun tutorial and learn how to create stunning nail art from the comfort of your home.
Personal Experience: Source
StyleCraze's articles are interwoven with authentic personal narratives that provide depth and resonance to our content. Below are the sources of the personal accounts referenced in this article.
i. Nail Art: Paint Splatter!https://themaniacnails.wordpress.com/2011/07/29/nail-art-paint-splatter/
Read full bio of Anuja Sachdeva
Read full bio of Shalini Roy
Read full bio of Madhumati Chowdhury
Read full bio of Joyce Joyson






Community Experiences
Join the conversation and become a part of our empowering community! Share your stories, experiences, and insights to connect with other beauty, lifestyle, and health enthusiasts.