13 Stylish Updos For Long Hair With Step-By-Step Tutorials
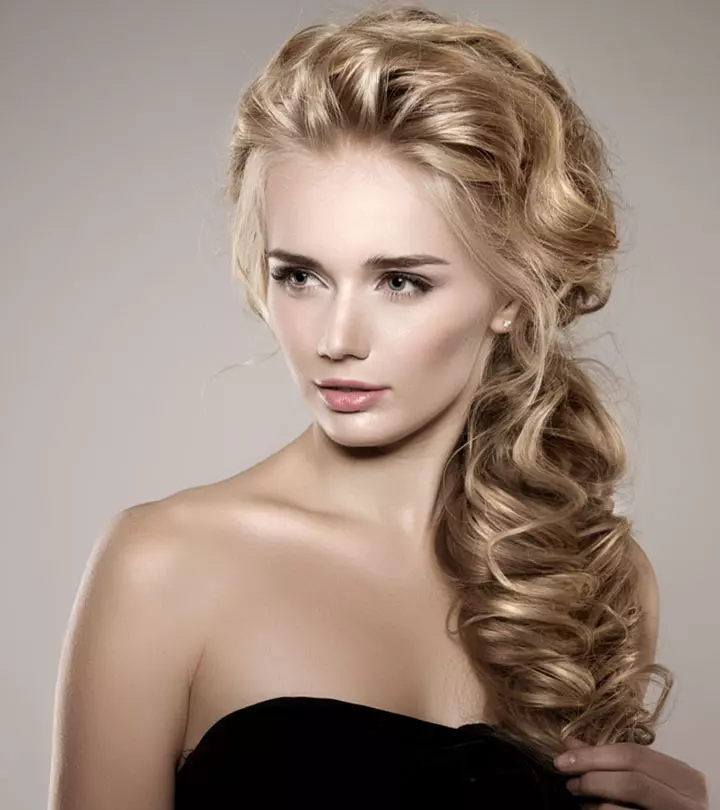
Learn to create the perfect updos to look your most formal and elegant self.
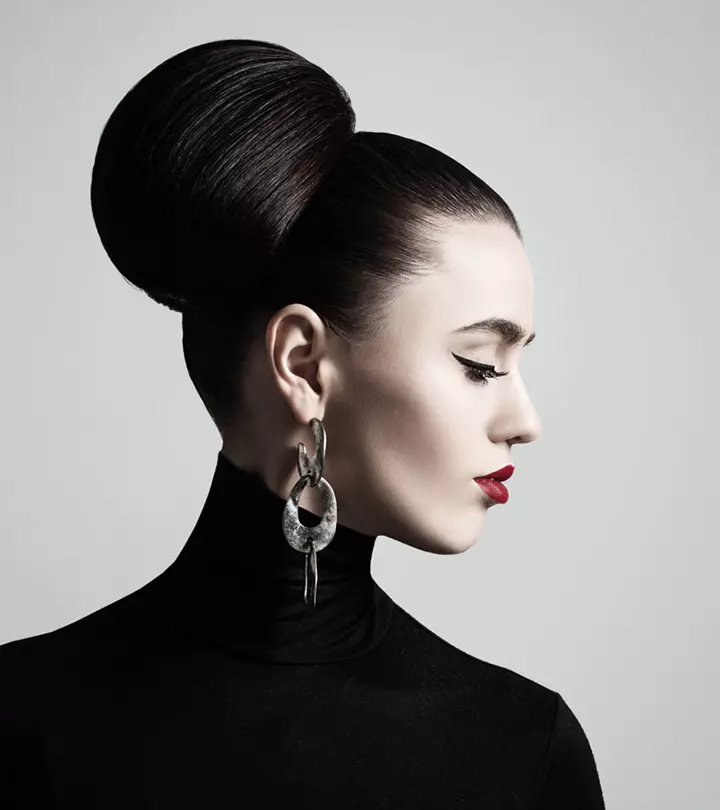
Image: Shutterstock
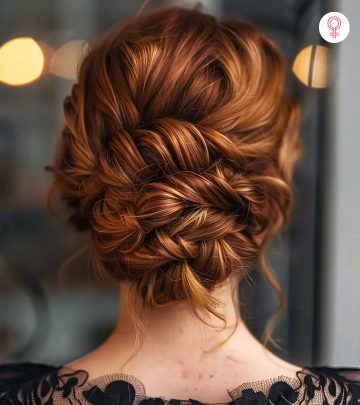
Time has given us some iconic updos like Audrey Hepburn’s stylish beehive in Breakfast at Tiffany’s. If you have long hair, styling it in a classy updo is a sure way to steal the spotlight. Find here 13 ethereal updos for long hair with a step-by-step tutorial so you can achieve your favorite look. From a braided updo to a messy French twist, these updos will make your morning hair styling sessions more fun. And they are a godsend for those hot days when you want to tie up your hair. Scroll down to check them out!
 Before You Get Started
- These hairstyles are detailed and intricate. They may take a bit more time than your regular updos and can be worn to formal events.
- Keep styling, texturizing, and volumizing hair products handy. Some of these styles have a layered look that can be perfected with the help of these styling products only.
- Use wide-toothed wooden combs unless instructed otherwise in the tutorials. Wooden combs are gentle on the hair and do not lead to breakage.
- Remember practice makes perfect. Up styles can be a learning curve so be patient and start practicing well ahead of the days you need them for.
In This Article
How To Do Updos for Long Hair
Updos are one of the most versatile and elegant hairstyles for girls with long hair, perfect for both formal events and casual outings. We have put together a list of 13 stunning DIY updo hairstyles for long hair. These hairstyles are so simple that you can try them out on your own.
1. Fishtail Bun
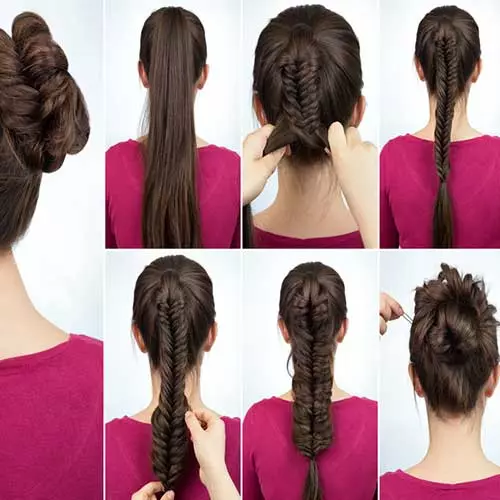
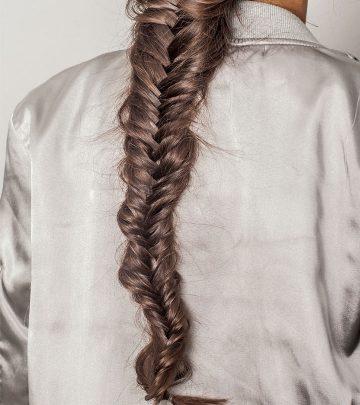
Combine a fishtail braid and a bun to create an elegant hairstyle for your long hair. This updo is highly recommended for any formal occasion, wedding, or party!
What You Need
- Hair brush
- Elastic hair bands
- Hair pins
- Hair spray
Procedure
- Brush your long hair to detangle all the knots.
- Gather the hair at the back to create a high ponytail and secure it with an elastic band.
- Start weaving a fishtail braid till the end and secure it with an elastic band.
- Gently pull the strands in the braid to volumize it.
- Twist the braided ponytail and wrap it around the base of the ponytail to create a bun.
- Secure the bun with hair pins and finish off the look by spritzing some hair spray.
2. Retro Chignon Bun
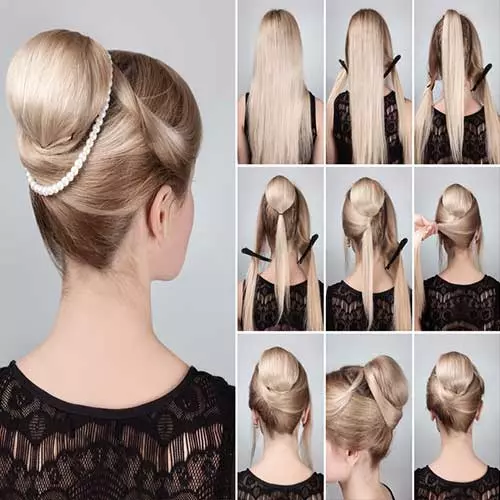
The retro chignon bun is highly suitable for any facial shape and event. If you absolutely adore chignon buns, you will love this elegant twist to the classic French bun.
What You Need
- Hair brush
- U-pins
- Elastic hair bands
- Claw hair clips
- Donut bun
- Hair accessories
Procedure
- Brush your hair to detangle all knots.
- Section the hair into three parts and secure the side section with claw clips. Separate a 2-inch hair section in the front.
- Tie the middle section into a high ponytail and place a donut bun under its base.
- Cover the donut bun with the ponytail hair and tie an elastic band for a puffed ponytail look.
- Take the left hair section and wrap it and the loose ponytail end of the middle section around the donut bun. Secure with U-pins.
- Repeat the process on the other side. Secure the bun with U-pins.
- Take the front layer, gently twist it, wrap it around the bun, and tuck the ends with U-pins or bobby pins.
- Accessorize the bun with a pearl string or other hair accessory.
3. Lace Braid Updo
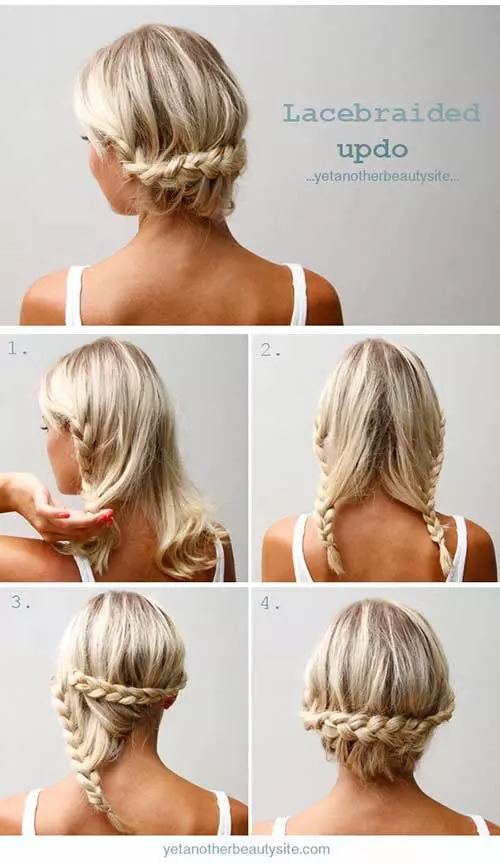
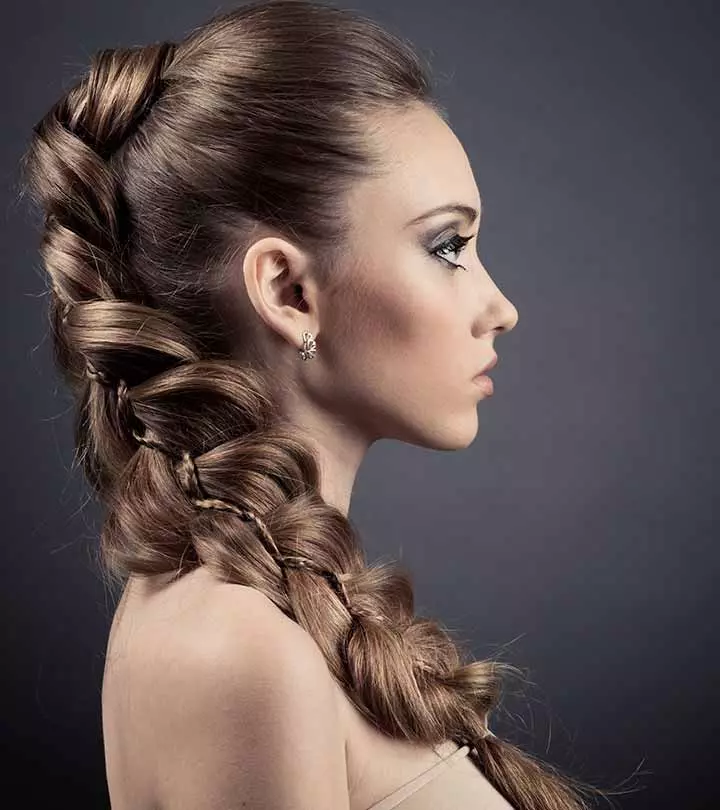
The lace braid updo looks amazing on people with any face shape. The loose side draws the eye sideways, thus accentuating your eyes and mouth. If you have a weak jawline this style will make the most of your profile.
What You Need
- Hair pins
- Elastic bands
- Comb
Procedure
- Divide your hair into two halves, from the center of your forehead to the nape of your neck. Allow the front sections of your hair to fall loose
- and frame your face.
- Start braiding one section of your hair, beginning at the ear and extending all the way down to your neck. As you braid your hair, keep adding more hair into it with each subsequent stitch. Make sure the braid is a little loose as you will be moving it.
- Tie the end with an elastic band.
- Repeat the same for the other section.
- Take one braid and pin it up on the opposite side, behind your ear.
- Position the second braid over the first braid and pin it up behind your ear on the opposite side.
- You will see that there is a nice fall of hair just below the braid. This will only appear if you weave your hair loosely as you keep adding hair to the braid.
- If you’re a neat freak and you want to keep the nape cleaned up be sure to use a little more hairspray in the nape while braiding.
4. The Dutch Braid Bun Updo
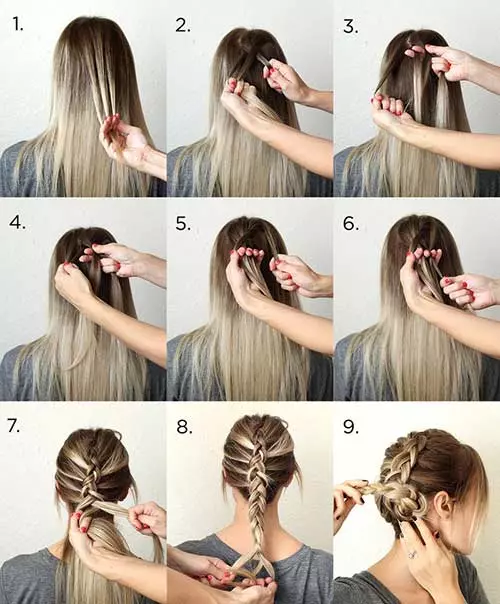
In a braid, you have three sections: the two side sections and the middle section. Generally, the middle section always goes under the side sections. But in a Dutch braid, the middle section goes over the side sections. This is why a Dutch braid is also called an inverted French braid.
What You Need
- Elastic bands
- Hair pins
- Comb
Procedure
- Comb your hair to remove all knots and tangles.
- Pick up a small section of hair from where you want the braid to start and divide it into 3 equal sections.
- Weave your hair in two stitches of a braid. The middle section always goes under the side sections.
- After two stitches, add some hair from outside the braid to the side sections. Again, weave the hair in two stitches and then add more hair to the sides.
- Keep doing this until you reach the end of your hair and tie it with an elastic band.
- Roll the bottom half of the Dutch braid into a bun. If you have medium length hair, a flat bun will show off the braid and create a chic look. If you have long hair, a full bun will look stunning.
This hairstyle looks incredible on women with oval faces. If you have a slightly broad face, allow some strands of hair to fall to the sides of your face. You need hair of symmetrical lengths as heavily layered hair can prove to be more difficult with this braid.
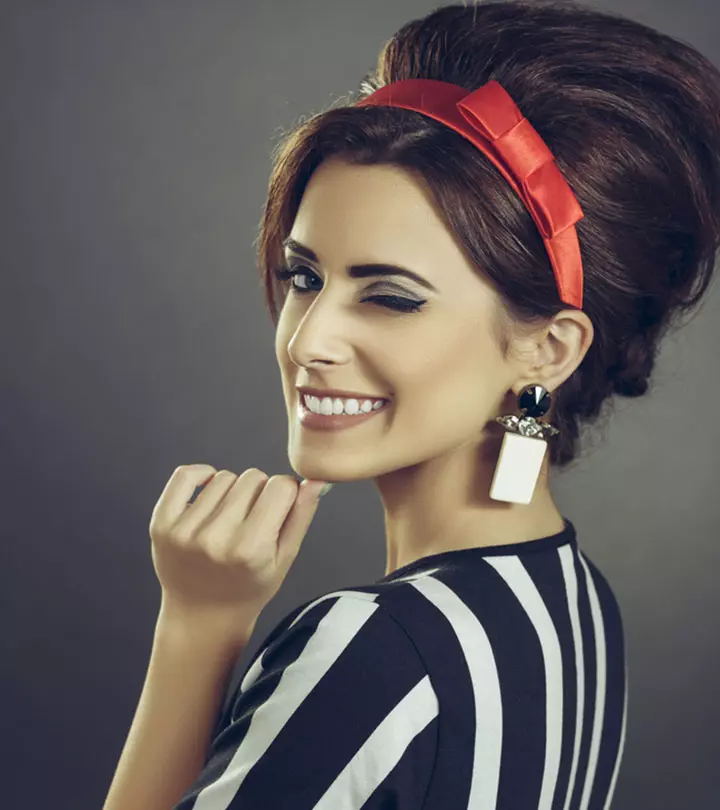
5. The Beehive Bun Updo
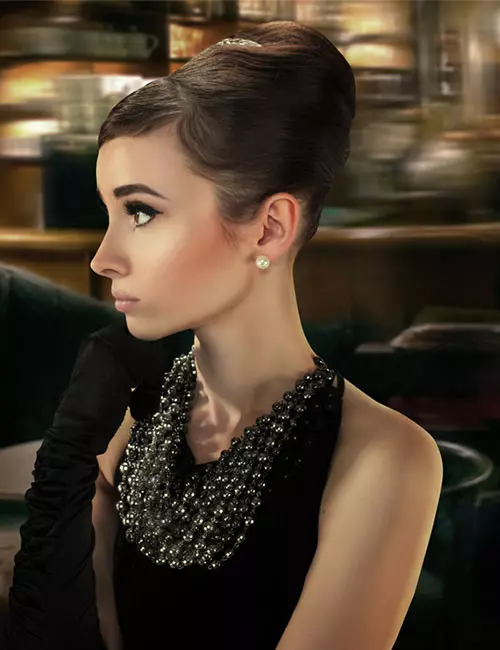
What You Need
- Elastic bands
- Hair pins
- Comb
Procedure
- Comb your hair to detangle it. Part your hair on one side.
- Brush all your hair to one side, holding it in place with hair pins.
- Create a bouffant at the top by holding your hair as you would a high ponytail and pushing it up. If you feel that the bouffant will not stay in place, pin it up.
- Twist the high ponytail into a French twist and pin it in place.
- Take the side sections and pin them under the French twist bun.
This updo is perfect for formal events as well as for nights when you want to draw some heavy eyeliner, put on your Doc Martens, and go clubbing. You can also leave some side strands loose to frame your face and add some oomph to the look.
6. The French Twist Updo
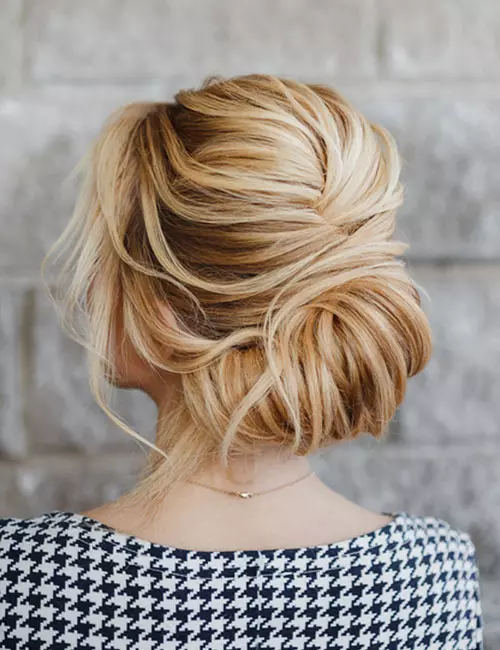
The French twist is perfect for all face shapes. If you have a square, round, rectangular or heart-shaped face, consider adding bangs to the look. Side or feathered front bangs look amazing with this hairdo.
Experienced cosmetologist and owner of HairNerd, Richard Morrill says, “This may be the easiest style you can do on your own. If you have a short bob cut, you can pin the under section up or wear it smooth and down.”
What You Need
- Elastic hair bands
- Hair pins
Procedure
- Detangle your hair with a comb. If you have fine textured hair, apply some dry shampoo to give it more volume.
- Gather your hair at the center of your head.
- Start twisting your hair inward (towards your head).
- Once all your hair is wrapped up, pin the bun in place.
- Allow some loose strands of hair to frame your face, giving the hairstyle a boho vibe.
7. The Puffy Ponytail
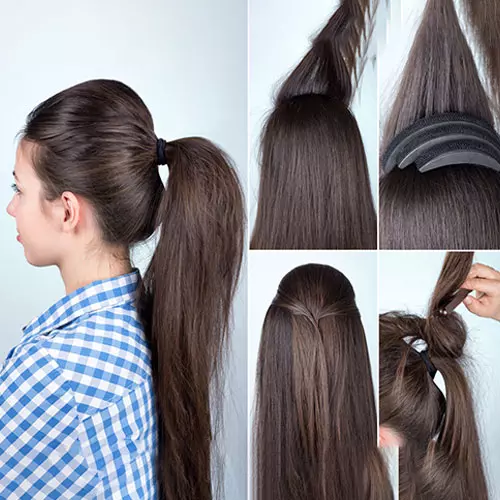
The puffy ponytail is the perfect hairdo for the working woman. Simple and quick to do, this hairstyle is sure to become a fast favorite.
Richard Morrill offers a pro tip for this style, “This is a great hairstyle for day 2 or 3 of not washing. The extra grit gives the style a little more sex appeal. Don’t forget a little Dry Shampoo Sprinkle.”
What You Need
- Elastic bands
- Hair pins
- Rat tail comb
Procedure
- Comb your hair to remove all knots.
- Spritz on some hairspray or dry shampoo to add some texture and volume to your hair.
- Part your hair on one side.
- Back-comb the hair on the crown of your head and pin it in the center at the back of your head. This will create a half ponytail. Make sure to leave out the front sections of your hair.
- Apply some hairspray on this half ponytail.
- Using a curler, curl the ends of your hair.
- As you gather your hair to tie the high ponytail, you’ll notice that the half ponytail you had tied earlier forms a bouffant. Tie the ponytail in place with an elastic band. If you want the bouffant to be puffier, tug up the hair gently.
8. The Messy Bun Updo

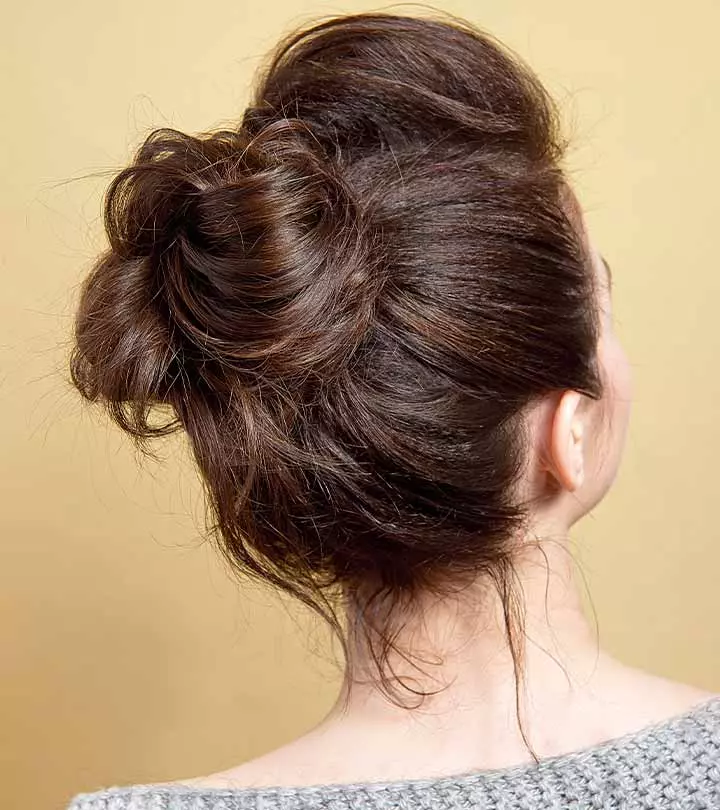
The messy bun is one hairstyle that works for almost all events and all face shapes. The messy hair adds volume to the hairstyle, and the loose strands frame the face well.
What You Need
- Elastic bands
- Hair pins
Procedure
- Start tying your hair in a high ponytail.
- At the last twist of the elastic band, pull out your hair only halfway through to form a bun.
- Twist the ends and wrap them around the base of the bun. Use some hair pins to secure them in place.
Lainey, a YouTuber, creates a DIY bun updo. She shares the entire process and begins with a half-up half-down section and guides on creating topsy tails from the tresses and finally achieving her desired look. As a note of recommendation, she adds, “I’m just gonna pinch and pull the crown on my head for some texture and volume (i).”
 Quick Tip
9. The Braided Bun Updo
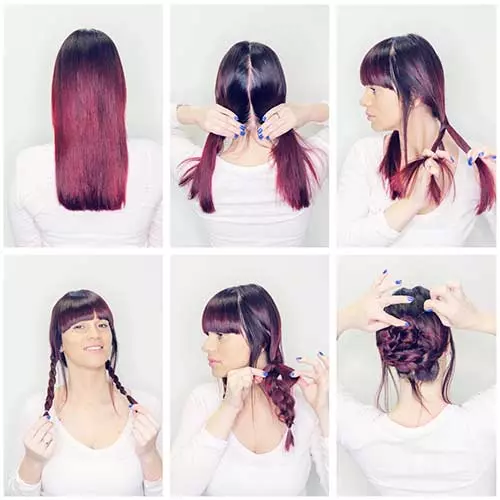
The braided bun looks impressive on oval faces. Style it with some thick blunt bangs to frame your face nicely. If you’re lacking in the bang department use a deep part and include all hair in your two braids. Don’t forget your earrings and your clutch.
What You Need
- Elastic hair ties
- Hair pins
Procedure
- Detangle your hair with a comb.
- Split your hair into two sections from the hairline to the nape of your neck, leaving out your bangs.
- Weave each section into a braid.
- Pancake the braid to give it a boho feel. Pancake means to gently tug the braid apart, making it loose and big.
- Wrap the braids around each other to form a bun and secure them in place with hair pins.
10. The Korean Bun Updo
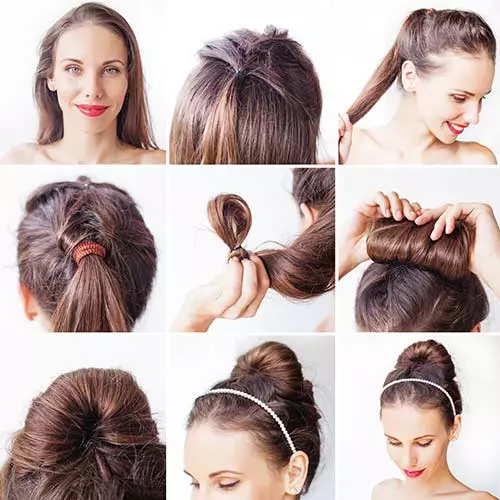
The incredible Korean bun updo works for all face shapes. Style it with some curled loose side strands to add to the beauty of this hairstyle.
What You Need
- Elastic hair bands
- Hair pins
- Rat tail comb
- Hair Spray
Procedure
- Comb your hair to detangle it.
- Start braiding your hair into a French braid. Weave about five stitches of the braid and then tie it with an elastic band.
- Tie all your hair into a ponytail.
- Now, take the end of your ponytail and wrap it upwards and around itself until you reach the top of your head. To make sure that the ends do not unravel, tie them together with an elastic band after one wrap and then continue wrapping the hair over itself.
- Once you reach the top, pin the hair up on the sides, forming a beautiful downward French twist.
11. The Elegant Bun Updo
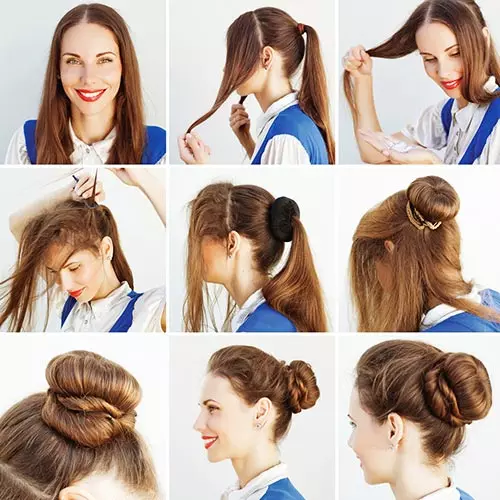
Here’s another office essential. This elegant bun updo screams ‘boss lady’! This pretty updo works for all face shapes and accentuates the facial features very well. It is a combination of the donut bun and twists.
Richard Morrill offers another expert suggestion, “Wash your hair twice and then add your favorite Mousse and blow dry all of your hair towards your bun band when your hair is dry brush it smooth then follow the steps. From boss lady to Queen.”
What You Need
- Elastic bands
- Hair pins
- Donut bun band
Procedure
- Comb your hair to detangle it.
- Divide your hair into two sections. The first section starts at the beginning of one ear and ends at the beginning of the other ear. The second section is the rest of your hair. Tie the second section up in a ponytail.
- Now, part the first section down the middle and backcomb it.
- Take the donut bun band and insert it at the base of your ponytail. Slide it to the end, arrange the hair around it (covering it), and fold it outwards while moving it towards your head. Using another elastic band, keep this in place.
- If you have very long hair, not all of your hair will fit into the donut bun. That’s fine. Once the donut bun reaches your head, tie an elastic band around it, keeping it in place, and allow the ends of your hair to hang down. Twist the ends and wrap them around the base of the bun.
- Neatly and gently, comb the first section of hair backward. Pin up the long hair neatly around the bun. Due to the backcombing, your hair will form a slight puff in front.
12. The Back Braided Bun
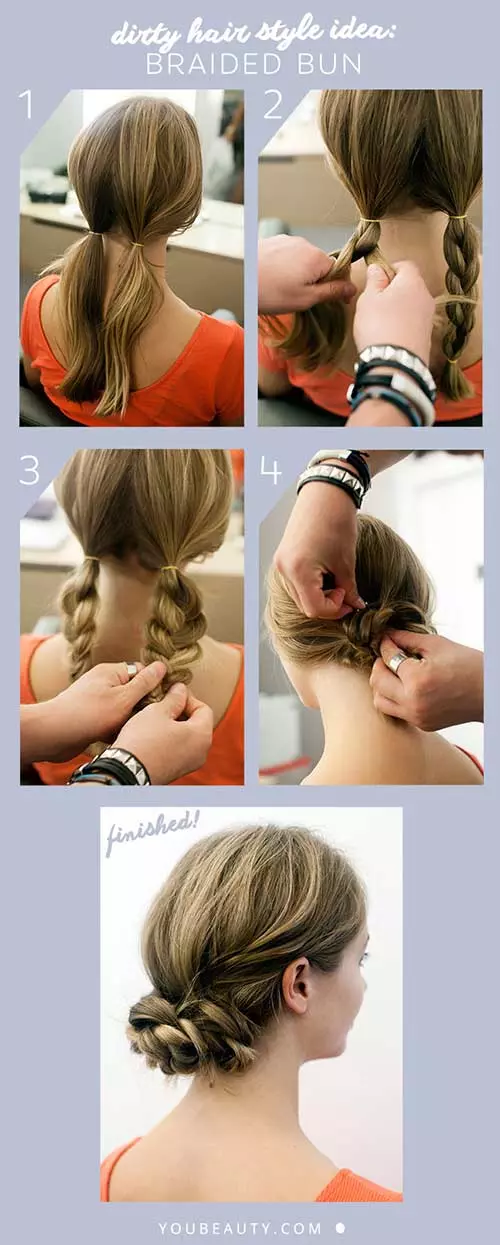
Besides being oh-so-easy to do, this back braided bun looks gorgeous. You can also play around with this style. For instance, you can take two sections of hair from each side, as if you were going to tie a half ponytail. Twist each section of hair inwards (towards your head) and pin it once you reach the center of your head. Then, follow the instructions given below to complete the hairstyle. You can also accessorize this braided bun with simple pin beaded flowers.
“HairNerd tip #300: If you have limp fine hair or tons of layers, curl and tease your hair before you start making your first braid. The hair is much harder to manipulate once it’s been braided. Captain obvious I know!” quips Richard Morrill.
What You Need
- Rat tail comb
- Hair pins
- Elastic hair bands
- Hairspray
Procedure
- Comb your hair to remove any knots.
- Divide your hair into two parts and tie them in ponytails.
- Weave each ponytail into a braid.
- Take one braid, roll it into a bun, and pin it to your head.
- Repeat the same with the other braid, positioning it over the first braid.
- Finish with a hairspray to keep the look in place.
 Quick Tip
13. The Twisted Bun
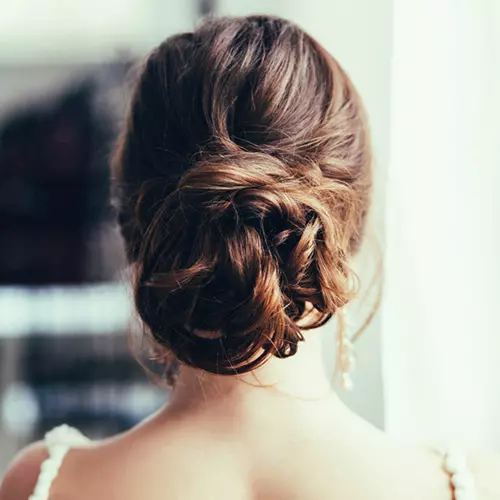
Step into sophistication with the twisted bun hairstyle – a versatile and chic look that complements all face shapes and exudes timeless elegance.
What You Need
- Detangling comb
- Elastic bands (as needed)
- Hair pins (as needed)
- 1 donut bun band
Procedure
- Begin by detangling your hair with a comb.
- Divide your hair into two sections: the first, spanning from one ear to the other, and use the second section to tie into a ponytail.
- Backcomb the first section after parting it down the middle.
- Insert the donut bun band at the base of your ponytail, sliding and arranging hair from the first section around it and securing it all with an elastic band.
- If your hair is very long, secure the donut bun when it reaches the back of your head. Twist the ends of the first section and wrap around the bun.
Stunning updos can elevate any look and make you look elegant and graceful. But if the same hairdo starts coming off, it can look most unkempt and gauche. So, in the section below, we have mentioned some styling tips that will help you maintain your look throughout the day!
Key Takeaways
- Updo hairstyles exude sophistication and elegance, making them ideal for formal occasions.
- You require styling products and tools such as a texturizing spray, straightener, and curler to achieve the perfect updo.
- Individuals with long tresses can opt for updos such as fishtail bun, retro chignon bun, and beehive bun.
- Twists and braids can be added to an updo hairstyle to boost its overall appeal.
Tips For Keeping Your Updo Intact All Day
Here are some simple tips that can come in handy when creating an updo hairstyle for long hair and to ensure it stays put for hours.
- Apply a stronghold hairspray or styling gel before creating your updo to help maintain its shape throughout the day.
- Use bobby pins or hair pins to secure the updo in place, ensuring they are strategically placed for extra hold.
- Start with a tight base when gathering your hair, this will ensure you get a secure foundation that can stay stable for longer.
- Avoid constantly adjusting or touching your updo, as this may loosen it, thereby reducing its longevity.
- Carry a small kit with bobby pins and travel-sized hairspray for quick touch-ups throughout the day if needed.
Infographic: Tips For A Neat & Perfect Updo
Updos are the go-to hairstyle for anyone intending to make a good impression in formal or semi-formal events. However, the purpose is lost if your hair keeps falling apart, looks greasy, or appears so disheveled that it cannot even pass off as a messy bun. Check out the infographic below for hair care tips to ensure your updo stays presentable. Illustration: StyleCraze Design Team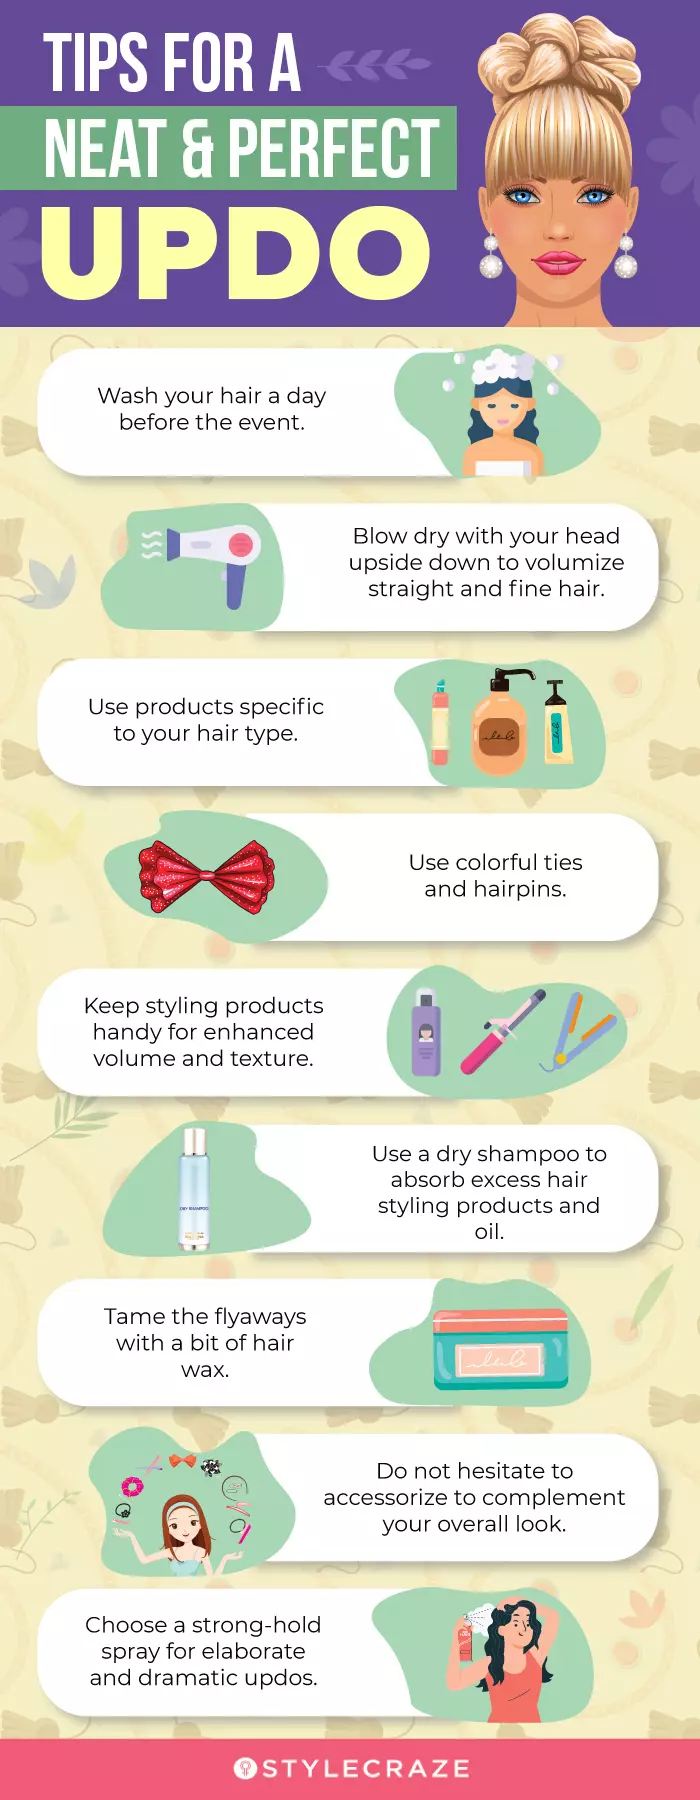
These updos for long hair are so beautiful and easy to achieve. But, of course, you will need practice to perfect them. From classic styles that you can flaunt at weddings and other formal occasions to messy hairstyles you can sport at casual parties and date nights, these updos keep your long flowy locks fresh and stylish. And you can add your twist and hair extensions twist to these hairstyles! You can play around with hair colors and accessories to give these hairstyles a personalized touch. And let’s not forget, when you and your girlfriends want to have a SATC style wardrobe fashion show, these hairstyles will pair well with any outfit!
Frequently Asked Questions
Are there any updos for long hair that are suitable for everyday wear?
Yes, the messy bun and the puffy ponytail updos are suitable for everyday wear. These hairdos go with a variety of outfits and are perfect for a casual yet chic look. They are also one of the best formal hairstyles for long hair you can wear every day.
Can you create a romantic and whimsical updo with long hair for a wedding or special occasion?
Yes, you can easily add soft curls, tests, or waves to create a romantic and whimsical updo for a wedding or special occasion.
How do you achieve a messy, bohemian-inspired updo with long hair?
Add loose braids and face-framing strands to your updo along with flowers or nature-inspired accessories to create a messy, bohemian updo. Messy and loose styles are perfect updos for long curly hair that add a playful and effortless touch to your look.
Can you create a unique and eye-catching updo with long hair by adding braids or twists?
Yes, add braids or twists to your updo for a unique look. Both these protective styles help add volume and texture to the look with minimal effort. You can play around with the look by accessorizing them with beads or pearls to complete the look.
Illustration: Stylish Updos For Long Hair With Step-By-Step Tutorials
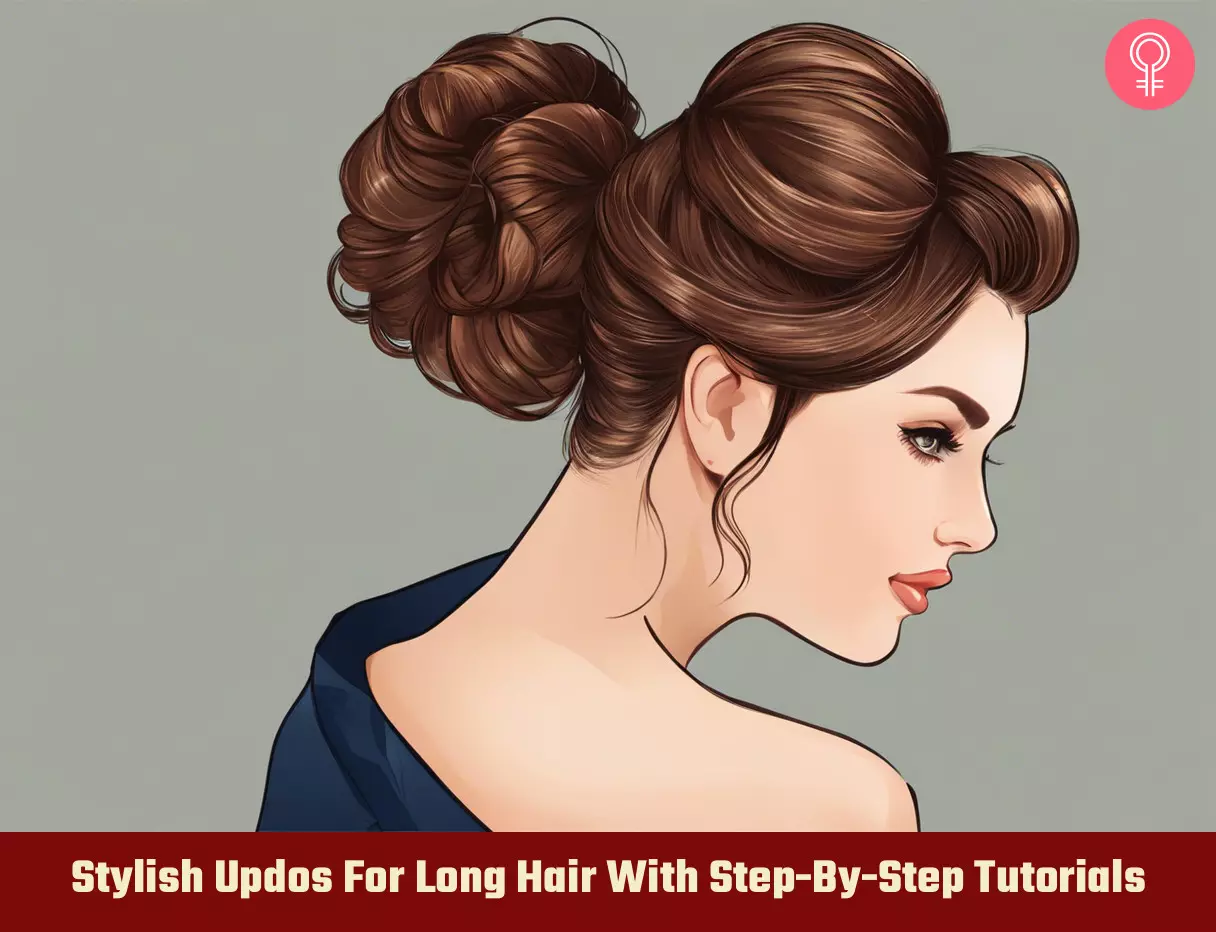
Image: Stable Diffusion/StyleCraze Design Team
Learn how to create a simple and elegant updo for long hair! Perfect for casual days, and special occasions. Check out this easy hair tutorial!
Personal Experience: Source
StyleCraze's articles are interwoven with authentic personal narratives that provide depth and resonance to our content. Below are the sources of the personal accounts referenced in this article.
i. EASY UPDO HACK YOU NEED TO TRY! MEDIUM AND LONG HAIRSTYLEShttps://youtu.be/923YMiwJUWc?si=_3dyIHoz2HFVCTrC
Read full bio of Richard Morrill
Read full bio of Anjali Sayee
Read full bio of Subhrojyoti Mukherjee
Read full bio of Vaishali Sinha


Community Experiences
Join the conversation and become a part of our empowering community! Share your stories, experiences, and insights to connect with other beauty, lifestyle, and health enthusiasts.